

A resource for those seeking information on organizing and transforming spaces.
What to Expect With a Professional Heating Installation
A professional heating installation goes a long way towards keeping your home warm and comfortable. When done correctly, it ensures reliable performance, lower utility costs, and a system that lasts for years. That’s why it’s important that homeowners have an idea of what they’re getting into when they start looking to have a heater or furnace either replaced or newly installed in their home. Below is a walkthrough of what to expect when getting a heating element installed from start to finish.
A professional heating installation goes a long way towards keeping your home warm and comfortable. When done correctly, it ensures reliable performance, lower utility costs, and a system that lasts for years. That’s why it’s important that homeowners have an idea of what they’re getting into when they start looking to have a heater or furnace either replaced or newly installed in their home. Below is a walkthrough of what to expect when getting a heating element installed from start to finish.
The Importance of Professional Installation
A good professional heating installation involves far more than placing a new furnace or heat pump in your home. Licensed HVAC technicians, such as those from BJ Heating & Cooling, follow strict safety standards and protocols to ensure your system operates correctly. Proper installation directly affects everything from system performance to energy efficiency, as well as your equipment’s lifespan. Homeowners who choose professional service benefit from more accurate sizing and safe connections, as well as the long‑term reliability that DIY or low‑cost shortcuts simply can’t match.
Initial Consultation and Home Assessment
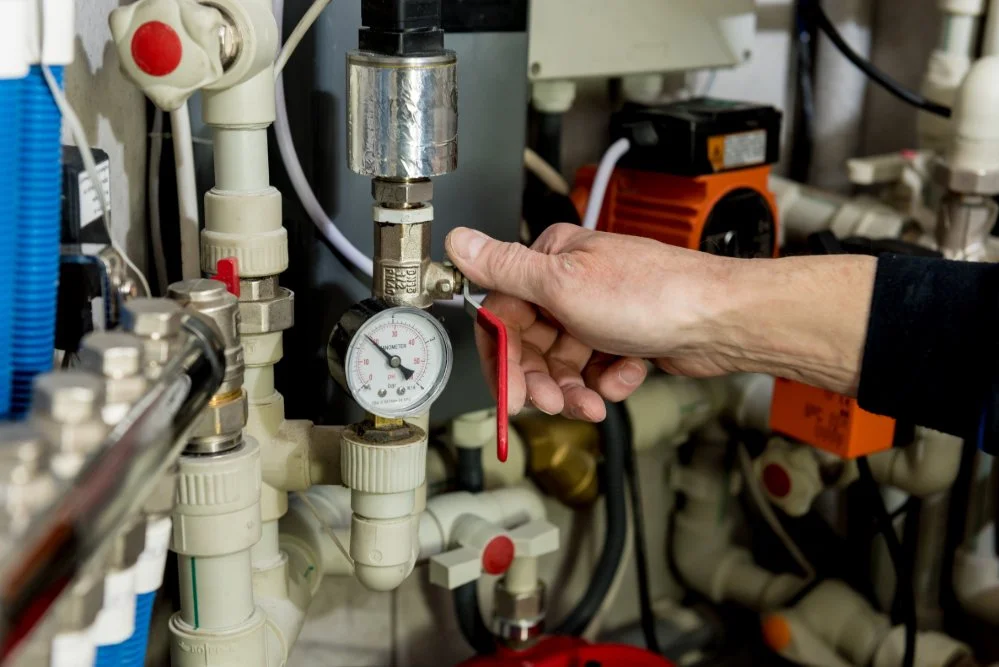
The heating installation process begins with an in‑home consultation. During this visit, the technician performs a detailed evaluation to figure out your home’s heating needs. They assess things like square footage, insulation levels, window quality, ductwork condition, and the performance of any existing equipment. This information is essential for determining the correct system size.
A key part of this assessment is the load calculation. Using industry‑standard methods such as Manual J, the technician calculates the precise heating capacity your home requires. Oversized systems waste energy and cycle on and off too frequently, while undersized systems struggle to keep up on cold days. Accurate sizing ensures consistent comfort and efficient operation.
Based on the evaluation, the technician provides system recommendations tailored to your home and budget. They explain the differences between models, efficiency ratings, and features so you can make an informed decision. They can also provide transparent pricing, outlining what is included in the installation and avoiding vague or incomplete estimates.
Preparing the Home for Installation
Before the new system is installed, the team prepares the workspace to ensure safety and efficiency. If you have an older furnace or heat pump, the technicians handle the removal of the old system. They disconnect electrical wiring, gas lines, and ductwork, then remove the equipment safely and dispose of it according to environmental guidelines.
Next, the team inspects your ductwork. A ductwork inspection identifies any issues that could reduce the performance of your new system. Addressing these problems before installation ensures proper airflow and efficiency.
Professional installers also manage all code compliance requirements. They obtain necessary permits, schedule inspections, and ensure every part of the installation meets local building and safety standards.
The Installation Process
Once preparation is complete, the installation begins. The new equipment is positioned carefully to ensure proper clearance, ventilation, and accessibility for future maintenance. This equipment placement step is essential for safe operation and long‑term performance.
Technicians then complete the electrical and gas connections. These connections must be handled by licensed professionals to ensure safety and compliance with local codes. Proper wiring and gas line installation prevent hazards and ensure the system operates as designed.
Ventilation is another critical component. The team installs or adjusts the venting and flue system to ensure safe removal of combustion gases. Incorrect venting can lead to carbon monoxide risks, so this step is handled with precision.
If needed, the technicians make duct adjustments to improve airflow. This may include sealing leaks, resizing ducts, or modifying connections to support the new equipment.
The installation also includes thermostat setup. Whether you choose a standard programmable thermostat or a smart model, the technician ensures it is wired correctly and calibrated for accurate temperature control.
Before the installation is considered complete, the team performs a series of quality checks. These include verifying electrical connections, checking gas pressure, confirming proper airflow, and ensuring the system meets manufacturer specifications.
System Testing and Performance Verification
After installation, the technician conducts startup testing to ensure the system ignites safely and operates smoothly. They check fuel delivery, ignition timing, and temperature rise to confirm everything is functioning correctly.
Next, they perform airflow balancing. This involves adjusting registers and dampers to ensure even heating throughout the home. Proper balancing prevents hot and cold spots and improves overall comfort.
The technician also verifies the system’s efficiency. Through efficiency testing, they confirm the equipment is performing at its rated AFUE or heat pump efficiency level. Noise and vibration checks ensure the system runs quietly and without unnecessary strain.
Homeowner Walkthrough and Education
Once testing is complete, the technician provides a detailed system overview. They explain how the equipment works, what each component does, and how to operate it safely.
You also receive thermostat training. This includes programming schedules, adjusting settings, and using smart features to maximize comfort and efficiency.
The technician outlines maintenance expectations such as filter changes, annual tune‑ups, and signs that may indicate a problem. Proper maintenance protects your investment and ensures long‑term reliability.
Finally, they review warranty information and provide all necessary documentation, including manuals, inspection reports, and maintenance logs.
Safety, Compliance, and Long‑Term Reliability
Professional installation ensures full code adherence and reduces safety risks. Proper venting, sealed combustion, and correct gas connections protect your home from carbon monoxide and other hazards. These combustion safety measures are essential for any heating system.
Correct installation also improves system longevity. When equipment is installed according to the manufacturer specifications, it experiences less strain and fewer breakdowns. This leads to lower repair costs and a longer service life.
Energy efficiency is another major benefit. A properly installed system delivers optimal efficiency, reducing utility bills and improving comfort.
After‑Installation Support
Reputable HVAC companies provide ongoing support after installation. This may include follow‑up visits to verify performance or make adjustments. Many homeowners choose to enroll in maintenance plans to ensure regular tune‑ups and priority service. If issues arise, professional companies offer emergency support and responsive customer service to keep your home comfortable year‑round.
A professional heating installation provides long‑term comfort and efficiency for you and your family. With expert sizing, careful preparation, precise installation, and thorough testing, homeowners gain peace of mind knowing their system is built to perform. Choosing trained, certified technicians ensures your investment delivers reliable warmth and energy savings for years to come.

What to Expect When Repairing a Heater in an Older Home
Repairing a heater in an older home is rarely a simple tune‑up. These systems often carry decades of wear, outdated components, and design limitations that modern equipment no longer uses. Homeowners who understand the unique challenges of older heating systems are better prepared for the repair process, the potential costs, and the decisions that follow.
Repairing a heater in an older home is rarely a simple tune‑up. These systems often carry decades of wear, outdated components, and design limitations that modern equipment no longer uses. Homeowners who understand the unique challenges of older heating systems are better prepared for the repair process, the potential costs, and the decisions that follow.
System Overview
The first step in repairing an older heater is identifying exactly what type of system you have. Many older homes still rely on equipment such as gravity furnaces, early forced‑air units, or heaters with standing pilot assemblies—systems that operate very differently from today’s high‑efficiency models. Technicians look for clues such as the age of the blower motor, the presence of mercury thermostats, or ductwork sized for outdated fuel sources like coal or oil.
Outdated components are common. Older heaters may use wiring that predates modern grounding standards, burners that no longer ignite reliably, or heat exchangers that have weakened over time. These details matter because they influence both the system's safety and the feasibility of repair. Compatibility is another concern: older heaters may not integrate cleanly with updated electrical panels, gas lines, or ventilation systems, which can affect repair options.
Common Issues
Older heating systems tend to show predictable patterns of deterioration. Corrosion on burners, cracked heat exchangers, worn bearings in blower motors, and failing ignition systems are among the most frequent problems. These issues don’t just reduce performance as they can create serious safety hazards if ignored.
Airflow problems are also common in older homes. Ductwork may be undersized, poorly insulated, or leaking air through joints that have loosened over decades. In some cases, the heater itself is functional, but the duct system prevents it from distributing heat effectively. Technicians often find that improving airflow is just as important as repairing the heater.
Safety concerns deserve special attention. Older systems are more prone to carbon monoxide leaks, gas line deterioration, and electrical hazards. A thorough inspection is essential to ensure the system can operate safely after repairs.
Technician Evaluation
A professional repair visit, such as from a company like Legacy Plumbing and Heating, begins with a detailed inspection of the heating unit and its supporting components. Technicians examine burners, wiring, sensors, heat exchangers, and ventilation pathways. They test airflow, temperature rise, and fuel efficiency to determine how well the system is performing.
One of the most important outcomes of this evaluation is determining whether repair or replacement is the better long‑term choice. If the heater is structurally sound and parts are available, repair may be straightforward. But if the system is nearing the end of its lifespan, has significant safety issues, or relies on components that are no longer manufactured, replacement may be the more practical and cost‑effective option.
Repair Challenges
Repairing heaters in older homes often involves challenges that newer systems don’t present. Sourcing parts is one of the biggest obstacles. Many older components—such as specific ignition modules or blower assemblies—are discontinued, which can extend repair timelines or require retrofitting with modern alternatives.
Technicians may also need to address outdated wiring, ungrounded circuits, or aging gas lines before repairs can be completed safely. These upgrades are not optional; they ensure the system meets current safety standards. Structural limitations can also complicate repairs. Older basements, crawlspaces, and utility rooms often have tight access points, making removing or servicing equipment more time‑consuming.
Costs and Timelines
Because of these complexities, repair costs for older heaters can vary widely. Labor tends to be higher due to the additional diagnostic work and the difficulty of accessing components. If parts must be sourced from specialty suppliers or retrofitted, timelines may extend beyond a typical repair window.
Homeowners should also consider the long‑term financial picture. Repeated repairs on an aging system can quickly exceed the cost of a modern replacement. When efficiency, safety, and reliability are factored in, upgrading often becomes the more economical choice.
After‑Repair Steps
Once repairs are complete, older systems benefit greatly from consistent maintenance. Regular tune‑ups, filter changes, and safety inspections help extend the life of the equipment and reduce the likelihood of future breakdowns. Improving home efficiency, such as sealing ducts, upgrading insulation, or installing a modern thermostat, can also reduce strain on the heater.
Planning for eventual replacement is wise. Even well‑maintained older systems have a limited lifespan, and preparing ahead of time helps avoid emergency failures during peak heating season.
Repairing a heater in an older home requires a clear understanding of the system’s age, limitations, and safety concerns. With the right expectations and a qualified technician, homeowners can navigate the process confidently and make informed decisions about repair, maintenance, and future upgrades. A thoughtful approach ensures the home stays warm, safe, and efficient, no matter how old the heating system may be.

5 Ways a Properly Installed Heating System Can Lower Your Energy Bills
Keeping your home warm during the colder months doesn’t have to mean sky-high utility bills. The secret lies in having a properly installed heating system that works efficiently and consistently. When installed correctly, your system not only keeps you comfortable but also helps you save money in the long run.
Keeping your home warm during the colder months doesn’t have to mean sky-high utility bills. The secret lies in having a properly installed heating system that works efficiently and consistently. When installed correctly, your system not only keeps you comfortable but also helps you save money in the long run.
Let’s explore five specific ways professional heating installation can make a real difference in lowering your energy costs.
Improved Energy Efficiency Through Correct Sizing
One of the most important factors in heating efficiency is system size. If the unit is undersized, it will constantly run in an attempt to keep up, consuming more energy than necessary. Conversely, an oversized system tends to switch on and off too often, which creates uneven temperatures and puts extra strain on the equipment. Professional installers carefully calculate the right size for your home, taking into account square footage, insulation, and climate. This ensures your heating system operates at peak efficiency, using only the energy it needs to keep your home comfortable without overworking.
When your system is sized correctly, it doesn’t waste energy trying to compensate for poor performance. Instead, it delivers steady warmth while consuming less power. Over time, this balance translates into lower monthly bills and fewer repair costs. Proper sizing also helps extend the life of your equipment, since it avoids the stress caused by constant cycling or overuse.
Reduced Heat Loss With Proper Ductwork Installation
Even the most advanced heating system can lose efficiency if the ductwork isn’t installed correctly. Poorly sealed or poorly designed ducts allow warm air to escape before it reaches your living spaces. This forces your system to work harder, driving up energy bills. A proper installation includes sealing joints, insulating ducts, and designing a layout that minimizes airflow restrictions. With these steps, more of the heat you pay for actually reaches your rooms, reducing waste and lowering costs.
Think of ductwork as the delivery system for your heating. If it leaks or is poorly designed, you’re essentially paying for heat that never arrives where you need it. Professional installation ensures ducts are airtight and positioned to maximize airflow. This means your system doesn’t have to run longer than necessary, and you enjoy consistent warmth without unnecessary energy loss.
Optimized Performance Through Professional Installation
Heating installation isn’t just about connecting equipment—it’s about ensuring every component works together seamlessly. Professional installers check airflow, calibrate thermostats, and balance the system to deliver consistent warmth throughout your home. When everything is set up correctly, your system doesn’t need to run longer than necessary, which directly reduces energy consumption.
This optimization also extends the lifespan of your equipment, saving you money on repairs and replacements down the line. A properly installed system is less likely to experience uneven heating, short cycling, or mechanical strain. Instead, it runs smoothly and efficiently, giving you peace of mind that your investment is working as intended. Over time, these small adjustments add up to significant savings on energy bills.
Lower Maintenance Costs With Fewer Breakdowns
A poorly installed system often leads to frequent breakdowns and costly service calls. Misaligned parts, incorrect wiring, or improper ventilation can all cause stress on the unit. By contrast, a properly installed heating system runs smoothly and requires less maintenance. This not only saves you money on repairs but also ensures your system continues to operate efficiently, keeping energy bills lower year after year.
Preventing problems before they start is one of the most effective ways to protect your budget. When installation is done correctly, your system doesn’t experience the wear and tear that comes from constant strain. This means fewer emergency repairs, fewer replacement parts, and more predictable maintenance costs. In the long run, the savings from reduced breakdowns can be just as valuable as the energy savings themselves.
Enhanced Comfort That Reduces Overuse
When your heating system is installed correctly, it delivers steady, even warmth throughout your home. You won’t need to constantly adjust the thermostat or run the system longer to compensate for cold spots. This improved comfort means you use less energy overall. A well-installed system also responds more accurately to thermostat settings, so you can enjoy the right temperature without wasting power.
Comfort and savings go hand in hand. When your home feels consistently warm, you’re less likely to overuse the system or push it beyond its limits. This balance helps reduce energy consumption while keeping your living spaces cozy. Proper installation ensures that every room benefits from the system’s output, eliminating the frustration of uneven heating and the temptation to overcompensate with higher thermostat settings.
Conclusion
Lowering your energy bills doesn’t always mean cutting back on comfort—it often comes down to how well your heating system is installed. From proper sizing and ductwork to professional calibration and reduced maintenance, each step of correct installation plays a role in saving energy and money. Investing in expert heating installation ensures your home stays warm, efficient, and cost-effective for years to come.
By focusing on efficiency, reliability, and comfort, a properly installed system gives you the best of both worlds: a cozy home and lower monthly expenses. It’s a smart investment that pays off season after season.

Why Indoor Air Quality Matters—and How Your HVAC System Can Help
We spend most of our time indoors, but we don't often think about the air we breathe at home. As houses get more energy-efficient and sealed up tight, indoor air quality becomes more important. Your HVAC system does more than control temperature—it's key to keeping your indoor air clean and healthy.
We spend most of our time indoors, but we don't often think about the air we breathe at home. As houses get more energy-efficient and sealed up tight, indoor air quality becomes more important. Your HVAC system does more than control temperature—it's key to keeping your indoor air clean and healthy.
Why Indoor Air Quality Should Be a Priority
Bad indoor air can make you feel sick and uncomfortable. You might notice ongoing allergies, worse asthma, frequent colds, feeling tired all the time, or getting headaches often. Kids, older adults, and people with health problems feel these effects more strongly.
Common air pollutants live in every home. Dust and pet hair float around. Mold can grow in damp spots. Paint, furniture, and cleaning products put chemicals in the air. Smoke from cooking and pollen from outside also make the air quality worse.
Several things trap bad air in your home. Poor ventilation keeps stale air inside. Dirty ducts collect dust and germs. Too much humidity helps mold and dust mites grow. When you seal your home to save energy, you can accidentally trap pollutants inside without enough fresh air coming in.
How HVAC Systems Control Air Quality
Your HVAC system manages the air you breathe every day. It moves air around your house, brings in fresh air, and pushes out stale air. This job becomes extra important in today's tight, energy-saving homes.
Your system's filters catch airborne particles as air moves through. Basic filters grab big stuff like dust and hair. Better filters catch much smaller particles. Filter ratings help you pick the right protection level. Most homes do well with medium-quality filters that clean well without blocking airflow.
Your HVAC system also controls how much moisture stays in your air. Keeping humidity at the right level stops mold from growing and cuts down on dust mites. Both are big problems for air quality. Too much moisture encourages harmful growth. Too little can irritate your breathing.
HVAC Features That Clean Your Air
Several upgrades can make your home's air much cleaner. High-quality filters remove most airborne particles, including very small ones. Not every system can handle the strongest filters, but most homes can upgrade to better ones that make a real difference.
UV light systems in your ducts kill germs, viruses, and mold as air passes by. These work all the time to destroy harmful organisms. They help a lot if family members have allergies or if you live where it's humid and mold grows easily.
Air cleaning systems can be built into your HVAC or added separately. These use different methods to remove particles, smells, and chemical fumes. Some use electrical charges to grab particles. Others use carbon filters to soak up odors and gases.
Special ventilation systems bring fresh outdoor air into your home while pushing stale indoor air out. They save energy by moving heat between the incoming and outgoing air. These work great in newer, tightly sealed homes.
Smart controls and air sensors are the newest way to manage home air quality. They watch your air quality constantly, track humidity, and tell you when to change filters. They can automatically adjust your system to keep air quality at its best.
Keep Your System Working for Clean Air
Even the best HVAC system won't clean your air without regular care. Changing filters regularly is the most important thing you can do. How often depends on what type you use, how many people live in your home, if you have pets, and your local conditions. Basic filters need changing every month. Better filters might last several months.
Professional duct cleaning every few years stops dust, mold, and debris from building up in your air system. Regular HVAC maintenance keeps your system running well and lets technicians catch air quality problems early.
Working with qualified HVAC technicians, such as someone from BJ Heating & Cooling, helps you maintain good air quality. These professionals can check how well your current system works, suggest the right upgrades, and make sure improvements get installed correctly. They can also test your air quality to find specific problems and suggest the best solutions for your budget.
Watch humidity levels with simple monitors, but call HVAC professionals when you notice ongoing air quality issues.
Warning Signs of Poor Air Quality
Health Symptoms That Won't Go Away
Pay attention when family members have ongoing allergy symptoms or breathing troubles that get better when they leave home. This pattern strongly suggests your indoor air has problems. Persistent coughing, sneezing, watery eyes, or feeling stuffy inside but fine outdoors are clear warning signs.
Visible and Smelly Problems
Musty smells anywhere in your home point to moisture and possible mold issues. Visible mold growth on walls, ceilings, or around windows means your air quality needs immediate attention. If dust builds up fast despite regular cleaning, your air filtration system isn't working well enough.
Moisture Issues
Too much condensation on windows during cold weather shows high indoor humidity. High humidity readings on monitors also signal moisture problems that can lead to mold and bacteria growth. These conditions create perfect breeding grounds for air quality problems.
When to Upgrade Your HVAC System
Older HVAC systems often lack modern air cleaning features and might need upgrades to clean your air properly. Think about improvements if you've recently renovated, as changes can affect ventilation needs. New health problems among family members or home additions might also mean your system needs evaluation.
Upgrade choices include adding UV lights, installing better filters, adding energy-saving ventilation, and putting in smart controls for better air management. An experienced HVAC technician, for example, someone like Ryan's AC & Heating, can check if your existing system and ducts can handle upgrades without overworking your equipment. They can also help you decide which improvements matter most based on your specific air quality concerns and budget.
Your HVAC system protects your family from indoor air pollutants that can hurt your health and comfort. Understanding how your system works and using available improvements and regular maintenance helps you create healthier indoor air for everyone in your home. Clean air isn’t just a luxury, it’s a smart investment in your family’s well-being.