

A resource for those seeking information on organizing and transforming spaces.
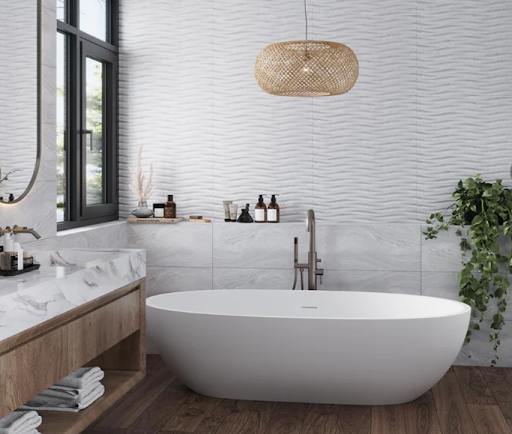
Natural Look Tiles: For Organic and Earthy Bathroom Floors
A comfortable, restorative, and calm bathroom can help you disconnect from the hustle and bustle of daily life and relax and recuperate. A simple and efficient way to make your bathroom feel inviting and appealing is through organic materials and designs. Wood, stone, marble, fiber, etc., can help you bring a lot of texture, warmth, and visual depth to your bathroom and connect it to Mother Nature.
We partnered with a home design company. for this post. The opinions in the post are honest. All reviews and opinions expressed in this post are based on our personal views. We are excited because we know you will love it.
A comfortable, restorative, and calm bathroom can help you disconnect from the hustle and bustle of daily life and relax and recuperate. A simple and efficient way to make your bathroom feel inviting and appealing is through organic materials and designs. Wood, stone, marble, fiber, etc., can help you bring a lot of texture, warmth, and visual depth to your bathroom and connect it to Mother Nature.
While natural materials can be used in bathrooms, some of them, especially wood, can be difficult to maintain. In such cases, using natural-look tiles is the best way to introduce nature’s beauty to your bathroom in a more practical and durable manner. These tiles combine the elegance of natural materials with the strength and practical benefits of tiling materials, making them the perfect tiling choice for any bathroom flooring.
With the help of modern manufacturing techniques, tiles are now able to mimic the fine details of natural materials such as veining, patterns, and surface variation with a high level of precision. This helps homeowners and designers alike to create a natural aesthetic without the hassle and constraints of the actual materials. Unlike actual materials, natural-look tiles can be used across bathroom floors where the real deal would be a strict no-no.
Defining Natural Look Tiles
Natural look tiles are designed to mimic the look of various natural materials such as stone, wood, marble, fabric, and concrete. These tiles not only try to achieve visual similarity, but also try to simulate the finish and surface of the real material. They are typically made using durable materials such as porcelain and ceramic, which provide them with structural reliability and aesthetic appeal.
Compared to actual natural materials, natural look tiles have many benefits. These include:
● Better moisture resistance compared to natural wood or porous stone.
● Easier cleaning and lower maintenance requirements.
● Improved durability for long-term use.
● Easy installation.
● Wider design flexibility across different bathroom styles.
This makes them suitable for bathroom floors where durability is just as important as appearance. Instead of limiting material choices based on environment, natural look tiles expand what is possible across different areas of the home. Here are the top five types of natural-looking tiles that are popular today.
1. Wood Look Tile: For Warmth and Wonder
As the name suggests, wood look tiles simulate the wooden grain and tonal shifts of real hardwood while discarding its many limitations. Available in various formats such as planks, large-format tiles, mosaic, and more, these tiles help create a natural and wooden feel in any space.
Unlike real wood, wood-like tiles are highly stable and do not contract or expand with changes in moisture or temperature. This makes them highly reliable for bathroom flooring where water exposure is unavoidable. Larger plank formats can also visually elongate smaller bathrooms, making the space appear more open and continuous. They work especially well in contemporary, Scandinavian, farmhouse, and Japandi-inspired interiors.
2. Concrete Look Tile: Simple Yet Bold
Concrete-look tiles are known for their understated elegance and a clean look that goes well with modern design styles. While real concrete is sturdy, it is susceptible to cracking and requires sealing. Concrete-look tiles provide a good alternative to real concrete as they are low on maintenance and high on aesthetics.
Instead of strong patterns, concrete-look tiles feature various soft tonal shifts that add depth and dimension to the surface. They serve as a great foundation on which you can add various design elements.
When you are on the lookout for tiles designed for wet-area flooring, concrete-look tiles provide exceptional traction for better footing. They are highly suitable not just for bathrooms but also for shower floors and other high-moisture zones. Concrete-look tiles create an uncluttered, calm look on bathroom floors, and their neutral colors go well with simple fixtures.
3. Stone Look Tiles: Where Tile Meets Substance
Stone-look tiles recreate the appearance of natural materials such as slate, limestone, and travertine, bringing organic texture and visual variation in a more durable and predictable tile format.
While natural stone often varies significantly in color, thickness, and finish, stone-look tiles offer a more controlled and refined interpretation of these characteristics. This allows for easier installation, greater consistency, and a more uniform overall appearance without losing the natural charm of real stone.
Perfect for all kinds of wet spaces, stone-look tiles not only add a natural beauty to your floors (and walls) but also provide traction to keep you safe. They are highly recommended in homes with pets, children, and the elderly.
4. Marble Look Tiles: Elegance with Ease
The natural veining and contrast found in natural marble are often recreated to perfection in marble-look tiles. By mimicking the beauty of marble patterns, the tiles create a more predictable design result.
These tiles are available in a range of styles, from subtle white marble effects to bold, dramatic veining. On bathroom floors, they help brighten the room and create a more refined, upscale atmosphere.
Because they do not require sealing and are less prone to staining, they are easier to maintain than natural marble. This makes them a practical choice for spaces that see regular use. Large-format marble look tiles can make smaller bathrooms feel more expansive, while mosaic versions work well in shower floors where additional grip is beneficial.
5. Fabric Look Tile: Fancy and Fabulous
Fabric look tiles bring a soft visual texture that looks just like textile or woven surfaces. Fabric tiles, given their textural and material differences, focus on creating a tactile and layered effect.
These tiles work particularly well in bathrooms designed around calm, muted palettes. Their understated surface patterns add depth without overwhelming the bath space, making them suitable for minimalist and contemporary interiors.
Their purpose is to add depth without introducing strong patterns, making them useful in spa-like bathrooms where subtlety is important.
Conclusion
Natural look tiles make it possible to create bathroom floors that feel warm, grounded, and visually connected to nature without compromising on durability or practicality.
When used thoughtfully, they can create bathrooms that feel cohesive, calming, and highly functional. Their value lies not only in how closely they replicate natural materials, but also in how well they withstand the demands of everyday use.

Essential Tips for a Successful Flooring Replacement
Replacing your flooring can dramatically enhance your home's look and feel, offering a significant upgrade to your living spaces. However, embarking on this project without careful consideration and planning can lead to unnecessary complications and less-than-ideal outcomes. By focusing on a few key areas, you can ensure a smoother and more successful flooring replacement experience.
Replacing your flooring can dramatically enhance your home's look and feel, offering a significant upgrade to your living spaces. However, embarking on this project without careful consideration and planning can lead to unnecessary complications and less-than-ideal outcomes. By focusing on a few key areas, you can ensure a smoother and more successful flooring replacement experience.
Meticulous Planning and Accurate Measurement
Thorough planning forms the bedrock of any successful flooring project. Before you even begin to explore material options, take the time to clearly define your needs for the space and establish a realistic budget that accounts for all potential expenses, including materials, tools, and labor.
Accurate measurements are essential to avoid shortages or excessive waste; carefully measure each room, paying close attention to any irregular shapes or architectural features. Don't neglect the crucial step of inspecting your subfloor for any signs of damage, unevenness, or moisture issues, addressing these problems proactively before laying the new flooring to ensure its stability and longevity.
Thorough Research of Your Options
The sheer variety of flooring materials available on the market today can feel overwhelming, making thorough research a critical step in the replacement process. Take the time to explore the unique characteristics, advantages, and disadvantages of different options to identify the best fit for your specific needs, lifestyle, and aesthetic preferences. Carefully consider factors such as durability and maintenance requirements based on the room's function and the level of foot traffic it will endure. Explore how different materials align with your desired style and the existing décor of your home, utilizing samples to visualize how they will appear under your specific lighting conditions. Furthermore, be realistic about your comfort level with DIY installation and factor in the complexity associated with different flooring types, as some may require specialized tools and professional expertise.
Gathering the Necessary Tools and Materials
Whether you intend to tackle the flooring replacement as a do-it-yourself project or plan to hire a professional installer, having a clear understanding of the required tools and materials can’t hurt. If you're opting for a DIY approach, take the time to research the specific tools recommended for your chosen flooring material, ensuring you have everything from measuring tapes and cutting tools to installation aids like tapping blocks and rubber mallets. Equally important is the selection of appropriate underlayment, which provides a stable base, reduces noise transmission, and can offer crucial moisture protection depending on your subfloor and flooring type. Finally, ensure you have the correct type of adhesive if required for your chosen material. Also, don't forget essential finishing touches like transition pieces to create seamless and safe connections between different flooring types or changes in floor height.
Proper Preparation of the Installation Space
Proper preparation of the installation space is a crucial step that is often underestimated but significantly impacts the outcome and the ease of the installation process. Begin by completely clearing the room of all furniture, rugs, and any other obstructions to provide a safe and unobstructed work area. Next, take the time to thoroughly clean the subfloor by sweeping, vacuuming, and ensuring it is free of any dust, debris, or loose particles that could interfere with adhesion or create an uneven surface. Finally, remember the important step of acclimating your new flooring materials, especially natural wood, and laminate, to the temperature and humidity levels of the room for the recommended period specified by the manufacturer to prevent warping or gapping after installation.
Knowing When to Seek Professional Assistance
While undertaking a flooring replacement as a do-it-yourself project can offer potential cost savings, it's essential to honestly assess your skill level, comfort with the necessary tools, and the complexity of the job at hand. Suppose you feel uncertain about any aspect of the installation process or lack prior experience. In that case, hiring a qualified professional installer, such as those at companies like Sam's Carpets and Flooring Ltd, can ultimately save you valuable time, prevent frustrating mistakes, and ensure a high-quality finished result. Consider the intricacies involved in complex installations, such as intricate patterns, large areas, or materials like hardwood and tile that often demand specialized tools and techniques. Furthermore, remember that improper DIY installation can sometimes void the manufacturer's warranty on your flooring materials, making professional installation a worthwhile investment for long-term peace of mind and protection.
By carefully considering these five essential tips, you can approach your flooring replacement project with greater confidence and increase the likelihood of achieving beautiful, durable, and long-lasting results. Taking the time to plan meticulously, research thoroughly, prepare diligently, and recognize your limitations will ultimately lead to a successful transformation of your living spaces, enhancing both their aesthetic appeal and overall functionality.

The Timeless Allure And Flexibility Of Laminate Flooring: A Deep Dive
Are you in the process of refurbishing your home? Or maybe you're diving into the intricate world of interior design and homebuilding for the first time? Whatever the case may be, choosing the right flooring can be a daunting task as it sets the tone for the whole house. This blog post introduces the enduring beauty and versatility of one such flooring type – laminate flooring.

Are you in the process of refurbishing your home? Or maybe you're diving into the intricate world of interior design and homebuilding for the first time? Whatever the case may be, choosing the right flooring can be a daunting task as it sets the tone for the whole house. This blog post introduces the enduring beauty and versatility of one such flooring type – laminate flooring.
Laminate flooring, while not as traditional as hardwood or as extravagant as marble, is quickly making its way into homes due to its high-quality finish, cost-effectiveness and ease of maintenance. Could it be the perfect choice for your home? Stick around as we delve into this fascinating topic.
In this blogpost, we'll explore just what makes laminate flooring a beloved choice among homeowners and interior design enthusiasts alike. We'll journey through its various facets, including its pros and cons, where and why to use it, and answer the important question: Is laminate flooring right for you?
What exactly is Laminate Flooring?
When you are embarking on an interiors journey, understanding the materials you're working with is crucial. So, what exactly is laminate flooring? Laminate flooring is a synthetic flooring system made up of multiple layers fused together through a lamination process. The top layer is a hard, transparent layer designed to resist wear and tear, underneath which is a high-resolution photographic image layer that replicates the aesthetic of various flooring materials like wood, marble or granite.
The popularity of laminate flooring stems from its imitation abilities - it convincingly emulates the look of other flooring materials, while being more affordable and easier to install. Plus, it comes with a durability that rivals even that of its more expensive counterparts.
This innovation started in the 1970s, but has since evolved in leaps and bounds with enormous strides made in style, utility and durability, and so is now a top choice for many homemakers and designers.
Examining the Advantages of Laminate Flooring
While the ease of installation and interesting design possibilities are noteworthy, the advantages of laminate flooring extend well beyond this surface level. First and foremost, laminate flooring is tough! It doesn't stain, scratch, or dent easily, making it perfect for high-traffic areas and households with children or pets.
Another advantage worth mentioning is its immunity to sunlight discoloration. Unlike hardwood, which can bleach or darken over time due to sunlight exposure, laminate maintains its color quality for years to come.
Finally, laminate flooring is quite affordable. When compared with other popular flooring options such as hardwood or natural stone, you’re sure to notice a significant reduction in material and installation costs.
Are there any Downsides to Laminate Flooring?
Everything comes with a bit of downside, and laminate flooring is no exception. One trade-off to consider with laminate flooring is that it does not repair easily. Once damaged, the entire plank often needs to be replaced.
Another disadvantage of laminate flooring is that it can feel and sound a bit artificial underfoot. The synthetic nature of the material may not provide the same level of comfort compared to natural materials.
Regardless of these downsides, laminate flooring remains an excellent choice. It's all about understanding the needs of your home, your taste and your lifestyle.
Laminate Flooring: Home and Commercial Applications
Laminate flooring is incredibly versatile and fits well in a variety of applications, from residential homes to busy commercial spaces. Its resilience to wear makes it well-suited even in high-traffic areas such as entryways, kitchens, and offices.
Given the multitude of styles, colors and patterns that laminate flooring has to offer, it can seamlessly match various design styles from rustic to modern, minimalist to baroque.
Whether you're designing a restful coastal residence or a bustling city office, you'll find that laminate flooring meets the aesthetic and instrumental needs impeccably.
Making the Right Flooring Decision: Is Laminate Flooring for you?
Choosing the right flooring material can feel like a daunting task. However, by understanding the distinct characteristics of each available option, you can make a decision tailored to your specific needs.
laminate flooring Werribee , given its durability, versatility, and affordability, is an excellent option for many homeowners. If you prize easy maintenance, an abundance of design options, and resilience to wear and tear next to everything else, then laminate flooring might just be the perfect match for you.
Conclusion:
From being a replicative material in the 1970s to now a loved and sought-after flooring option, the evolution of laminate flooring is a narrative of innovation meeting aesthetics and function. Its various benefits such as durability, cost-effectiveness, and an impressive design range make it a compelling choice for many.
However, like any concept in design, it’s not a one-size-fits-all solution. It’s essential to weigh the pros and cons concerning your specific space, lifestyle and personal aesthetics before choosing the right floor. Should you choose laminate, rest assured that this modern, stylish and practical flooring choice will serve you well in the years to come.

What to Do If Your Hardwood Floors Start Showing Wear and Tear
Hardwood floors add timeless elegance and warmth to any home, but over time, they can start to show signs of wear and tear. Whether it's from daily foot traffic, shifting furniture, or general ageing, even the most durable hardwood floors can begin to lose their lustre. Fortunately, there are plenty of steps you can take to restore the beauty of your floors and protect them from further damage.
We partnered with a home improvement company for this post. The opinions in the post are honest. All reviews and opinions expressed in this post are based on our personal views. We are excited because we know you will love it.

Hardwood floors add timeless elegance and warmth to any home, but over time, they can start to show signs of wear and tear. Whether it's from daily foot traffic, shifting furniture, or general ageing, even the most durable hardwood floors can begin to lose their lustre. Fortunately, there are plenty of steps you can take to restore the beauty of your floors and protect them from further damage.
In this guide, we’ll explore what to do when your hardwood floors start showing wear and tear, offering practical solutions to address common issues and preserve the longevity of your flooring.
1. Assess the Type and Extent of Damage
Before deciding on the best course of action, it’s essential to assess the type and extent of the wear and tear on your floors. Are there just a few scratches or scuffs, or are there deeper gouges, discolouration, or water damage? Is the wear limited to one area, or is it spread throughout the room?
For example, French oak floors may show subtle wear differently than other types of hardwood, with their grain patterns hiding some imperfections. On the other hand, highly polished floors may highlight every scratch. Assessing the damage will help you determine whether a minor touch-up, a more extensive repair, or a full refinishing job is necessary.
2. Dealing with Minor Scratches and Scuffs
For minor surface scratches and scuffs, you may not need to take drastic measures. If the wear is light and hasn’t penetrated the finish, you can often fix the issue with a few easy steps. Here are a few solutions to try:
Use a Hardwood Floor Cleaner: Start by thoroughly cleaning the area using a cleaner designed for hardwood floors. This can remove dirt and grime, making scratches less noticeable.
Apply a Wood Floor Polish: Wood floor polishes can restore shine and fill in shallow scratches. Be sure to choose a product that’s suitable for your specific type of finish and follow the manufacturer’s instructions for application.
Touch-Up Markers or Wax Sticks: For more visible scratches, you can use touch-up markers or wax sticks that are colour-matched to your floor. These are inexpensive and can effectively hide scratches by blending them into the surrounding wood.
These minor repairs can make a significant difference in the overall appearance of your floors, especially in high-traffic areas that see the most wear.
3. Fixing Deeper Scratches and Gouges
Deeper scratches and gouges require a bit more effort to repair. While surface-level fixes may not be enough, there are still ways to address these issues without resorting to a full refinish.
Sanding and Spot Refinishing: If the scratch or gouge is deeper than the surface finish, you may need to lightly sand the affected area and apply a new coat of finish. Use fine-grit sandpaper to gently sand the damaged spot, taking care not to over-sand or damage the surrounding floor. After sanding, clean the area thoroughly and apply a matching finish, whether it’s polyurethane or oil-based, to blend the repair with the rest of the floor.
Wood Filler for Large Gouges: For larger gouges, you may need to use wood filler to fill in the damaged area. Choose a wood filler that matches the colour of your hardwood floors, apply it to the gouge, and smooth it out with a putty knife. Once it dries, lightly sand the area and apply a finish to seal the repair.
By addressing deeper scratches promptly, you can prevent further damage and maintain the structural integrity of your hardwood floors.
4. Addressing Discolouration and Fading
Over time, hardwood floors can become discoloured due to sunlight exposure, water damage, or even general ageing. Fading can leave certain areas of the floor looking dull or uneven compared to the rest of the room. Here’s what you can do to address these issues:
Move Furniture and Rugs Regularly: Sunlight can cause floors to fade unevenly, especially in areas where furniture or rugs have remained in the same spot for extended periods. To prevent this, try rearranging your furniture or rotating rugs to expose different parts of the floor to sunlight. You can also install UV-blocking window treatments to minimise fading.
Buffing and Recoating: If your floors have lost their shine or have areas of discolouration, buffing and recoating may be a good solution. This process involves lightly sanding the top layer of the finish and applying a new coat of polyurethane or other floor sealants. It’s less invasive than a full refinish and can restore the colour and sheen of your floors without removing the entire finish.
Staining to Restore Colour: If the discolouration is more severe, you might need to sand down the entire floor and apply a new stain. This is a more involved process, but it can completely transform the look of your floors and breathe new life into faded or discoloured areas.
5. Tackling Water Damage
Water is one of the biggest enemies of hardwood floors. If your floors have been exposed to excessive moisture, you may notice warping, cupping, or staining. It’s essential to address water damage as soon as possible to prevent further deterioration.
Dry the Area Thoroughly: If you catch water damage early, your first step should be to dry the affected area as quickly as possible. Use fans or a dehumidifier to remove moisture from the wood and prevent further warping.
Sanding and Refinishing Water-Damaged Sections: For minor water damage, sanding and refinishing the affected area may be enough to restore the floor. However, if the damage is more extensive, such as significant warping or buckling, you may need to replace individual floorboards or even sections of the floor.
Prevent Future Water Damage: To avoid future water damage, make sure your home is properly ventilated, especially in areas like kitchens, bathrooms, or entryways where water exposure is more common. Clean up spills promptly and use rugs or mats in high-risk areas.
6. When to Consider Full Refinishing
If your hardwood floors have extensive wear and tear that can’t be addressed through spot repairs or buffing, it may be time to consider a full refinishing job. Refinishing involves sanding down the entire surface of the floor to remove the old finish and imperfections, then applying a fresh coat of stain and sealant.
Refinishing can restore even severely worn floors to their original beauty, but it’s a more time-consuming and costly process. The good news is that solid hardwood floors can be refinished multiple times throughout their lifespan, making it a long-term investment in maintaining your home’s aesthetics.
7. Preventing Future Wear and Tear
Once you’ve addressed the current wear and tear on your hardwood floors, it’s essential to take steps to prevent future damage. Here are a few tips to keep your floors looking their best:
Use Protective Mats: Place mats at entryways to trap dirt and moisture before they reach your floors. In high-traffic areas, consider using runners or area rugs to protect the floor from excessive wear.
Regular Cleaning: Sweep, vacuum, or dry mop your floors regularly to remove dirt and debris that can cause scratches. Avoid using harsh chemicals or excessive water when cleaning hardwood floors.
Maintain Proper Humidity Levels: Wood expands and contracts with changes in humidity, so maintaining a consistent humidity level in your home can prevent warping and cracking.
Final Thoughts
Hardwood floors are a beautiful and valuable feature in any home, but they require care and attention to stay in top condition. Whether you’re dealing with minor scratches, discolouration, or more significant damage, there are solutions to restore and protect your floors for years to come. From simple touch-ups to full refinishing, taking the right steps at the right time can help you preserve the natural beauty of your hardwood flooring. With a little effort, your french oak floors or any other hardwood type can remain a stunning feature in your home, providing warmth and elegance for generations.