

A resource for those seeking information on organizing and transforming spaces.

Pool Plastering vs Pool Resurfacing: What Homeowners Should Know
Pool plastering is one of the most important steps in keeping a swimming pool smooth, watertight, and visually appealing.
We partnered with a home improvement company for this post. The opinions in the post are honest. All reviews and opinions expressed in this post are based on our personal views. We are excited because we know you will love it.

Pool plastering is one of the most important steps in keeping a swimming pool smooth, watertight, and visually appealing.
Many homeowners only start thinking about their pool surface when something feels off under their feet.
I remember stepping into a neighbor’s pool during a backyard barbecue and immediately noticing the rough texture along the shallow end.
The water looked clear, but the surface felt gritty and uneven.
That moment showed how the condition of the interior finish affects the entire swimming experience.
Understanding the difference between pool plastering and resurfacing can help homeowners make smarter renovation decisions.
Choosing the right option can extend the life of the swimming pool while saving thousands of dollars in unnecessary renovations.You can learn more about the process by visiting pool plastering.
What Pool Plastering Actually Does
The plaster layer is the interior coating applied directly over the concrete shell of a swimming pool.
This finish creates the smooth surface swimmers feel when they move along the walls or steps.
It also acts as a protective barrier that seals the pool structure and prevents water from penetrating the concrete underneath.
Over time, chemical exposure, sunlight, and regular use slowly wear down that protective layer.
When that happens, the surface begins to lose its smooth texture and visual brightness.
A fresh plaster coat restores the interior finish while improving durability and appearance.
Most residential pools need a new plaster layer every 7 to 12 years, depending on water chemistry and maintenance habits.
A pool technician once told me that many homeowners mistake surface wear for simple staining.
They spend months trying to scrub discoloration away, only to realize the finish itself has deteriorated.
Applying a new plaster layer often makes the pool look brand new again.
Signs Your Pool Surface Needs Attention
Surface damage usually develops gradually, which makes it easy to overlook early warning signs.
One of the first clues is a rough or chalky texture underfoot.
Swimmers often notice this when they push off from the wall or walk along the shallow end.
Another sign is persistent staining that doesn't disappear even after chemical balancing and brushing.
Mineral deposits can settle into worn areas of the surface and create uneven colors.
Small cracks or tiny pits may also begin forming across the interior walls.
These tiny holes, sometimes called spalling, indicate the surface layer is breaking down.
A homeowner I spoke with once noticed white dust collecting in his pool filter every week.
That powder turned out to be deteriorating plaster slowly flaking away from the surface.
Addressing the issue early prevented much larger repairs later.
Pool Resurfacing: When Repairs Go Deeper
Resurfacing is a more extensive renovation process compared to standard plaster work.
Instead of simply applying a fresh coat, resurfacing involves removing the existing interior finish and installing a completely new surface system.
This step becomes necessary when the underlying material has deteriorated or when structural cracks appear in the pool shell.
Resurfacing also gives homeowners the opportunity to upgrade their pool finish to more durable materials.
Quartz finishes, pebble aggregates, and specialty coatings offer stronger protection than traditional plaster.
These finishes also change the visual appearance of the water by adding texture and depth.
I once saw a pool transformed with a pebble finish during a renovation project.
Before resurfacing, the water looked flat and dull.
After the new finish was installed, the pool reflected sunlight beautifully and looked like something you'd see at a luxury resort.
While resurfacing costs more upfront, it often provides longer-lasting durability.
The Cost Difference Homeowners Should Expect
Budget considerations play a major role when homeowners compare surface renovation options.
Applying a new plaster layer typically costs less because the underlying structure remains intact.
The process focuses on restoring the interior finish rather than rebuilding the entire surface system.
Resurfacing, however, requires additional labor to remove the existing material and install a new finish.
That extra construction work increases the overall project cost.
However, choosing the cheaper option when more serious structural damage exists can lead to repeated repairs later.
A homeowner in my neighborhood learned this lesson the hard way.
He replastered his pool twice within six years because the original structural damage had not been addressed.
Eventually, a full resurfacing project solved the underlying issue and prevented further deterioration.
This example shows why understanding the true condition of the pool is critical before making renovation decisions.
How Surface Materials Affect Pool Longevity
The material used for a pool’s interior finish plays a huge role in durability and maintenance.
Traditional plaster surfaces remain the most common option in residential pools.
They create a smooth, classic look and provide reliable performance when properly maintained.
Quartz finishes improve durability by mixing plaster with crushed quartz crystals.
This combination strengthens the surface and adds subtle shimmer under sunlight.
Pebble finishes go even further by embedding small natural stones into the surface layer.
These finishes are extremely durable and resist chemical wear much better than standard plaster.
A friend of mine recently upgraded to a pebble finish during a renovation project.
He immediately noticed that algae buildup became less frequent and that cleaning required far less effort.
Selecting the right finish can dramatically affect maintenance requirements and overall lifespan.
Maintenance Habits That Extend Surface Life
Even the best pool finish can deteriorate quickly without proper maintenance.
Water chemistry management is one of the most important factors.
When pH levels become unbalanced, acidic water can slowly dissolve interior surfaces.
Regular brushing also prevents mineral buildup and algae growth that damage finishes over time.
Routine inspections allow homeowners to catch small cracks or rough areas before they become major problems.
A pool professional once compared surface care to brushing your teeth.
Skipping routine maintenance might not cause immediate damage, but the problems slowly accumulate.
Consistent care helps extend the life of the interior finish and prevents expensive repairs later.
Homeowners who stay on top of maintenance often get several extra years out of their pool surface.
Making the Right Choice for Your Pool
Choosing between plaster repair and full resurfacing depends largely on the condition of the pool shell.
If the damage is limited to surface wear, applying a new plaster layer may be the most practical solution.
When deeper cracks, flaking surfaces, or structural deterioration appear, resurfacing is usually the better long-term investment.
Understanding what lies beneath the surface is key to making the right decision.
A professional inspection can reveal whether the issue is cosmetic or structural.
Once the right renovation method is chosen, the transformation can be dramatic.
A restored pool surface improves comfort, enhances appearance, and extends the life of the entire structure.
For many homeowners, it turns the pool back into the centerpiece of their backyard again.
The Ultimate Homeowner’s Guide to Annual Heating Maintenance
Annual heating maintenance is one of the most effective ways to keep your home comfortable, efficient, and safe throughout the colder months. A well‑maintained system runs more smoothly, experiences fewer breakdowns, and uses less energy to heat your home. Many homeowners don’t realize how much strain their heating system endures each winter, making routine service essential for long‑term performance. With a simple yearly tune‑up, you can avoid unexpected repairs and enjoy consistent, reliable warmth.
Annual heating maintenance is one of the most effective ways to keep your home comfortable, efficient, and safe throughout the colder months. A well‑maintained system runs more smoothly, experiences fewer breakdowns, and uses less energy to heat your home. Many homeowners don’t realize how much strain their heating system endures each winter, making routine service essential for long‑term performance. With a simple yearly tune‑up, you can avoid unexpected repairs and enjoy consistent, reliable warmth.
The Benefits
Annual heating maintenance offers a wide range of advantages that go far beyond basic comfort. A yearly tune‑up helps your system run more efficiently, last longer, and operate more safely, making it one of the smartest investments you can make in your home.
Improved Efficiency
A clean system doesn’t have to work as hard to heat your home, which means it uses less energy and delivers more consistent airflow. Removing dust and buildup from internal components helps the system operate at peak performance. Over time, this improved efficiency can lead to noticeable savings on your monthly utility bills.
Fewer Repairs
Most heating issues start small—loose connections, worn parts, or minor airflow problems. During a tune‑up, a technician can spot these early warning signs before they turn into costly repairs. Preventing breakdowns not only saves money but also ensures your home stays warm when you need it most.
Longer Lifespan
Heating systems last significantly longer when they’re maintained regularly. Tune‑ups reduce stress on motors, burners, and heat exchangers, helping each component perform better for more years. This means you can delay the expense of a full system replacement and get the most value from your investment.
Cleaner Air
Dust, debris, and allergens can build up inside your heating system and circulate through your home. Replacing filters and cleaning internal parts helps improve indoor air quality and reduces the amount of airborne particles your family breathes. This is especially beneficial for households with allergies or respiratory concerns.
Better Safety
Safety is one of the most important reasons to schedule annual maintenance. Technicians check for carbon monoxide leaks, gas line issues, and electrical hazards that could put your home at risk. A yearly inspection ensures your system operates safely and gives you peace of mind throughout the heating season.
The Warning Signs
Even with regular maintenance, certain symptoms indicate your system needs immediate attention. Unusual noises—such as banging, rattling, or squealing—often signal mechanical issues. Burning or musty smells can point to electrical problems or dust buildup inside the system. Uneven heating, cold spots, or weak airflow may indicate blocked ducts or failing components. Rising energy bills without a clear cause can also be a sign that your system is struggling. If your furnace cycles on and off frequently or produces a yellow burner flame, it’s important to call a professional right away to prevent further damage.
Tune‑Ups and Scheduling
A professional tune‑up includes a thorough inspection, cleaning, and adjustment of your heating system. Technicians check electrical connections, test safety controls, clean burners or coils, verify airflow, and calibrate the thermostat to ensure accurate temperature control. This detailed process helps your system run more efficiently and reduces the risk of unexpected failures.
The best time to schedule maintenance is early fall, before temperatures drop and HVAC companies become busy. Booking service ahead of the cold season ensures your system is ready when you need it most. When choosing a technician, look for proper licensing, certifications, and experience with your specific system type. A reputable professional, such as someone like TRS Heating and Air Conditioning, will provide transparent pricing, clear communication, and reliable service, giving you confidence that your system is in good hands.
The DIY Tasks
Homeowners can support their heating system with a few simple maintenance tasks throughout the year. Replacing air filters regularly helps maintain proper airflow and reduces strain on the system. Keeping vents and returns clear of furniture, dust, and debris ensures warm air can circulate freely. Checking thermostat settings and replacing batteries when needed helps maintain consistent temperature control. While these tasks are helpful, anything involving internal components, gas lines, or electrical systems should always be left to a trained professional.
Annual heating maintenance is one of the most reliable ways to protect your home’s comfort, safety, and long‑term budget. A yearly tune‑up keeps your system running efficiently, reduces the risk of unexpected breakdowns, and helps prevent safety hazards like carbon monoxide leaks or electrical issues. By pairing professional service with simple at‑home upkeep, you can extend the life of your heating system and enjoy consistent, dependable warmth throughout the winter. With regular care and the right technician, maintaining your heating system becomes an easy habit that pays off year after year.
How to Prepare Your Home for a Renovation
A home renovation isn’t just about new finishes, it’s about how your house actually works. Behind the walls, systems like wiring, plumbing, insulation, and even your furnace determine comfort, efficiency, and long-term costs. Proper home renovation planning before demolition starts helps you avoid expensive surprises and make decisions that improve performance, not just appearance.
We partnered with a home improvement company for this post. The opinions in the post are honest. All reviews and opinions expressed in this post are based on our personal views. We are excited because we know you will love it.

A home renovation isn’t just about new finishes, it’s about how your house actually works. Behind the walls, systems like wiring, plumbing, insulation, and even your furnace determine comfort, efficiency, and long-term costs. Proper home renovation planning before demolition starts helps you avoid expensive surprises and make decisions that improve performance, not just appearance.
Defining Your Home Renovation Goals
If your only goal is "make it look better," you’re not planning deeply enough.
A home renovation should solve a problem, not just change a surface. A renovation should solve structural, functional, or efficiency problems, not just visual dissatisfaction.
Maybe your kitchen isn’t ugly, it just doesn’t function when two people cook. Maybe your bathroom isn’t outdated, it’s poorly ventilated and always damp. Maybe your layout doesn’t support how you actually live.
Start by asking:
What frustrates me daily in this space?
What do I want this room to feel like at 7 AM and at 9 PM?
Am I renovating for resale value, lifestyle improvement, or long-term durability?
Before work begins, define the measurable outcome you want from your home renovation. That might include reducing energy loss and lowering utility bills, improving lighting quality and reducing shadow zones, increasing usable storage without expanding square footage, improving indoor air quality and ventilation, or supporting lifestyle changes like working from home.
When you’re clear on the outcome, efficiency, resale ROI, better lighting, energy savings, smarter storage, every decision in your home renovation plan becomes easier. Clear objectives prevent budget drift. If the goal is durability and performance, materials and systems should reflect that. If the goal is resale value, design choices should align with buyer expectations in your market. If the goal is long-term living, comfort and infrastructure matter more than trends.
Without a defined result, a home renovation becomes an aesthetic upgrade instead of a strategic improvement.
Building a Clear Home Renovation Plan
A mood board is not a plan.
A clear home renovation plan includes more than design drawings. It includes sequencing, technical coordination, and defined decision points.
A real home renovation plan includes scope (what’s being touched, and what’s not), a budget with a 15-20% contingency buffer, a timeline with realistic sequencing, contractor responsibilities, permit requirements, and material lead times.
Before demolition starts, you should know the exact scope of work, which walls are structural, where utilities run, the order in which trades will work, when materials must be delivered, and what inspections are required.
You also need a decision schedule as part of your home renovation planning. Many delays happen because homeowners are still choosing tile while the crew is ready to install it. It is critical to finalize selections early. Cabinet sizes affect electrical placement. Plumbing fixture specs affect rough-in heights. Flooring thickness affects door clearances.
The more decisions you make before demolition starts, the cheaper and smoother your home renovation will be. When planning is incomplete, small technical oversights compound into delays and added costs.
Smart Home Renovation Planning Before You Start
The most expensive mistakes happen inside walls, not on surfaces. Most expensive mistakes happen behind the walls, not on the surface.
Think beyond finishes. Infrastructure first. Electrical capacity, plumbing lines, ventilation, insulation, these determine long-term performance during a renovation at home.
Focus on electrical panel capacity and circuit distribution, plumbing pipe condition and water pressure, proper drainage slope and venting, HVAC airflow balance and return placement, insulation gaps and air sealing.
Future-proofing matters in home renovation planning. Even if you’re not installing smart systems now, run conduit or extra wiring. It’s cheap while walls are open and expensive later.
Workflow, not aesthetics. In kitchens and bathrooms especially, movement patterns matter more than color palettes. Lighting layers are critical. Most homes rely too heavily on overhead lighting. Plan task, ambient, and accent lighting from the start.
Energy efficiency also deserves attention during a home renovation. Air sealing and insulation upgrades during renovation often pay back faster than cosmetic upgrades.
Layout changes drive cost. Moving plumbing stacks or load-bearing walls significantly increases structural and labor expenses.
Another major source of budget overrun during renovation at home is scope expansion mid-project. Clearly define what is excluded as well as what is included. If something is not written into the contract, it will likely become a change order.
Costly mistakes usually happen when people design for Pinterest instead of real-life use. Precision in scope prevents financial surprises.
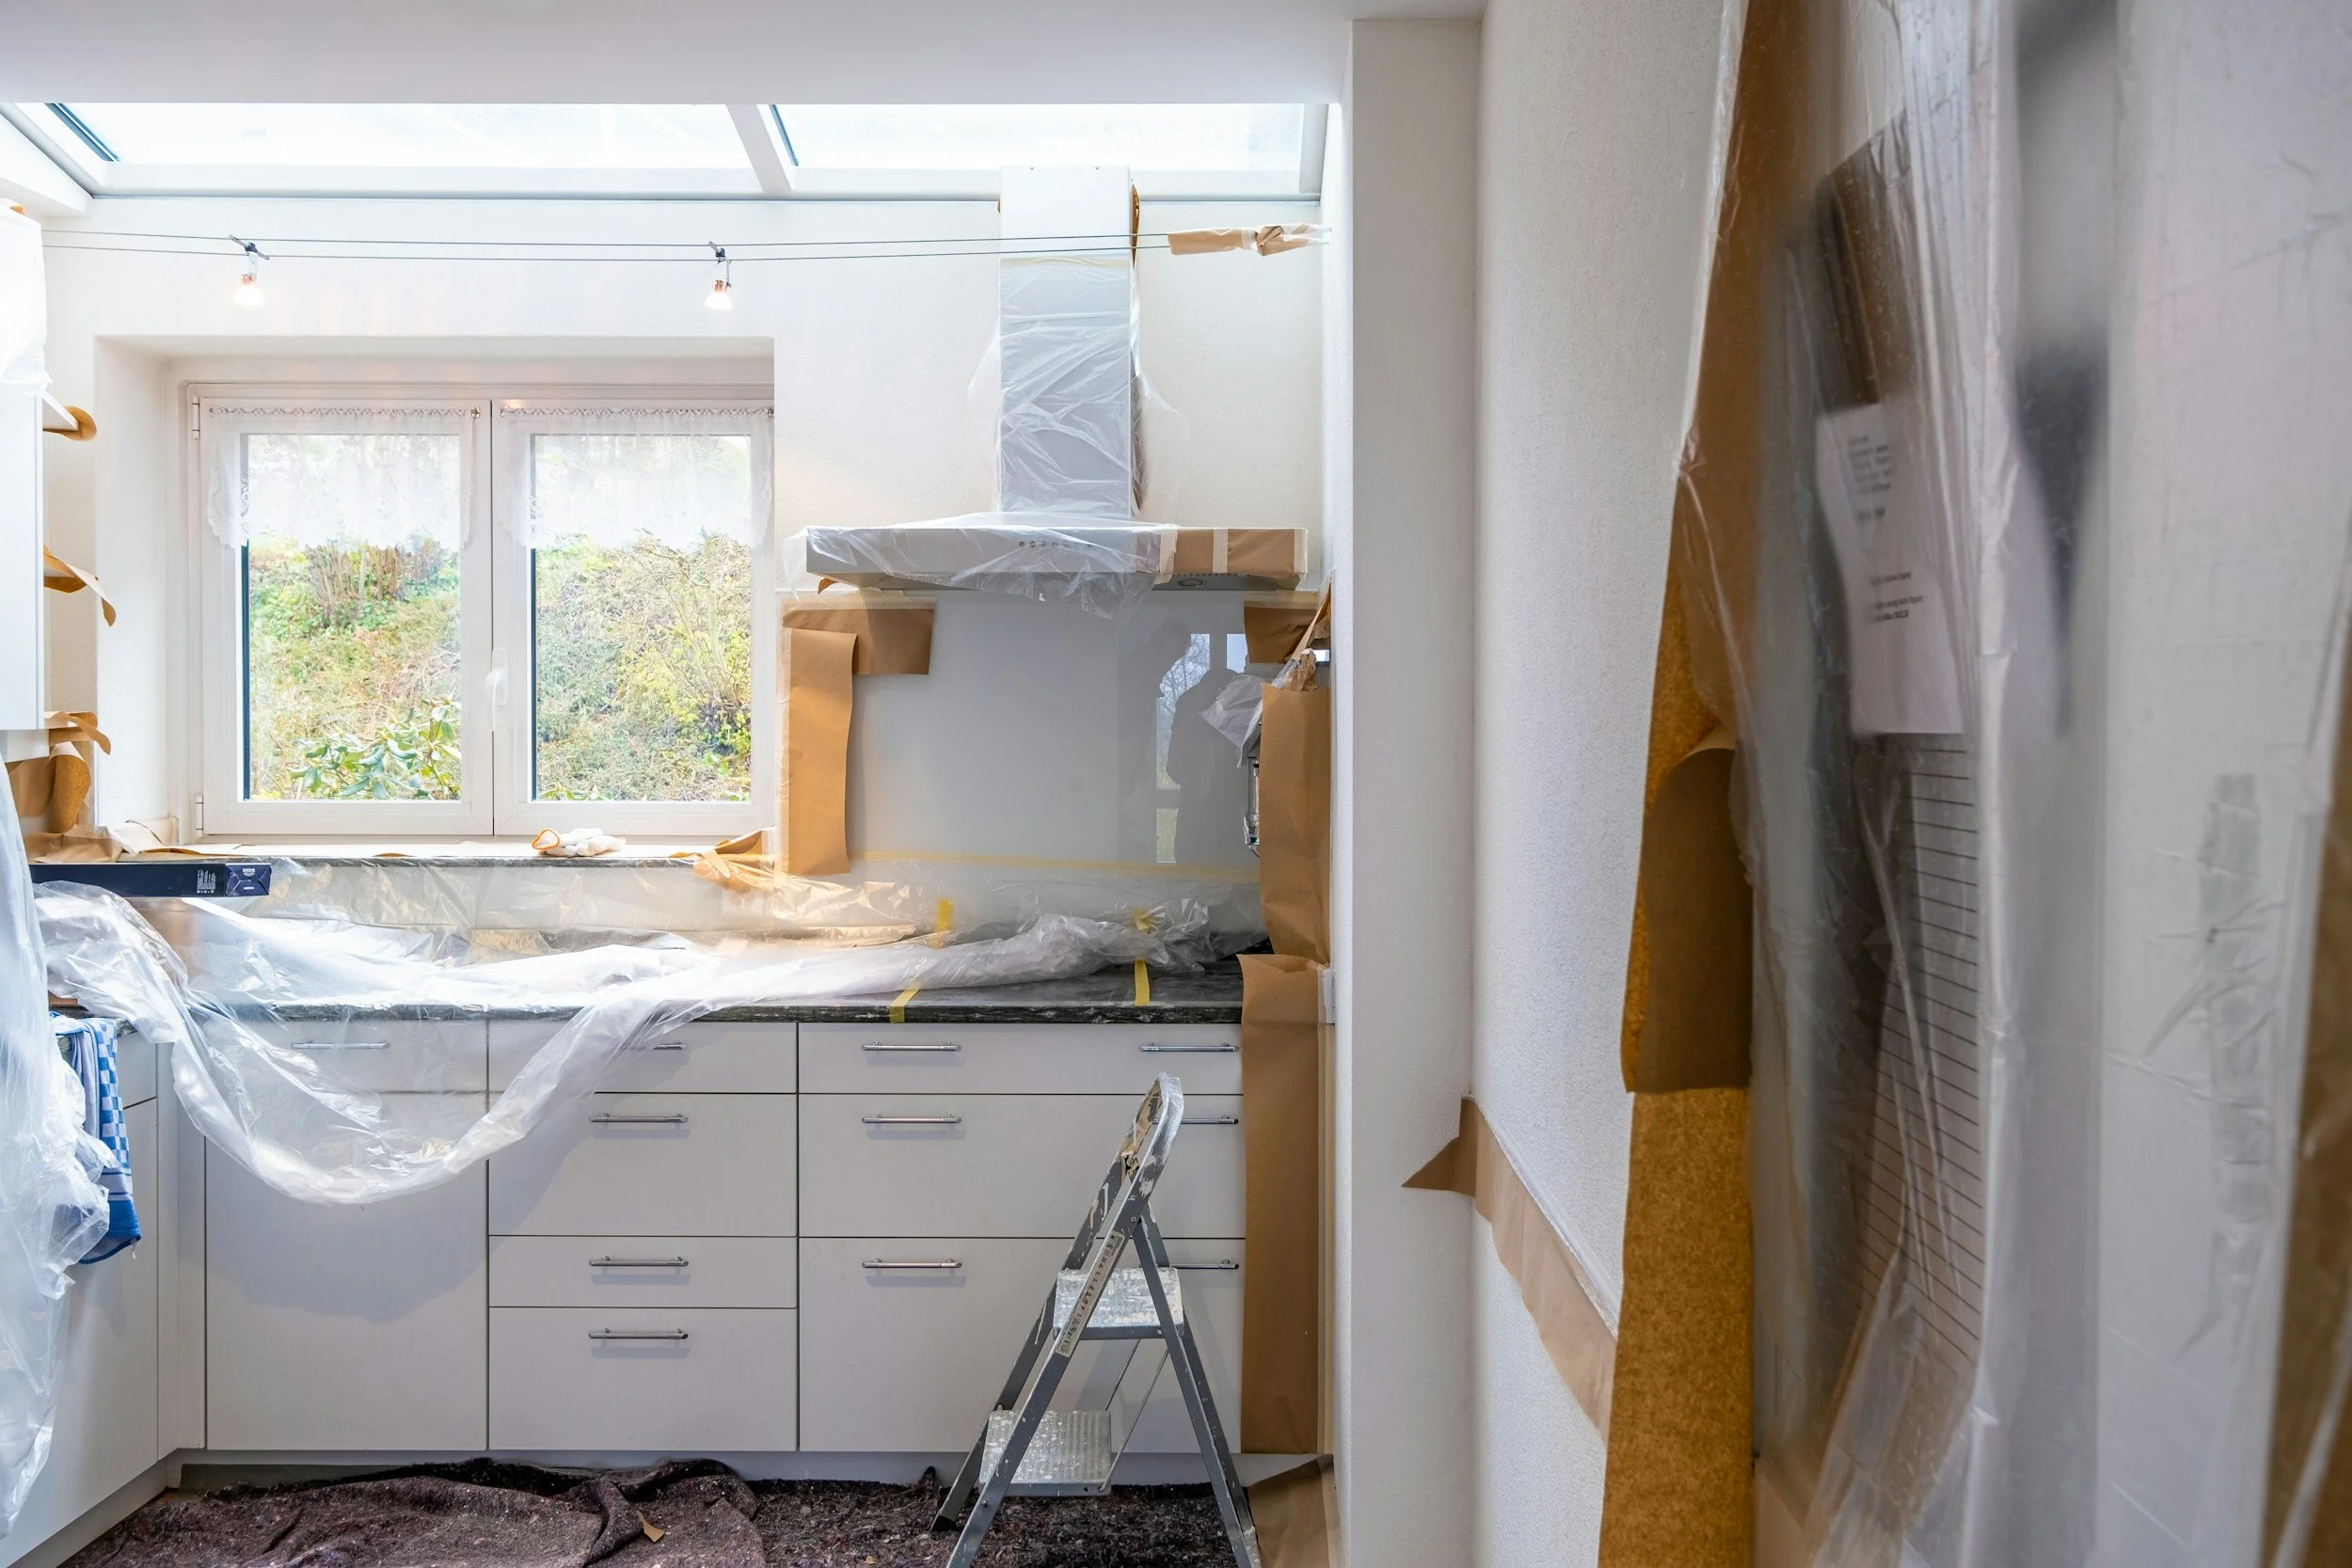
How to Prepare for a Home Renovation
Renovation is disruptive. Plan for that disruption, not just the build.
Preparing your home for renovation reduces damage and downtime. Preparing logistically minimizes disruption and protects existing finishes from unnecessary damage.
Declutter aggressively. Anything left in the work zone will get dusty, or damaged. Remove valuables and fragile items from the renovation zone.
Create "safe zones." Designate one calm, clean area of the house that stays untouched. If remaining in the home during renovation at home, establish a temporary living setup. That might include a makeshift kitchen, temporary laundry access, or alternate bathing arrangements.
Physically preparing your home for renovation is about containment. Practically preparing yourself is about lowering expectations for comfort during the process.
Seal off adjacent rooms to limit dust spread. Protect flooring in access paths. Protect flooring and HVAC. Seal vents and isolate construction areas to prevent dust spreading through the entire home. If your project will generate heavy dust, scheduling furnace service before and after renovation can help protect the system from debris buildup and airflow restrictions.
Plan for noise and access. If you work from home, consider temporary workspace relocation.
Identify storage for delivered materials and confirm access to electrical panels and water shut-offs as part of preparing your home for renovation.
How to Prepare the Electrical System for a Home Renovation
Electrical upgrades should be strategic, not reactive.
Electrical planning should account for both current demand and future load growth during a home renovation. Modern homes consume more electricity than older systems were designed to handle. Induction cooking, electric vehicles, heat pumps, and home offices increase demand.
Before renovation begins, check your panel capacity and confirm it can handle new loads. If the panel is undersized, outdated, or lacks breaker space, electrical panel replacement may be necessary to safely support modern demand. Evaluate panel amperage and available breaker space, dedicated circuits for large appliances, GFCI and AFCI code requirements, proper grounding and bonding, and surge protection at the panel level.
Plan additional outlets where furniture placement actually makes sense. Separate lighting circuits from outlet circuits where possible. Upgrade old wiring if the home is older.
If walls are open during renovation at home, it’s the perfect time to add dedicated circuits for major appliances, install surge protection at the panel, pre-wire for future smart systems, improve lighting circuits, run conduit for future technology, and, if needed, upgrade service capacity.
Electrical upgrades are relatively inexpensive during home renovation planning, and extremely expensive after drywall is closed. Electrical upgrades are far less expensive during a home renovation than after finishes are installed.
How to Prepare Home for Plumbing Renovations
Plumbing planning is about access and risk reduction.
Start by confirming the condition and material of existing pipes before beginning your home renovation. Older galvanized pipes may need replacement rather than connection to new fixtures. Inspect old pipes for corrosion and decide whether you’re patching or fully replacing aging plumbing. Inspect old pipes for corrosion and decide whether you’re patching or fully replacing aging plumbing. This is also the right time to schedule water heater service to assess tank condition, sediment buildup, heating efficiency, and remaining lifespan.
First, understand where shut-off valves are and ensure they work. Replace old ones if necessary. Confirm main shut-off valve condition, fixture shut-off functionality, drain line integrity, vent stack adequacy, and water pressure levels.
Plan fixture placement carefully. Moving plumbing fixtures increases cost significantly in a home renovation plan. If possible, keep toilets and drains near original locations. Relocating toilets or main drain lines significantly increases labor and structural modifications.
Upgrade to pressure-balanced or thermostatic valves in showers. Plan cleanouts and access points for future maintenance.
Have a clear plan for temporary water shutoffs and drainage during the project. Ensure temporary water shutdowns are scheduled and communicated clearly if you are living in the home during renovation at home.
Proper plumbing preparation prevents leaks, pressure issues, and drainage failures after renovation is complete.
Managing Life During a Renovation at Home
This is where many homeowners underestimate reality.
Where will I cook?
Where will I shower?
Where will I store daily-use items?
Renovation is part construction, part logistics management. Living through renovation at home requires structure.
Define work hours and site access rules. Establish material staging areas and safe pathways through the home. Clarify daily cleanup expectations. Protect pets from noise and open doors. Dust control and noise management should be addressed in advance, especially if working remotely.
If renovating a kitchen, set up a temporary "mini kitchen" with a microwave, coffee maker, mini fridge, and basic dishwashing station. Establish a simplified food prep zone with essential appliances. If renovating bathrooms, confirm access to alternate facilities.
The smoother your daily routine runs during a home renovation, the less stressful the project feels. Maintaining predictable routines reduces stress and keeps renovation at home from disrupting work and family life more than necessary.
Final Checklist Before Your Home Renovation
Before demolition day in your home renovation:
Permits approved
Insurance verified (contractor liability + your home insurance)
Materials ordered and confirmed
Payment schedule documented
Written contract signed
Detailed scope defined
Timeline reviewed
Contingency budget set aside
Neighbors informed (if needed)
Photos taken of the current space (for reference and protection)
One more overlooked step in home renovation planning:
Walk the project with your contractor and confirm exactly what is not included in your home renovation plan. Misunderstandings usually happen around assumptions. Confirm details such as outlet placement, fixture heights, material transitions, final drawings, and measurements.
Clarity before demolition reduces disputes, delays, and expensive rework, and ensures your home renovation delivers the results you planned for.

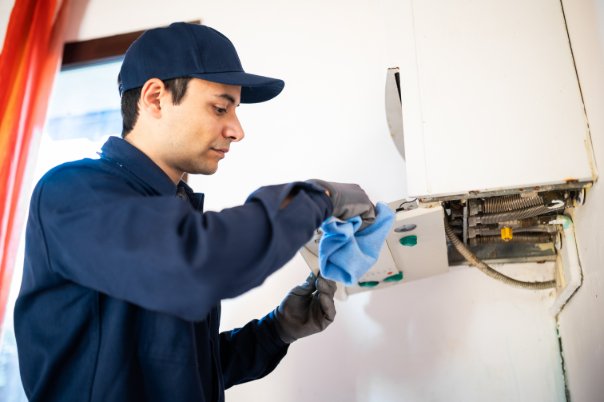
Why Professional Help Matters for HVAC Repair in Your Home
A reliable heating and cooling system is essential for comfort, safety, and energy efficiency. When something goes wrong, it can be tempting to troubleshoot the issue yourself, but HVAC systems are complex machines that require expert care. Understanding why professional help matters—and how to recognize when you need it—can save you time, money, and stress while keeping your home running smoothly.
A reliable heating and cooling system is essential for comfort, safety, and energy efficiency. When something goes wrong, it can be tempting to troubleshoot the issue yourself, but HVAC systems are complex machines that require expert care. Understanding why professional help matters—and how to recognize when you need it—can save you time, money, and stress while keeping your home running smoothly.
Spot HVAC Problems Early
Your HVAC system often gives early warning signs when something isn’t right. Strange noises—such as banging, rattling, or squealing—can indicate loose parts, failing motors, or airflow problems. Weak airflow or inconsistent temperatures throughout your home may signal clogged filters, duct issues, or a failing compressor. These symptoms rarely resolve on their own and often worsen over time.
Rising energy bills are another red flag. When your system struggles to heat or cool efficiently, it consumes more energy to compensate. A sudden spike in utility costs often means your HVAC system is working harder than it should, and a professional inspection can pinpoint the cause.
Even small issues can be symptoms of deeper mechanical problems. A minor leak, for example, may indicate a refrigerant issue, while a slight burning smell could point to electrical trouble. Addressing these concerns early with professionals, such as someone like A&K Service Inc, help prevents costly breakdowns and keeps your system operating safely.
Understand the Value of Professional Technicians
Professional HVAC technicians bring specialized training, certifications, and diagnostic tools that homeowners simply don’t have. Modern heating and cooling systems involve electrical components, refrigerant lines, sensors, and computerized controls. Without the right expertise, it’s easy to misdiagnose a problem or overlook a critical issue.
Safety is another major factor. HVAC repairs often involve electrical wiring, gas lines, and high‑pressure refrigerants. Professionals know how to handle these components safely and in compliance with local codes. Their work ensures your system operates efficiently without creating hazards in your home.
Expert repairs also protect your system’s warranty. Many manufacturers require that repairs and maintenance be performed by licensed technicians. Attempting DIY fixes can void your warranty and lead to expensive out‑of‑pocket costs later. By relying on trained professionals like those at Texas Ace Service - Heating & Air, you extend the lifespan of your system and maintain its warranty coverage.
Avoid Risks of DIY HVAC Repairs
While it’s fine to change air filters or clear debris from around your outdoor unit, most HVAC repairs should never be attempted without proper training. Electrical components pose shock and fire hazards if handled incorrectly. Refrigerant handling is regulated by law, requiring certification to ensure safe and environmentally responsible use.
Complex parts—such as compressors, heat exchangers, and blower motors—are intricate and expensive. Attempting to repair or replace them without expertise can cause further damage or create dangerous conditions. Even small mistakes, like using the wrong replacement part or reconnecting wiring incorrectly, can lead to system failure.
DIY repairs can also void warranties and increase long‑term costs. What seems like a simple fix may mask a deeper issue that only a professional can diagnose. In many cases, homeowners end up calling a technician anyway—after unintentionally making the problem worse.
See How Professionals Repair Your System
A professional service visit typically begins with a thorough inspection. Technicians evaluate your system’s components, test electrical connections, check refrigerant levels, and measure airflow. This comprehensive approach allows them to identify both the immediate issue and any underlying problems that could cause future breakdowns.
Once the diagnosis is complete, the technician explains the findings and recommends the best course of action. Sometimes a repair is sufficient; other times, replacement may be more cost‑effective, especially for older systems. Professionals help you weigh the pros and cons so you can make an informed decision.
During the repair process, technicians use specialized tools to ensure accuracy and safety. They verify that refrigerant levels are correct, airflow is balanced, and all components are functioning properly. Before leaving, they perform safety checks and test the system to confirm everything is operating as it should.
Choose a Qualified HVAC Expert
Selecting the right HVAC professional is essential for reliable service. Look for technicians who are licensed, certified, and experienced with your specific type of system. Reading reviews, asking for referrals, and checking credentials can help you find a trustworthy provider.
Before scheduling service, ask questions about pricing, warranties, and what the inspection includes. A reputable technician will be transparent and willing to explain their process. Many companies also offer maintenance plans, which provide regular tune‑ups and priority service. These plans help prevent breakdowns and keep your system running efficiently year‑round.
Gain Long‑Term Benefits From Professional Care
Professional HVAC care offers long‑lasting advantages. Regular maintenance and expert repairs improve energy efficiency, reducing your monthly utility bills. A well‑maintained system also lasts longer, saving you from premature replacement costs.
Consistent professional care enhances indoor air quality by ensuring proper filtration, ventilation, and humidity control. Most importantly, it keeps your home comfortable and safe, no matter the season.
Professional HVAC help is one of the smartest investments you can make in your home’s comfort and safety. By relying on trained technicians, you ensure your system receives the expert care it needs to run efficiently, avoid costly breakdowns, and maintain a healthy indoor environment. Building a relationship with a trusted HVAC provider gives you confidence through every season, knowing your heating and cooling systems are in capable hands.