

A resource for those seeking information on organizing and transforming spaces.

How To Keep Your Bathroom Spotlessly Clean
Have you ever found yourself staring at your dirty bathroom and wondering where to start? We’ll teach you how to keep your bathroom spotlessly clean.
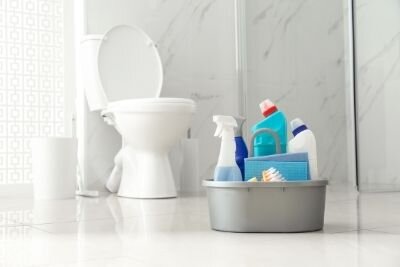
The bathroom is one of the oft-used rooms in your home that, somehow, gets dirty faster than all the others. Mere days after wiping everything down, you probably find yourself asking, “How did this sink get so grimy? I could have sworn I just cleaned it.” Cleaning a bathroom is certainly an ongoing job, but it’s a job that needs to be done and should be done well. To make your life a little easier, here are some tips for how to keep your bathroom spotlessly clean.
Clean Every Surface
In a bathroom, you must regularly wipe down basically every surface, including counters, mirrors, showers, and toilets. On most surfaces, like countertops and showers, a general bathroom cleaner and a soft cloth or disinfectant wipes will get the job done. For mirrors or glass shower doors, you’ll want to use a glass cleaner that won’t leave unattractive streaks. Scrub toilets with disinfectant toilet bowl cleaner and a toilet brush, then wipe down the outside with disinfectant wipes.
Tackle the Big Jobs
Inevitably, you’ll encounter a few bigger jobs while cleaning, like stubborn hard water deposits or mildew that has sneakily grown on the inside of your shower curtain. For these types of jobs, you’ll usually need something stronger than everyday bathroom cleaner—use either a heavy-duty bathroom cleaner specifically for that purpose or a solution that includes vinegar, which will break down tough stains.
Eradicate Excess Moisture
Have you ever noticed mold or mildew growing on your sinks, shower curtains, or even the walls of your bathroom? This is because bathrooms, especially full bathrooms with showers, notoriously accumulate tons of moisture. To get rid of excess moisture, turn on the exhaust fan in your bathroom every time you shower. That way, you won’t have to deal with getting rid of mold, mildew, or peeling wallpaper down the road.
Stay On Top Of Cleaning
Once you’ve done all that hard work to clean your bathroom, make sure you stay on top of cleaning it, so it actually stays clean. Now that you know how to keep your bathroom spotlessly clean, you should be able to do so easily! Make a cleaning schedule and perform smaller tasks, like wiping down surfaces and cleaning the toilet, regularly. Performing tasks like these daily or weekly will keep your bathroom cleaning from becoming a huge, day-long chore.

Guest Post - 10 Essential Products Every Home Needs in 2021
When it comes to your home, it’s important to consider form and function. Make sure that your house is filled with items that not only help you be productive but improve your overall health and wellbeing. You don’t need to undergo a major home improvement project to change up your space.

When it comes to your home, it’s important to consider form and function. Make sure that your house is filled with items that not only help you be productive but improve your overall health and wellbeing. You don’t need to undergo a major home improvement project to change up your space.
Here’s a list of the ten best products that your home needs in 2021.
1. Kitchen Knives
When was the last time you replaced your old kitchen knives with new, sharper ones? A dull knife can absolutely ruin your cooking and eating experiences, not to mention, duller knives take longer to cut and may actually shred your food instead of chopping or slicing it. Take a look at your current kitchen knives, from your steak knives to your cooking knives. While they may not be broken, consider whether or not they work as well as they used to.
While you can always sharpen your knives, you can’t completely return them to their former glory. Instead, look at the ways your kitchen has changed over time. Maybe you’ve gotten new cupboards or changed the color scheme. Replace your knives with new ones that match your kitchen’s aesthetic so that your knives look like they belong.
2. Robot Vacuum

The most famous brand of robot vacuums is Roomba®, but there are tons of other brands on the market. These robot vacuums can help keep your home dust-free and can be especially beneficial for homes with pets. While these vacuums aren’t as powerful as your traditional vacuum, they lessen the need to vacuum as often. They’re also not designed for serious messes, but they can offer you protection from dust and any crumbs that you might have let fall onto the floor.
3. Pet Feeder
If you have pets, a pet feeder can help you manage your dog or cat’s eating habits. There are tons of pet feeders and food dispensers available, and some you can even manage remotely, which means that you can feed Fido while you’re at work. These automatic feeders can help you ensure the health and wellness of your pet while you’re away from home.
You can also find pet treat dispensers that come with a built-in camera so that you can train your dog or cat while you’re on the go. You can also watch them through the camera when you miss them while you’re away.
4. A Solid Air Conditioner
We’ve been at home a lot more lately, and having a well-working AC unit to cool your home is pertinent, especially in the summer months. In order to decide what would be the best AC unit for your home, you’ll want to know the square footage of your house. That way you’ll be able to calculate the number of BTUs your space needs to cool down your home when it gets too hot outside.
5. Light Dimmer Switch
You don’t have to change out the lighting in your home to change its ambiance. Simple as can be, a light dimmer covers your light switch so that you can have dimmer control for smart lights. These can also be controlled via an app and prevents anyone from disabling your smart lights by accidentally flipping the switch out of habit.
6. A Better Bed and Quality Pillows
Your bed is essential for your sleep. Unfortunately, most of us don’t purchase new mattresses or pillows as often as we should, which can result in poor sleep quality and pain. A shoulder relief pillow can take the pressure off of your shoulder if you’re a side sleeper so that you can sleep more soundly at night and wake up with less pain.
Did you know? Your pillow can actually be a health hazard. Many people use the same pillow for decades without taking proper care of it. Dust, mold, and more can get trapped in your pillow without you realizing it, which can be a health hazard to you and your family. If you haven’t properly cleaned your pillow in a long time, do it ASAP. If you’ve never cleaned your pillow, it might be time to look for a new one that can improve your sleep and your health.
7. Security Cameras
Security cameras for your house connect to your Wi-Fi and are an affordable way to watch your home when you’re not there. You can even record images and videos of suspicious activity. These cameras also alert you of movement so that you know exactly when there is a suspicious person outside your home.
Wi-Fi enabled security cameras can be used indoors and outdoors so that you can have a clear view of your home. You can also use them to keep an eye on your pets!
8. Smart TV
Smart TVs are high resolution that improves the contrast of your television screen, making your television shows and movies come to life. They also offer benefits that other televisions cannot, such as voice control and access to a number of channels without the need for an antenna or cable service. Some smart TVs even provide web browsing and access to your stored media content.
9. A Laptop Table
Working from home or any place other than your office just got easier. With a laptop table, you can adjust the height of your laptop to make it easy to use just about anywhere. You can even use it on top of your home desk to make it a stand-up desk or in bed when you need additional comfort while you work. Laptop tables can improve your posture by allowing your back, arms, wrists, neck, and shoulders to align properly no matter where you choose to work.
10. An Elliptical (Or Other Exercise Equipment)
While some people enjoy going to the gym, others don’t have the time to drive to a new location for a workout. An elliptical can provide you with a total body workout without the need to leave your house. These machines are available at all different price points, so you can choose one that works for your space and budget. Not a fan of the elliptical? You can try a stationary bike that folds up to be stored away in a closet when not in use.
Author Bio

Matt Casadona has a Bachelor of Science in Business Administration, with a concentration in Marketing and a minor in Psychology. He is currently a contributing editor for 365 Business Tips. Matt is passionate about marketing and business strategy and enjoys the San Diego life, traveling and music.

Keeping Your Plants and Garden Clean and Healthy
Like anything else around your home, plants must be clean to look good and thrive. Here are some tips for keeping your plants and garden clean and healthy.

It’s time to think about getting back to the land—namely, the plants around your home. Plants grant a fresh, natural beauty to your home while providing plenty of fresh air. But while they seem independent, they need your help to look good and thrive. Give your indoor and outdoor plants a makeover! Here are tips for keeping your plants and garden clean and healthy.
Spring Cleaning! But Wait...
If you garden, you probably get the hankering to pull weeds, trim plants, and turn over the soil on the first pleasant day. Resist the urge. Hundreds of species of insects—including bees, caterpillars, ladybugs, and others—are hibernating in your garden’s soil and plants. Let the temperatures linger around the 50-degree mark for a week before you start digging and cutting. Give all those wonderful pollinators and pest-eating bugs a chance to wake up! When you start cutting, consider leaving the trimmings off to the side for a few days before disposal, just in case any are still napping. Hold off on mulching until the ground dries up a bit so as not to trap any bugs that can help your garden grow.
Clear the Way!
When it’s time to clean up, make sure you remove any leaves that have fallen into your garden. You should remove dry leaves in fall, of course, because they can collect, get damp, and permit the development of harmful plant diseases that can hurt new growth in the spring. Likewise, remove any winter mulch you laid down in the fall. Look at shrubs, bushes, and similar plants and inspect them for damage. Clip off the damaged parts to prevent insect infestation or disease. Pull all the dead annual plants, and trim away the dead parts of your perennials. Slip on your gloves, pull the weeds that are starting to pop up, and trim the edges of your garden against encroaching grass. It’s a tough job, but it all pays off at harvest time—plus the wet, post-melt soil makes it all easier to do.
Another way to prevent insect and pest manifestation from running over your plants is by using nets as protection or fence. This will also discourage birds from roosting too close and feeding on your plants or creating nests.
Indoor Plants
When keeping your plants and garden clean and healthy, don’t forget the ones inside. If you maintain an indoor garden through hydroponics, you already ensure your system is clean and runs efficiently, protecting your crops from disease and more (and if you don’t, you really should). However, it’s easy to overlook potted plants. After all, they’re like furniture—they’re beautiful but blend into the background. Even so, they need more than the occasional watering. Gently dust them with a soft-bristled brush or toothbrush, and wipe down larger leaves with a wet cloth. Handle them with care, and don’t use cleaners that can prevent the plants from breathing. Trim dead leaves and stems, and clear the pot of any dead matter that can attract insects and promote mold or mildew growth.

How to Resize a Photo for Print Without Losing Quality
A problem with modern amateur photography is that it is predominantly digital-based. Most camera phones of today by far outperform professional-level cameras of the past. Each year, the gap closes between camera phones and standalone cameras. However, most of the photos we take with our phones are designed to be posted on social media platforms and websites.

A problem with modern amateur photography is that it is predominantly digital-based. Most camera phones of today by far outperform professional-level cameras of the past. Each year, the gap closes between camera phones and standalone cameras. However, most of the photos we take with our phones are designed to be posted on social media platforms and websites.
When photos are taken from these sources, they can be difficult to print well while maintaining a high-quality image. For printing, the most critical factor is dots per inch (DPI). The higher the concentration of dots, the better quality your image will be. For high-quality printed photos, around 300 DPI is desirable. Quality ink or Canon toner cartridges can also help produce high-grade prints.
If you’re struggling to print a photo of adequate quality, you’re most likely encountering sizing issues. Fortunately, there are several ways to resize a photo for print without losing quality. The following guide takes you through the steps to achieve great-looking prints.
The Native Computer Editing Tool Technique
If DPI is the issue, your computer’s standard photo editing software should be sufficient to adjust the DPI. Here are the key steps:
Open the image file in preview mode.
Click on “Tools” on your menu bar.
In the dropdown, find “Adjust Size” and click on it. From here, you should be able to see different options for adjusting, such as “Width,” “Height” and “Resolution.”
Select “inches” for height and width. Choose “pixels/inch” for Resolution.
Ensure the “Resample Image” box is unchecked.
Set the Resolution to 300 pixels/inch or the highest possible number. The maximum width and height dimensions will adjust automatically.
When the image is resized to your desired dimensions, click “OK.”You can then save the file.
It is important to note that the aspect ratio doesn’t have to be perfect, as the image can be cropped easily.
Depending on the maximum DPI, you can experiment with different levels to determine how large you can make the image without losing quality. Find a balance between your desired size and quality before printing.
The Scanning Technique
Printing a smaller image at the highest possible DPI, and then scanning and printing, is a trick for enlarging a photo. This can be a highly effective way to maximize the size of a print while maintaining quality. However, it is dependent on the resolution of your scanner. A high-resolution scanner is capable of quadrupling the size of an image.
Similar to digital images, resizing with scanners comes down to DPI capabilities. Many regular scanners found in people’s homes can scan images at up to 1,200 DPI. This allows them to create quality images of much greater size than the original.
While many scanners are capable of 1,200 DPI scanning, they’re unlikely to be set to this number by default. You must first adjust the settings to 1,200 DPI. When you scan the file, you’ll have to alter the resolution of the digital file. This process is the same as the native computer editing method.
In addition to a high-quality scanner, it’s also important to have a printer with good native resolution. Otherwise, it won’t be capable of printing at high quality, regardless of the image size. Invest in good photo ink such as Canon ink cartridges for maximum quality.
For downsizing images, you never need to reduce the resolution.
Photoshop Method

If you have access to Adobe Photoshop, this is perhaps the best way to resize a photo or print. However, this software can be tricky to use, so you may want to familiarize yourself with it before attempting Photoshop editing. The following steps will help you to resize your photo exactly how you want to.
Resizing
Open your image in Photoshop.
Click the size dialogue box to bring up the “Width,” “Height” and “Resolution” options.
Set the resolution to 300 DPI, and then adjust the “Width” or “Height” to your desired size. Photoshop automatically adjusts to maintain the correct aspect ratio.
If enlarging the image reduces the DPI, you may have to upsample it to increase the quality.
Note that resizing an image will likely result in the file changing size. This is important if you have limited storage space and are editing multiple photos.
Upsampling
Upsampling involves increasing the quality (DPI) of the image manually. While all images have a maximum ceiling for quality, many photos can be upsampled effectively. Here are the key steps
Under the “Resolution” section in the dialogue box, tick the box next to “Resample.”
Enter your desired resolution. Ideally, this should be 300 DPI. However, you may be happier with a slightly lower quality print.
After upsampling, make sure to double-check the “Height” and “Width” settings in case there is an issue or automatic adjustment.
Interpolation
When an image is resampled, Photoshop adjusts the number of pixels. This is called interpolation. Multiple interpolation options can affect the end quality of the photo. The default automatic setting often gets the best-quality image, as Photoshop chooses what’s most suitable.
However, when enlarging images and upscaling the quality, the interpolation method called “Preserve Details 2.0” is the recommended setting, and it doesn’t get selected when interpolation is set to automatic. This setting is only available on Photoshop software from 2018 and onward.
Changing the Aspect Ratio
You may want to adjust the aspect ratio of your photo to fit a particular frame or space. This can be done through cropping:
Close the size dialogue box.
Select the “Crop Tool.”
In the “Options Bar,” enter your ideal aspect ratio into the “Width” and “Height” boxes.
Photoshop automatically reshapes the photo border, but you can resize it by dragging the outer handles of the image.
Save Your File
Once you have completed these steps, your photo or print is ready to save and print.
Create the Perfect Collage from Home
With the right software, printer and ink, you can create professional-level photos from home. Although it can take some tinkering, basic photo editing is relatively straightforward, allowing you to restore and resize your favorite memories.
It’s important to be realistic, however. Some old, grainy photos simply don’t have enough pixels to resize effectively. There must be a minimum resolution level for each photo to resize without losing quality.