

A resource for those seeking information on organizing and transforming spaces.

Different Ways To Keep Your Home Heated This Winter
The temperatures are beginning to fall, and the winter season is looming—here are some better, cheaper ways to keep your home heated this winter.

The summer has come to an end, and the cold weather of the fall and winter seasons is beginning to loom. This may come with some dread if your home isn’t properly outfitted with a heating system, or perhaps if its central heating system is outdated. To help you stay nice and warm, here are some different ways to keep your home heated this winter.
Refurbish Window Seals
Drafty doors and windows are typically problems in older homes because of the wear and tear that happens with time. Before the harsh cold of winter comes, use the fall season to re-caulk your windows and seal up any cracks in the doors to prevent heat from escaping your home and drafts from entering. Cranking up the thermostat to compensate for lost heat will cost you a lot more money and use up a lot more energy. Always start here when you’re considering the different ways to keep your home heated this winter.
Install Baseboard Heaters
Baseboard heaters are much safer, more effective, and cheaper than older central heating systems. Baseboard heaters are also much more subtle than radiators while still capable of evenly heating a room. They also use far less energy than other heating systems. They’re easy to maintain, too, typically only requiring you to remove the baseboard cover and clean the heater of dust once a year.
Install a Programmable Thermostat
Whatever system you’re using for heat, installing a programmable thermostat is another great way to keep your heating system much more energy efficient. This will allow you to preset temperatures for different times of the day so that you don’t have to worry about adjusting the temperature yourself. You’ll see a noticeable difference in your energy bills when your heating system isn’t operating at the same temperature around the clock.

4 Things to Think About When Rewiring Your House
When it comes to home renovations and upgrade, ensuring top-quality electrical work is never a concern to be taken lightly. From eliminating potential safety hazards to future-proofing your next home upgrade, you would do well to address the following concerns before you begin rewiring your home.
When it comes to home renovations and upgrade, ensuring top-quality electrical work is never a concern to be taken lightly. From eliminating potential safety hazards to future-proofing your next home upgrade, you would do well to address the following concerns before you begin rewiring your home.
Safety
Working with electricity can be extremely dangerous, especially for those who lack the proper tools or training. Handing the job over to a licensed and experienced professional can often be the best way to deal with the situation. Should you have any doubts or reservations about your ability to rewire your home, you would be wise to contact a professional.
Following that, the first thing you should do when it comes to electrical safety is turn the power off. Do not turn the power back on until you’re finished. After that, it’s a matter of making sure you have the correct tools for the specific job you’re undertaking and an understanding of what you’re trying to do. Deteriorated or fraying wires should warrant the most attention, as their state leaves live wires exposed. You should also be sure to not overload your fuse box, as this will automatically shut off the power.
Ensuring All Work Is up to Code
Work that fails to meet local building codes can lead to no end of problems. In addition to being a potential fire and safety hazard, substandard electrical work could damage appliances and electrical equipment or force you to deal with costly repairs and additional upgrades in order to correct the problem. Doing business with professionals who offer a full range of residential electrical services needed to complete your next home upgrade can provide you with superior results as well as peace of mind.
Using Quality Equipment and Electrical Components
Trying to save on costs by purchasing poor-quality wiring, fixtures, and other electrical components could end up being more costly in the long run. Working with equipment that may wear out prematurely or installing appliances and electrical devices that are unable to provide the features, performance, and level of dependability you require is a misstep that you may soon come to regret.
Planning for Future Upgrades and Home Renovations
Fixing up an older property or turning your existing residence into the home of your dreams can often be a long-term project. Spending a little extra time, effort, and expense to future-proof your next renovation can spare you the added costs and headaches of having to duplicate your work and efforts in the days ahead. Additional redundancy, a modular wiring scheme, or electrical components that can easily be built upon or added to should the need arise may be able to provide you with greater value.
Rewiring a home can be a crucial aspect of any home expansion, renovation, or modernization project. Careful planning, access to the full range of equipment and resources you may need, as well knowing which issues or concerns may benefit from a little extra attention can all help to ensure the work goes as smoothly as possible.

Tips for Picking the Right Tree for Your Yard
Trees are a beautiful and practical investment for any yard. But how do you know which one to pick? Consider our tips for picking the right tree for your yard.

One of the best ways to spruce up your landscape is to plant a tree. The trick is to find one that fits your space, will thrive in your climate, and suits your needs. Whether you want something decorative, something that provides your yard with much-needed shade, or something that produces fruit, you have a plethora of options. Start your search with our tips for picking the right tree for your yard.
Pick One That Suits Your Location
As with any plant, some trees grow best in specific regions. Pecan trees grow well in southern climates, while apple trees grow well in northern climates. When choosing a tree, make sure you check its USDA growing zone and ensure it’s compatible with yours.
In addition to climate, you want to consider the area in which the tree will grow. Some trees do better in sheltered areas, while others do better with full exposure, such as on a hilltop. Other trees, such as pecan trees, grow to be enormous and, therefore, need lots of space to thrive.
Determine Your Needs
Do you need your tree to provide privacy or shade a play space for the kids? Perhaps you’re looking for a tree that burns a bright yellow, orange, or red in the fall or flowers in the spring. Knowing what role you’d like your tree to play in your yard will help you choose the right tree for your space.
Consider Your Space
Trees can be messy. They can drop twigs, leaves, fruit, or seeds at any time—especially after a big storm. If you have small children, fruit-producing walnut trees can pose a hazard. They can also be frustrating when it comes time to mow the lawn. If you’re planting a tree or two around a pool, know that you’ll be raking out leaves and twigs all summer long. Also, you’ll need to ensure that you don’t plant your tree near powerlines.
Consider the Season
Last up on our tips for picking the right tree for your yard is the season in which you’re purchasing the tree. You can plant some trees late in the fall, while others you should wait until spring. Do some research on your tree of choice before making the investment—this way, you’ll plant your tree at the right time and set it up to thrive.
Tips for Better Hobby Organization and Storage
If you’re in need of some tips for better hobby organization and storage, this is the right place to be. Start organizing your craft room-slash-nook today!

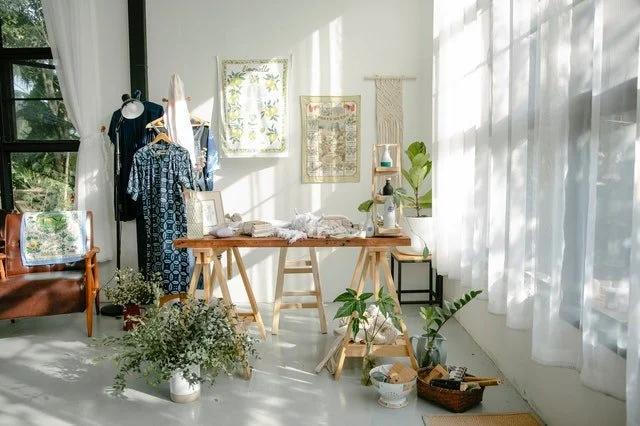
Gorgeous minimalistic craft room
In a world of full-blown technology addiction and lives structured around work rather than play, few things can be more fulfilling than a little hands-on crafting or a trip to nature. But any passionate crafter and hobbyist will tell you a hobby is far more than just a simple pastime. No matter what form it takes, hobbies can nurture our creative side, feed our soul, bring mindfulness into our lives, boost our overall health, and help us grow as a person. So, it's not hard to see why we deem our little craft nook or room a sacred place. That said, there's probably nothing that can crush creativity, motivation, and exhilaration quite as much as clutter and chaos in our personal sanctuary. If keeping your space neat is a bit of a problem area for you, like for many crafters, we give you some valuable tips for better hobby organization and storage.
Go back to square one
Do you wish to be completely thorough in organizing your hobby room? If yes, then clearing the space and starting from there may be the best approach. And by this, we don't mean just getting rid of your old materials, patterns you don't intend to complete, and leftover bits of projects. We're talking blank canvases, bare bones, and that sort of thing. Completely emptying the space allows you to look at the area through a fresh pair of eyes, which is vital for the following step.
Get building

Now that you've got everything out of the space, it's time to start planning the area and get building. If you're short on space, perhaps the most practical solution for better hobby organization and storage is to choose an empty wall to dedicate to shelving units. Shelves and cubbies can be customized according to your needs and the area's available space. It should give you plenty of space to store your tools, supplies, and other equipment in one place but also free up some floor space and the rest of the room for your actual work.
You can also opt for some hook and panel wall storage for holding all kinds of smaller items. For example, if you're designing a home gym, these work wonderfully for hanging jump ropes or resistance bands. Or, if you're setting up a sewing room, you can hang your pattern collection for display.
Other than wall storage, we've seen lots of crafters resort to a customized table or desk. The top serves as their primary workspace, whereas built-in storage drawers add the convenience of setting up the supplies right under the work surface, thus providing easy access to the most-used items.
Organize tools by craft
How do you categorize your tools and supplies when everything is crammed into random boxes or cluttering your work surface? Although a quick Google search will uncover a sea of organizing methods touted by expert crafters, organizing by craft, such as scrapbooking, painting, sewing, knitting, etc., is probably the most prevalent one. This allows crafters to whip out whatever they might need in one fell swoop. But, in the end, there is no one right way to do this. Perhaps the best thing you can do for yourself is store things in categories that make sense to you. Of course, you can always tweak your system later. So, if you want to do some experimenting with the categories, go for it.
Find everything a home

After you've gathered your tools and supplies and organized them by category, it's time to move on to the next step. Assigning a designated spot for everything may be one of the most important guidelines for effective hobby organization and storage.
While sorting the items for your current crafts, odds are your subcategories emerged as well. Now you know what you want to store. So, let this guide you as you head out to the local shop to purchase some storage solutions like Tupperware, baskets, and clear bins, as well as some organizers.
Then, start sorting the contents of each category into those smaller categories, placing your items into storage containers. For instance, if you're sorting out your knitting supplies, you would have categories like these: needles, yarn, patterns, notions, works in progress. Also, suppose you need to store and keep your camping equipment safe. Make sure to purchase bins in different sizes because you'll need bigger totes for things such as tents, chairs, hammocks, and other large camping gear. In contrast, you'd need smaller totes for items like water filters, first aid kits, and hammocks.
Don’t save things “just in case”
At this point, it's essential to include a little decluttering session. While in the sorting stage, keep a lookout for anything that no longer tickles your fancy. This could consist of supplies for the crafts or a craft you no longer do. Got it? Now kiss it goodbye. Throw it away, give it away, or sell it. Sure, it might feel painful at first, but once you've pared down to the essentials, you'll feel light as a feather – and your craft room organization will too.
Emphasize functionality and accessibility

You probably won't use your hobby area only for storing your supplies and equipment but for actual work. So, think about how your ideal space would look like, not only in terms of aesthetics but functionality as well. Consider what you might need to include in it to make it work for you. Here are some ideas:
Establish your central command area. A good rule is to establish an area where you get your crafting done. Doing so will help you avoid spreading your projects and supplies all over the house. A simple desk or table will work well.
Store frequently-used items in plain sight. Keep the containers and baskets of your frequently-used items close to your workspace and in plain sight. There are few things more frustrating than having to stop in the middle of your crafting process to look for that ever-elusive pair of scissors.
Use bins without lids. This way, you won’t find yourself stacking items on top of bins instead of opening them and putting items away. This is, of course, unless you plan on stacking bins on top of one another, which is necessary sometimes.
Think about portability. Creating kits of supplies for specific projects will make it easy for you to move from room to room, from inside to your backyard, as well as to leave the house for group projects and clubs.
Label everything. Labeling is a huge game-changer when it comes to organizing your hobby room or storage successfully. It makes both finding items and putting them away easy.
Leave extra space. Inevitably, craft supplies of any serious crafter grow exponentially over time. Regardless of how much of a minimalist you strive to be, it’s going to happen. So, do yourself a solid and remember to leave some extra space for those supplies heading your way.
Establish some ground rules for neatness
Congrats! You've successfully conquered the craft catastrophe that once was. From now on, you just have to make sure to keep it that way for more than a few hours. This may not be so easy, given you're using the space regularly, but it is crucial for better hobby organization and storage that remains in top shape. For starters, try setting a daily 5-minute tidy timer. The reason this method is so effective is that five minutes isn't at all long – so you'll stay motivated. Still, it's long enough for you to make a significant difference in your hobby room before the time is up. However, it's hardly a cure-all. So, you will need a better plan. True craft addicts might consider scheduling a deep-clean day once a week, whereas those who are only popping in the room once or twice a month could schedule it once a month.