

A resource for those seeking information on organizing and transforming spaces.
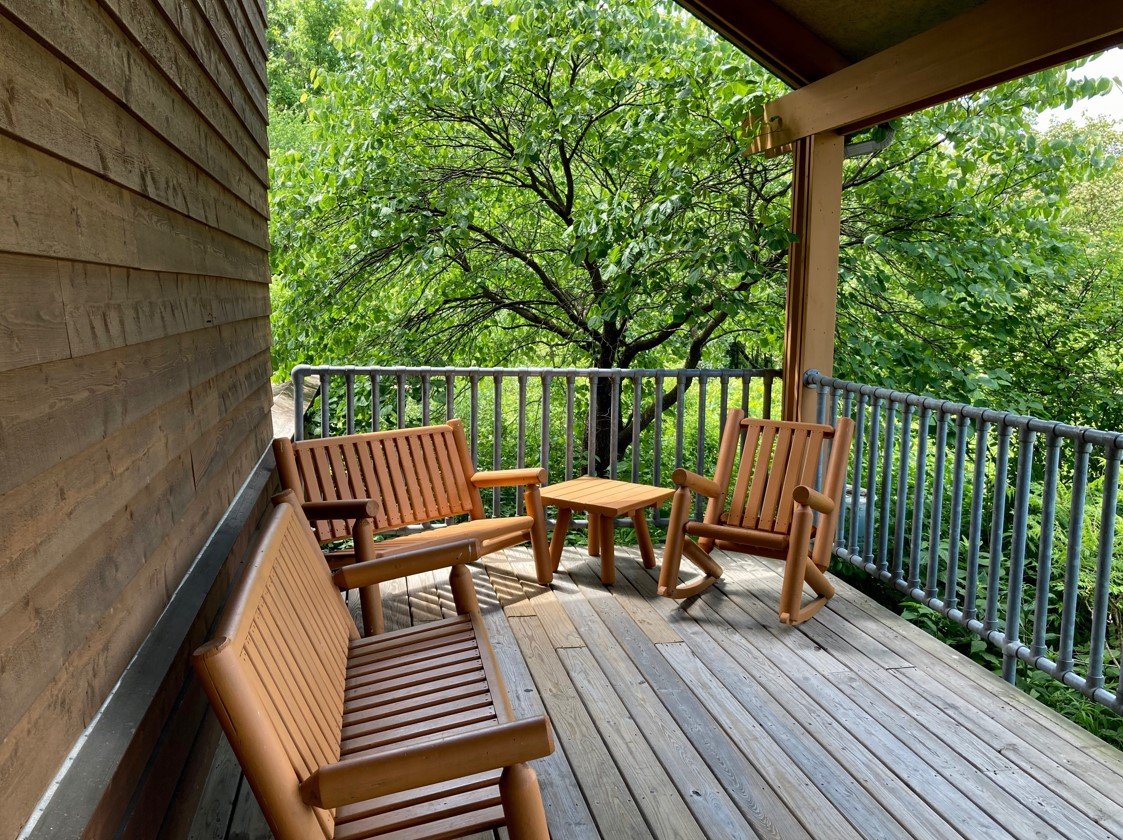
What Are the Standard Sizes and Gaps for Deck Railing?
Spring is a great time to tend to outdoor repairs and replacement of deteriorated portions of your home or building. This includes taking care of deck and balcony railings. If you are upgrading your railings or putting in a new deck with railings, you have many options. Railings can be constructed of wood, PVC, aluminum, steel, or composite material. Here is what you need to know about the sizes and spacings of railing components necessary for a safe and code-compliant barrier.
Spring is a great time to tend to outdoor repairs and replacement of deteriorated portions of your home or building. This includes taking care of deck and balcony railings. If you are upgrading your railings or putting in a new deck with railings, you have many options. Railings can be constructed of wood, PVC, aluminum, steel, or composite material. Here is what you need to know about the sizes and spacings of railing components necessary for a safe and code-compliant barrier.
Structural Posts
The integrity of the railing relies on the vertical posts that support the railing structure. You will need corner posts, as well as intermediate posts every few feet, normally spaced at 5 to 6 feet apart. These supports are quite often 4x4 square posts.
While the International building codes (IBC and IRC) are the gold standard for reference on the post and baluster spacing, check with your local building department for more stringent requirements. Local codes might also dictate the method you use to attach the posts to the deck. This could be post bases, different types of screws and bolts, and even post foundations, such as concrete footings. These ensure stability.
Top Rails
While many top rails and handrails are constructed of 2x4s that are cut on-site, there are packaged products where every component is already cut to size. These include easy assemble aluminum deck railing kits.
The top rails of decks need to be between 34 and 38 inches high minimum on decks that are anywhere from 18 to 30 or more inches above the surrounding grade below. This goes for the handrails of deck stairs as well. A good rule of thumb is 36 inches in height from the deck or stair tread nosing surface.
Balusters
Balusters are the thinner vertical posts that sit in between the top and bottom rails. These are designed to both support the rails and to provide a safety barrier between the deck and the grade below. Balusters are typically 2x2 inch square posts or 2-inch diameter dowels. However, they can be larger or smaller, depending on the material being used. For instance, wrought iron is often less than an inch in thickness.
The codes are clear that there cannot be a gap larger than 4 inches between each baluster. The inspiration for this number comes from the logistics of a small child not being able to fit between the balusters.
To prevent the balusters from being accidentally pushed out of place, they must be able to withstand the force of 50 pounds per square foot of area. Proper attachment with screws, nails, or bolts is essential to accomplish this.
Bottom Rails
The balusters are typically supported by the top and bottom rails. Though, balusters can also be connected directly to the deck structure. When using a bottom rail, the same rule applies to the balusters. The bottom rail can’t sit higher than 4 inches above the deck surface. Again, child safety is the guiding consideration. The bottom and top rails are commonly the same dimensions.
When choosing the appropriate railing system for your deck, it is important to pay close attention to the spacing of all the components and to the way the system is attached to the deck, and to adjoining components. The recommendations described here are excerpted from current building codes. Basically, the completed railing system must be able to support 200 pounds of pressure in all directions and provide a safe barrier, especially for children.

5 Updates to Your Patio for a More Open Feeling
Everyone wants to add a little extra space to their home or make the space they already have feel bigger, but sometimes it can be hard to know where to start when you have a small outdoor area in the front or back of your house. If you want to expand your patio so it feels more open and inviting, the right adjustments can make a big difference. Here are five ways you can expand your patio so it feels more open and inviting.
Everyone wants to add a little extra space to their home or make the space they already have feel bigger, but sometimes it can be hard to know where to start when you have a small outdoor area in the front or back of your house. If you want to expand your patio so it feels more open and inviting, the right adjustments can make a big difference. Here are five ways you can expand your patio so it feels more open and inviting.
Knock Down a Wall
If your patio feels too closed off, consider patio column removal or take down one of the exterior walls to create an open feel. This way, you’ll be able to have a more spacious patio and also create a breezier atmosphere on hot summer days. If you’re not comfortable removing any walls or think it would be too costly or difficult, look for alternative ways to increase airflow through your home to the patio.
Hang Paintings on the Walls
Hanging large paintings outdoors can help brighten your patio space and make it feel larger. Consider paintings that use colors like white, black, and blue to visually make the space seem grander than it is. If you don’t have any large paintings at home, there are many options available at thrift shops or home goods stores.
Hang Plants From the Ceiling
Plants help lower indoor temperatures, make our homes feel more alive, and are also an easy way to make your patio space seem bigger. Consider hanging plants from your patio ceiling to give it an open atmosphere while keeping your outdoor space stylish. Choose plants like long flowing ivies, strings of pearls, and pothos to make the distance between the floor and ceiling seem greater.
Add More Lighting
One of the most fundamental changes to make your patio feel more open is adding more lighting. The reason is simple: people like to feel like they're outdoors, but they also want the comfort of a well-lit room. When your space is dark, it's claustrophobic; when it's well-lit, you can relax and enjoy yourself in a safe and open area.
Consider using globe lights or candle lanterns instead of fluorescent tube lights to discourage bugs while keeping the patio well-lit. Outdoor LED bulbs are also an affordable way to turn any space into a welcoming place.
Incorporate Some Metal and Glass
Both metal and glass are transparent, making them the perfect material to use to give your patio an open, airy feel. Metal or glass can be used to make room dividers, tables, dining areas—basically any element of your patio. Make sure you stick with white or black metal for your pieces to protect them from the sun's rays and keep your furniture looking fresh.
If you’re looking for ways to make your patio feel homier, opening up the space is the way to do it. If your patio doesn’t feel as open as it could be, then it can discourage you from using it as much as you’d like, and make it harder to entertain guests. Keep this information in mind to make your patio feel bigger and more welcoming.

Things to Think About When Redesigning Your Deck
Your deck is an extension of your living space, providing you with an area where you can enjoy the outdoors. You can have a cookout, soak up some sun on a sunny day, or sip your morning coffee while the birds serenade you. If you feel that this important addition to your home can be improved, consider ways you can step up your deck with a new design.

Your deck is an extension of your living space, providing you with an area where you can enjoy the outdoors. You can have a cookout, soak up some sun on a sunny day, or sip your morning coffee while the birds serenade you. If you feel that this important addition to your home can be improved, consider ways you can step up your deck with a new design.
Keep It Simple
If you're not handy with tools or you don't want to do a structural makeover, small changes can go a long way. Try a new paint or stain that either complements your home or is a bold contrast. You can also dress up your deck with an outdoor rug. If your furniture is plain, try something that pops. Colorful cushions can breathe new life into the outdoor furniture you already have. Add a few potted plants or plant boxes to create your backyard oasis.
Add Railings or Posts
Many homeowners add a deck to their home that is slightly raised with only a few steps leading up to it. It looks more like a platform that may not truly accentuate the house. A simple addition of railings can take it to the next level. Aluminum deck railing kits can make your life easier. You can choose intricate patterns in wood if you feel like going over the top.
Transform Your Deck With a Pergola
Your deck can be so much more when you add a pergola overhead. Wooden columns are attached to your deck in order to support wooden beams that will stretch overhead in a roofing grid. You can drape outdoor lights or lanterns on your pergola, hang plants, or go wild with vinery from end to end.
Look at the Borders Surrounding Your Deck
If your deck is everything you could want, check out the surroundings. New paving stones, mulch, and a variety of plants can dress up your deck, creating a pleasing picture. If you only have a basic path leading to your deck, look at ways you can improve it. Shrubs and bushes can complete the package. Don't forget to check out the area between the bottom of your deck and the ground. Matching lattices can add a finishing touch.
Before you start your deck remodeling project, take a look at some of your options. Do an image search or talk to someone at your local home improvement store. Once you have a vision of all that your deck can be, you'll have a better chance of being happy with your results.

Guest post - The Most Common Patio Misting System Installation Mistakes
The patio misting system is proving to be one of the most effective and cost-efficient ways of staying cool outdoors.

The patio misting system is proving to be one of the most effective and cost-efficient ways of staying cool outdoors.
With the tiny water droplets that a standard misting system forces out of nozzles at very high pressure, anyone can spend their time on their patio without overheating, even during the hottest days and nights of the year.
If you’re planning to install a patio misting system for your home, it’s best to have a professional misting system technician do the job. It’s not uncommon for some homeowners to take the DIY route, but many make mistakes with the installation that their misting systems end up not working as well as expected.
Here are some of the most common patio misting system installation mistakes.
Choosing The Wrong Pump Size
Whether your patio misting system produces microdroplets of water, as it should, or a dripping mess out the end of its nozzles depends primarily on the pump you’re using.
It’s the pump that supplies the pressure to force water out of the very tiny holes of a misting system’s nozzles and produce the very fine mist that keeps everyone comfortable. Appropriately-sized pumps should be able to do the job.
Some homeowners, however, end up choosing a pump that’s too small for the job. It may be able to provide enough pressure for the nozzles nearest to it to produce the expected mist, but the farther nozzles will tend to just drip water and make a mess.
To ensure you have the right pump size and power for your misting system, it’s best to ask your provider about it.
Too Many Nozzles
A patio misting system pump is designed to perform optimally with a set number of nozzles.
However, many homeowners make the mistake of adding more nozzles, thinking it with help with distributing the mist over a larger area.
What happens when your patio misting system has one nozzle too many is that it messes up the required pressure to produce the mist that keeps people cool without getting soaked.
Each extra nozzle will take away some of that pressure, and the system will end up producing larger droplets that will get people and things wet.
If you want to add more nozzles to expand your misting system’s coverage area, make sure you get the right pump size for the number of nozzles you have in mind.
Forgoing The Filtering System
Most misting systems come with a filtration system, which is essential, especially if you live in an area where the taps run hard water.
If you skip the filter and the water coming out of your taps brings minerals like calcium and magnesium along, your patio misting system will eventually have problems.
The scale that hard water leaves behind as residue is bound to build up over time and eventually clog the tiny holes of your nozzles. Worse, scale buildup can also clog the pipes.
Forgoing the filter can eventually damage your misting system, and that’s why you should not skip this step if you have hard water coming out of your taps.
Failing To Tighten Joints
A misting system is essentially a plumbing system with pipes, elbows, nozzles, and joints, and water running through it.
As with a plumbing system, every single joint must be tightened to prevent water from escaping in places where they shouldn’t be.
However, with the sheer number of parts involved, many DIY installers tend to forget to tighten every single joint. The only time they realize that there are loose connections is when they turn the system on and see pressurized water blasting out of everywhere.
When installing your patio misting system, make it a point to double-check every single piece to ensure that all of them are securely fastened.
Nozzles Are Too Close Together
Some DIY misting system installers get creative with the spacing of the nozzles and put them too close together.
The problem with nozzles that are too close together is that the tiny water droplets they produce will likely collide, and they end up becoming large enough to make the people within its coverage area feel damp.
As much as possible, follow the manufacturer’s recommended spacing and distribution for the nozzles.
These are just some of the most common mistakes people make when installing their patio misting systems the DIY way. Avoid them when you finally decide to install one yourself and have a smoother and more enjoyable patio misting system experience.
About the Author
Anna Fox is the Content Marketing Strategist of Señor Mist, a Phoenix, Arizona-based company that provides high pressure misting systems/fog effects, comfort heaters, patio drop shades, hvls fans and more. When not writing, she makes use of her spare time reading books and hiking with her dog, Blaze.