

A resource for those seeking information on organizing and transforming spaces.

What to Do When Your Shower Drain Is Clogged
Nothing feels better than a hot shower after a long day of work. However, this personal relaxing time can be ruined if you have a clogged shower drain. Water builds up, and if it leaks over the curb, you may get water damage.
We partnered with a home maintenance company for this post. The opinions in the post are honest. All reviews and opinions expressed in this post are based on our personal views. We are excited because we know you will love it.

Nothing feels better than a hot shower after a long day of work. However, this personal relaxing time can be ruined if you have a clogged shower drain. Water builds up, and if it leaks over the curb, you may get water damage.
Usually, it is just a nuisance but aggravating. There are many reasons for this, including mineral build-up, dirt and debris, hair, soap scum, and grease
Whatever the reason for the blockage, the result is still the same: shower water not flowing down the drain. What can you do to correct the problem? There are several things you can do alone.
This is what to do when your shower drain is clogged.
Clean Out the Drain
This is a first-step solution that isn't too complicated, and if the clog is just below the drain cover, you should be able to access it with tweezers. If you can remove the cover, you will have better access. Then you can use something to scrape out and pull up what is down there.
It may be hair mixed with other debris, so once you get it out, throw it into the garbage instead of the toilet, or you might just move the blockage to another location.
Call a Plumber
Call your local plumber to get the job done when all else fails. Plumbers face these problems daily and have the right tools to do the job quickly. They will be able to get you back up and running in no time and offer some sage advice on preventing it again.
Try Plunging It
A plunger is designed to unclog drains and is the perfect tool for the job. There are, however, some concerns about using your toilet plunger as it may be covered in dangerous bacteria. If you can, use a dedicated plunger not for the toilet.
Plunging is pretty basic. You must form a tight seal over the drain so no air escapes. Then, plunge up and down to create force and suction. This breaks up a blockage and may let water drain out.
Boiling Water
Using boiling water is one of the best ways to clear a shower drain blockage. Usually, there will be a build-up of soap scum and hair, along with whatever else you allow to go down the drain.
Boiling water can melt it and loosen it up enough to wash down the drain pipes. You may have to do a few rounds of this, so get your biggest pots on the stove filled with water and try them out.
Baking Soda and Vinegar
These are two ingredients most people have around their house and, when combined, produce a powerful chemical reaction to eat away and clog. You can do this in two ways.
Pour a cup of baking soda down the drain if there is no standing water, and follow it up with a cup of vinegar. This will reach the clog and start breaking it down. You can also mix the two and pour it down the drain. Either way, it unclogs your drain powerfully.
Plumber's Snake
The next step is to bring out the big guns, and that is a plumber's snake. You can rent these at your local home improvement store or buy one if you think it is worth it. Then, tackle the clog yourself.
Remove the drain cover and feed the snake until you reach the blockage. Don't crank the device; it will work through the clog, breaking it down into small enough pieces to wash away.
Follow up with boiling water or run the hot water for 5 minutes to help. Make sure to clean the snake afterwards and return it if you are sure the problem is fixed.
Store-Bought Drain Cleaner
There are several brands of drain cleaners on the market, and these are very effective at clearing blockages in your drains. Be cautious when handling this chemical. Try not to breathe in the fumes.
Follow the package directions and see if this corrects the problem. If you have leftover cleaner, store it in a secure place where kids can't get it. You can also use it down the same drain or in the house.
This is what to do when your shower drain is clogged. Follow each step one after another, until you get it fixed, and then you will return to full shower operation again. And you may need another shower after all that effort and work!
5 Ways to Incorporate Sandstone into Small Urban Garden Designs
Learn eight creative ways to use sandstone in small urban gardens to boost your space with natural charm and timeless elegance.
We partnered with a home improvement company for this post. The opinions in the post are honest. All reviews and opinions expressed in this post are based on our personal views. We are excited because we know you will love it.
Your garden is like a little piece of paradise amidst the urban hustle. It's where you unwind, connect with nature, and let the stress melt away. So, why not make it even more special?
One way to make your garden design attractive is by adding sandstone into the mix. But how do you blend this natural beauty seamlessly into your small urban garden?
Fear not! We've got you covered with five genius ways to incorporate sandstone into your garden design.
5 Reasons Why You Should Incorporate Sandstone into Your Design
Natural Charm: Sandstone adds a touch of natural beauty to your garden, creating a warm and inviting atmosphere.
Versatility: It's incredibly versatile, allowing you to use it in various ways, from pathways and patios to garden borders and decorative features.
Durability: Sandstone is durable and weather-resistant, making it ideal for outdoor use. It can withstand the elements and retain its beauty for years to come.
Low Maintenance: Once installed, sandstone requires minimal upkeep, saving you time and effort in garden maintenance. You may contact sandstone repairs in Sydney for installation or restoration of your sandstone design.
Enhanced Aesthetics: Incorporating sandstone into your garden design can elevate the overall aesthetics, adding texture, color, and visual interest to your outdoor space.
5 Ways To Use Sandstone in Small Urban Garden Designs
Here are five ways to use sandstone in small urban garden designs:
1. Sandstone Pavers

Sandstone pavers are natural stone tiles cut from sedimentary rock formations. They often feature a rugged, textured surface with varying shades of beige, tan, brown, and gray, giving them a rustic and earthy appearance.
Sandstone pavers are available in various sizes and shapes, including square, rectangular, and irregular cuts, allowing for versatile design options in outdoor spaces.
Features:
Durability: Sandstone is known for its durability and resilience. It can withstand harsh weather conditions, heavy foot traffic, and exposure to UV rays without losing its color or texture.
Natural Beauty: Sandstone pavers showcase natural stone's unique patterns and colors, adding character and charm to any landscape design.
Easy Maintenance: Sandstone pavers require minimal maintenance to keep them looking their best.
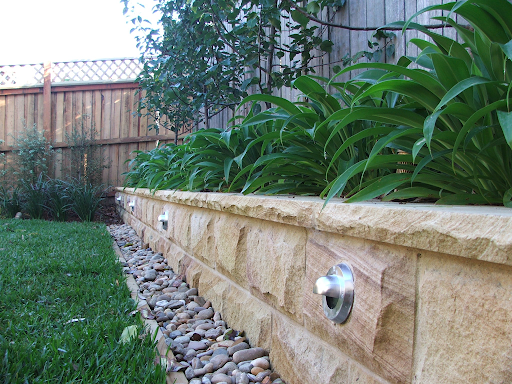
2. Sandstone Retaining Walls

Sandstone retaining walls are like sturdy barriers made of natural stone. They're often used in gardens or yards to hold back soil and create terraced levels. The cool thing about sandstone is its natural look – it adds a rustic vibe to any outdoor space.
Plus, it's tough and can handle the weight of soil without crumbling.
Features:
Natural Aesthetic: Sandstone retaining walls add a natural and rustic charm to outdoor spaces. The unique colors, textures, and patterns of the sandstone enhance the visual appeal of the landscape.
Durability: Sandstone is a durable material that can withstand the elements and the pressure exerted by soil.
Versatility: Sandstone retaining walls can be customized to fit various shapes, sizes, and terrains. They can be used to create terraced levels, define garden beds, or provide structural support in sloped areas.
Here are 4 key factors to consider when building a sandstone retaining wall:
Foundation Preparation: Make sure the ground is level and well-drained before starting. Good drainage prevents water from building up behind the wall and causing damage.
Material Selection: Pick durable sandstone blocks that fit your design and are suited for retaining wall construction. Choose colors and shapes that match your aesthetic while ensuring structural strength.
Wall Design and Construction: Plan the layout of the wall to support the slope of your land. Stack the blocks properly and use suitable techniques to ensure stability and longevity.
Professional Installation: Consider hiring experts to build the wall correctly. They'll ensure it's up to code, properly constructed, and able to withstand the test of time.
3. Sandstone Garden Edging

Sandstone garden edging is a cool way to give your garden beds a polished look. It's like adding a fancy frame to your favorite picture. Sandstone is a natural stone with different colors and textures, so it adds a touch of nature to your outdoor space. Plus, it's really sturdy, so it'll hold up against the elements and last a long time.
Here are four steps to build your own sandstone garden edging:
Plan Your Layout: Decide where you want your edging to go and mark it out with some chalk or string. You can make straight lines or curves, depending on the shape of your garden beds.
Prepare the Ground: Dig a shallow trench along the marked line, about the width and depth of your sandstone blocks. Make sure the trench is level and even.
Lay the Sandstone: Place the sandstone blocks or slabs along the trench, making sure they fit snugly together. You can stack them on top of each other for extra height or lay them side by side for a flat edge.
Secure the Edging: Backfill the trench with soil, packing it tightly around the sandstone to hold it in place. You can also use a rubber mallet to tap the blocks into position and ensure they're level. Then, water the soil to help settle it and hold the edging in place.
4. Sandstone Seating

Sandstone seating is like having nature's own benches in your backyard. It's made from natural sandstone, which gives it a rugged and rustic look that blends perfectly with outdoor settings. You can find sandstone benches in various shapes and sizes, from simple rectangular designs to more elaborate curved styles.
Whether you place them around a fire pit for cozy evenings or scatter them throughout your garden for quiet contemplation spots, sandstone seating adds both functionality and charm to your outdoor space.
5. Sandstone Planters

Sandstone planters are crafted from durable sandstone, which gives them a rugged and earthy vibe that perfectly complements outdoor spaces. They come in various shapes, sizes, and designs, allowing you to add a touch of rustic elegance to your garden beds, patios, or balconies.
Follow these three tips on building sandstone planters:
Choose the Right Size and Shape: When selecting sandstone blocks or slabs for your planters, consider the size and shape that best suits your space and planting needs.
Ensure Proper Drainage: To prevent water from pooling and causing root rot, it's crucial to incorporate drainage holes into your sandstone planters.
Secure the Planters: Once you've assembled your sandstone planters and filled them with soil and plants, ensure they are securely positioned in your desired location. Place them on a level surface and adjust as needed to ensure stability.
Conclusion
Sandstone offers versatile options for enhancing small urban gardens. Whether it's through pathways, borders, or decorative accents, incorporating sandstone adds natural charm and timeless elegance to outdoor spaces.
Experimenting with the five simple ideas we’ve listed above can transform even the tiniest urban gardens into beautiful and inviting retreats.

How to Downsize Your Home Before a Move
As the excitement of a new home looms on the horizon, the daunting task of downsizing can quickly become overwhelming. From sorting through years of accumulated belongings to deciding what stays and what goes, the process of downsizing before a move requires careful planning and organization.
We partnered with a home improvement company for this post. The opinions in the post are honest. All reviews and opinions expressed in this post are based on our personal views. We are excited because we know you will love it.
As the excitement of a new home looms on the horizon, the daunting task of downsizing can quickly become overwhelming. From sorting through years of accumulated belongings to deciding what stays and what goes, the process of downsizing before a move requires careful planning and organization.
In this blog post, we will explore practical tips and strategies to help you navigate the downsizing journey with ease. Whether you're moving to a smaller space or simply looking to declutter, we've got you covered.
The Importance of Downsizing Before a Move
Moving to a new home is an exciting time filled with new opportunities and fresh beginnings. However, before you embark on this adventure, it's crucial to understand the importance of downsizing. Downsizing refers to the process of reducing the number of belongings you own in order to fit into a smaller living space or simply to simplify your life.
Here, we will explore the reasons why downsizing is essential before a move.
Creating a Fresh Start: Shedding unnecessary possessions through downsizing allows for a clean slate in your new home, fostering a sense of renewal.
Streamlining Your Move: By significantly reducing the number of belongings before the move, downsizing efficiently streamlines the entire process, saving both time and money.
Maximizing Space and Efficiency: Downsizing enables the efficient use of space, providing ample room for better organization and arrangement of belongings in your new home.
Financial Benefits: Downsizing not only reduces moving costs and ongoing expenses but also potentially generates extra funds or tax deductions through the sale or donation of unneeded items.
Simplifying Your Life: By embracing minimalism via downsizing, you can liberate time and mental energy, allowing for a more focused and fulfilling life centered around what truly matters.
Eric Taylor, owner of Fort Mill Friendly Movers (fortmillmoving.com), says "In our experience at Fort Mill Friendly Movers, we've seen how downsizing before a move not only simplifies the process but also sets the stage for a smoother transition into a new home. It's about more than just fitting belongings into a smaller space; it's about embracing a fresh start and focusing on what truly matters in life."
Now, let’s delve into the practical steps of sorting and decluttering your belongings, helping you make informed decisions about what to keep and what to let go.
Sorting and Decluttering Your Belongings
Sorting and decluttering are key when downsizing before a move. It's about assessing what you own, and deciding what to keep, donate, sell, or toss.
Clutter affects our well-being by increasing stress and anxiety, and making it harder to focus and relax in our living spaces. By decluttering, you not only simplify your move but also create a more peaceful and organized new home.
Here's a guide to help you navigate this process efficiently and make informed choices about your belongings:
Supplies Needed for the Sorting Process
Before you begin sorting and decluttering, gather the following supplies:
Boxes and Bags: Use sturdy boxes or bags to separate items into categories, such as keep, donate, sell, or dispose.
Labels and Markers: Label the boxes or bags to clearly identify their contents and destination.
Sorting Tools: Keep a notepad and pen handy to jot down any important notes or reminders during the process.
Cleaning Supplies: Have cleaning supplies on hand to clean and freshen up items as you go through them.
The Process of Sorting and Decluttering
Now that you have the necessary supplies, let's dive into the process of sorting and decluttering:
Set Realistic Goals: Start by setting specific goals for each area or room you plan to declutter. This will help you stay focused and motivated throughout the process.
Take it One Area at a Time: Begin with one room or category at a time to avoid feeling overwhelmed. This could be a closet, kitchen, or even a specific type of item like clothing or books.
Create Sorting Categories: Use the boxes or bags to create separate categories for your belongings: keep, donate, sell, or dispose. As you evaluate each item, place it in the appropriate category.
Evaluate Each Item: When deciding whether to keep or let go of an item, ask yourself the following questions:
Do I use or wear this item regularly?
Does it hold sentimental value?
Can it be easily replaced if needed?
Consider Space Constraints: Keep in mind the limitations of your new home. If an item won't fit or doesn't serve a practical purpose in your new space, consider letting it go.
Handle Sentimental Items with Care: Sentimental items can be the most challenging to part with. If you're struggling to let go, consider taking photos or keeping a small memento that represents the memory instead.
Organize and Store Keep Items: Once you've sorted through all your belongings, organize the items you're keeping in a systematic and efficient manner. Use storage solutions such as bins, shelves, or organizers to maximize space and keep things tidy.
Dispose of Unwanted Items: Follow appropriate methods for disposing of items you no longer need. This could include donating to local charities, organizing a garage sale, or arranging for proper recycling or disposal of certain materials.
How to Adjust to a Smaller Living Space
Moving to a smaller living space can be a significant adjustment, but with the right mindset and strategies, you can make the most of your new home. This section will provide you with tips and techniques to help you adjust to a smaller space and create a comfortable and functional environment.
Tips for Living in a Smaller Space
Living in a smaller space requires creativity and efficient use of every inch. Consider the following tips to make the most of your new home:
Prioritize Your Essentials: Determine your essential items and prioritize them when arranging your new space. This includes furniture pieces, appliances, and other belongings you use on a regular basis.
Embrace Minimalism: Adopt a minimalist mindset and let go of unnecessary possessions. Focus on quality over quantity and surround yourself with items that bring you joy and serve a purpose.
Maximize Vertical Space: Utilize vertical space by installing shelves, hooks, or hanging organizers. This will help you free up valuable floor space and keep your belongings organized and easily accessible.
Invest in Multifunctional Furniture: Opt for furniture pieces that serve multiple purposes. For example, a sofa bed can provide seating during the day and transform into a comfortable bed at night.
Utilize Storage Solutions: Make use of storage solutions such as under-bed storage containers, hanging organizers, and storage ottomans. These can help you maximize storage space and keep your belongings tidy.
Arranging Furniture Efficiently
Careful planning is essential when arranging furniture in a smaller space to guarantee functionality and flow. Consider the following tips when arranging your furniture:
Measure and Plan: Measure the dimensions of your new space and sketch a floor plan. This will help you visualize how your furniture will fit and allow you to plan the best layout.
Create Zones: Divide your space into zones based on function. For example, designate areas for sleeping, dining, working, and lounging. This will help you create a sense of organization and make the most of your limited space.
Optimize Traffic Flow: Arrange furniture in a way that allows for easy movement and flow within the space. Avoid blocking walkways or creating obstacles that hinder movement.
Use Light Colors and Mirrors: Light-colored walls and furniture can create an illusion of a larger space. Additionally, strategically placed mirrors can help reflect light and create a sense of openness.
Maximizing Storage in Your New Home
Effective storage solutions are key to making the most of a smaller living space. Here are some simple storage tips to consider:
Utilize Vertical Storage: Install shelving units or wall-mounted organizers to take advantage of vertical space for storing books, decor, and other items.
Opt for Furniture with Built-in Storage: Choose furniture pieces, such as beds or coffee tables, that have built-in storage compartments. These provide hidden storage space for items you don't use every day.
Utilize Under-bed Storage: Use storage containers or bins to store items underneath your bed. This is a great way to maximize space and keep items out of sight.
Organize Closets and Cabinets: Make use of closet organizers, hanging shelves, and stackable bins to maximize storage space within closets and cabinets. Keep similar items together and use labels to easily locate things.
Consider Off-site Storage: If you have items that you don't use frequently but don't want to part with, consider renting a storage unit for long-term storage. This can free up valuable space in your new home.
You can adapt to a smaller living space and create a comfortable, functional environment that suits your needs by putting these tips and strategies into action. Embrace the chance to live with less and enjoy the benefits of a simpler, more organized lifestyle.
We hope this comprehensive guide has provided you with valuable insights and practical steps to make your move a success.

Setting Up a Functional Home Office in DC: Organization Tips for Remote Work
Set up a functional home office in DC with these unique organization tips for remote work. Boost productivity and efficiency in your workspace
The importance of a well-organized home office for remote work cannot be overstated. As remote work becomes a permanent fixture for many, creating an efficient workspace at home is essential for productivity and mental well-being. Setting up a home office in DC comes with its unique challenges, such as limited space and urban distractions. Uncover some practical and unique tips to help you set up a functional home office, ensuring your workspace is efficient and inspiring.
Assess Your Space
First and foremost, assess your available space for the home office in DC. Measuring your space accurately is essential to avoid clutter and make the most of every inch. Identify areas in your home that can serve multiple functions, such as a corner of your living room or a section of your bedroom. Natural light is a great asset, so consider spaces near windows. Maximizing your space is essential in a city like DC, where space is at a premium. Utilize vertical space with shelves and consider multifunctional furniture to keep your workspace efficient and tidy.
Choosing the Right Furniture
Comfort and functionality should be at the forefront of your furniture choices. An ergonomic chair is indispensable for long work hours, providing necessary support and preventing back pain. Choose a desk that fits your space and style, ensuring it’s large enough to hold all your essentials without overcrowding. Storage solutions, such as filing cabinets or under-desk drawers, are key to avoiding clutter. Multi-purpose furniture, like desks with built-in shelves, can help you make the most of your space without compromising on style or functionality.
Movers: Simplifying the Process

When setting up a home office in DC, movers can be incredibly helpful. Look for movers with long tradition and experience that comes with it. Movers like A2B Moving and Storage DC are highly recommended for their efficiency and reliability when it comes to commercial moving. With 2400+ clients a month, they are well-versed in helping you transport and set up your office furniture and equipment, saving you time and hassle. Their professional services ensure that your belongings are handled with care, making the transition to your new workspace without trouble.
Creating an Optimal Work Environment
Good lighting is vital for productivity and eye health. Natural light is the best option, as it reduces eye strain and boosts mood. Position your desk near a window to take advantage of daylight. If natural light is limited, supplement with artificial lighting. Use a combination of overhead lights, desk lamps, and ambient lighting to create a well-lit environment. Smart lighting solutions, such as adjustable LED lights, can be customized to your needs, providing bright light during work hours and softer light as you wind down.
Ensuring Seamless Connectivity

A reliable tech setup is the backbone of a functional home office. Essential tech tools for remote work include a high-quality computer, a reliable internet connection, and peripherals like a printer or scanner. Setting up a reliable internet connection is important; consider upgrading your router or opting for a wired connection to ensure stability. Cable management is often overlooked but is essential for keeping your desk tidy. Use cable organizers or clips to keep wires from tangling. Having backup solutions for power outages, such as a UPS (Uninterruptible Power Supply), can save you from losing work during unexpected disruptions.
Organizational Hacks
Keeping your workspace organized is key to maintaining productivity. Organizing your home office in DC with organizers and storage containers helps keep everything in its place and prevents clutter. Digital organization tools and apps, such as Trello or Asana, can help manage tasks and deadlines efficiently. Declutter your workspace regularly to keep it fresh and inviting. Schedule weekly or monthly decluttering sessions to maintain order. Simple tips like having a designated spot for everything and using labels can make a big difference in maintaining an organized workspace.
Creating Work Zones
Creating distinct work zones within your home office can enhance focus and efficiency. Dividing your space into different work zones, such as a primary workspace, a reading nook, or a brainstorming area, can help you stay organized and focused. A designated work area is important to maintain boundaries between work and personal life. Ideas for separating work and relaxation spaces include using room dividers or setting up your desk in a corner away from the main living area. This is important for your home office as the separation of your job and personal life needs to be clear.
Clear boundaries between work and personal life can help reduce stress and increase productivity. It might require you to plan your packing and relocation carefully. Separate the items you need for work from personal belongings. If you have a lot of heavy furniture to move around or items that are in the way and would be better off in a storage unit, using apartment movers in DC can come in handy as they can move and relocate all this for you. They will make setting up your home office and living area much easier. This will ensure that your furniture and equipment are safely transported and arranged.
Ensuring a Quiet and Productive Environment

Managing noise is essential for maintaining a productive work environment, especially in a bustling city like DC. Dealing with noise in an urban setting can be challenging, but soundproofing tips can help create a quieter workspace. Use soundproof curtains, rugs, or acoustic panels to reduce noise. White noise machines can also be beneficial in masking background sounds. A quiet space is essential for concentration and can significantly improve your work quality and focus.
Personalizing Your Space
Personalizing your workspace can significantly boost your motivation and comfort. Adding personal touches, such as family photos, artwork, or mementos, makes your workspace inviting and uniquely yours. Choose inspiring artwork or decor that reflects your personality and motivates you. Incorporating plants can enhance your workspace; they add a touch of nature, improve air quality, and reduce stress. Creating a comfortable and personalized space can enhance your productivity and make work more enjoyable.
Creating an Eco-Friendly Home Office in DC
Creating a sustainable home office is good for the environment and can be more cost-effective in the long run. Choosing sustainable furniture and supplies can reduce your environmental impact and support eco-friendly practices. Look for furniture made from recycled materials or those certified by environmental standards. Energy-efficient lighting options like LED bulbs can lower your energy consumption. Reducing waste by opting for digital documents instead of paper and recycling whenever possible are simple steps to make your home office greener. A sustainable home office is beneficial for both you and the planet.
Summary
Setting up a functional home office in DC involves careful planning and thoughtful organization of your living area. Each step is important for creating an efficient and inspiring environment, from assessing your space and choosing the right furniture to managing sound and personalizing your workspace. Through implementing these tips, you can create a home office in DC that boosts productivity and enhances your remote work experience. Remember to regularly assess and adjust your setup to meet your evolving needs, ensuring your workspace remains a place where you can thrive professionally.