

A resource for those seeking information on organizing and transforming spaces.

What to Do If Your Hardwood Floors Start Showing Wear and Tear
Hardwood floors add timeless elegance and warmth to any home, but over time, they can start to show signs of wear and tear. Whether it's from daily foot traffic, shifting furniture, or general ageing, even the most durable hardwood floors can begin to lose their lustre. Fortunately, there are plenty of steps you can take to restore the beauty of your floors and protect them from further damage.
We partnered with a home improvement company for this post. The opinions in the post are honest. All reviews and opinions expressed in this post are based on our personal views. We are excited because we know you will love it.

Hardwood floors add timeless elegance and warmth to any home, but over time, they can start to show signs of wear and tear. Whether it's from daily foot traffic, shifting furniture, or general ageing, even the most durable hardwood floors can begin to lose their lustre. Fortunately, there are plenty of steps you can take to restore the beauty of your floors and protect them from further damage.
In this guide, we’ll explore what to do when your hardwood floors start showing wear and tear, offering practical solutions to address common issues and preserve the longevity of your flooring.
1. Assess the Type and Extent of Damage
Before deciding on the best course of action, it’s essential to assess the type and extent of the wear and tear on your floors. Are there just a few scratches or scuffs, or are there deeper gouges, discolouration, or water damage? Is the wear limited to one area, or is it spread throughout the room?
For example, French oak floors may show subtle wear differently than other types of hardwood, with their grain patterns hiding some imperfections. On the other hand, highly polished floors may highlight every scratch. Assessing the damage will help you determine whether a minor touch-up, a more extensive repair, or a full refinishing job is necessary.
2. Dealing with Minor Scratches and Scuffs
For minor surface scratches and scuffs, you may not need to take drastic measures. If the wear is light and hasn’t penetrated the finish, you can often fix the issue with a few easy steps. Here are a few solutions to try:
Use a Hardwood Floor Cleaner: Start by thoroughly cleaning the area using a cleaner designed for hardwood floors. This can remove dirt and grime, making scratches less noticeable.
Apply a Wood Floor Polish: Wood floor polishes can restore shine and fill in shallow scratches. Be sure to choose a product that’s suitable for your specific type of finish and follow the manufacturer’s instructions for application.
Touch-Up Markers or Wax Sticks: For more visible scratches, you can use touch-up markers or wax sticks that are colour-matched to your floor. These are inexpensive and can effectively hide scratches by blending them into the surrounding wood.
These minor repairs can make a significant difference in the overall appearance of your floors, especially in high-traffic areas that see the most wear.
3. Fixing Deeper Scratches and Gouges
Deeper scratches and gouges require a bit more effort to repair. While surface-level fixes may not be enough, there are still ways to address these issues without resorting to a full refinish.
Sanding and Spot Refinishing: If the scratch or gouge is deeper than the surface finish, you may need to lightly sand the affected area and apply a new coat of finish. Use fine-grit sandpaper to gently sand the damaged spot, taking care not to over-sand or damage the surrounding floor. After sanding, clean the area thoroughly and apply a matching finish, whether it’s polyurethane or oil-based, to blend the repair with the rest of the floor.
Wood Filler for Large Gouges: For larger gouges, you may need to use wood filler to fill in the damaged area. Choose a wood filler that matches the colour of your hardwood floors, apply it to the gouge, and smooth it out with a putty knife. Once it dries, lightly sand the area and apply a finish to seal the repair.
By addressing deeper scratches promptly, you can prevent further damage and maintain the structural integrity of your hardwood floors.
4. Addressing Discolouration and Fading
Over time, hardwood floors can become discoloured due to sunlight exposure, water damage, or even general ageing. Fading can leave certain areas of the floor looking dull or uneven compared to the rest of the room. Here’s what you can do to address these issues:
Move Furniture and Rugs Regularly: Sunlight can cause floors to fade unevenly, especially in areas where furniture or rugs have remained in the same spot for extended periods. To prevent this, try rearranging your furniture or rotating rugs to expose different parts of the floor to sunlight. You can also install UV-blocking window treatments to minimise fading.
Buffing and Recoating: If your floors have lost their shine or have areas of discolouration, buffing and recoating may be a good solution. This process involves lightly sanding the top layer of the finish and applying a new coat of polyurethane or other floor sealants. It’s less invasive than a full refinish and can restore the colour and sheen of your floors without removing the entire finish.
Staining to Restore Colour: If the discolouration is more severe, you might need to sand down the entire floor and apply a new stain. This is a more involved process, but it can completely transform the look of your floors and breathe new life into faded or discoloured areas.
5. Tackling Water Damage
Water is one of the biggest enemies of hardwood floors. If your floors have been exposed to excessive moisture, you may notice warping, cupping, or staining. It’s essential to address water damage as soon as possible to prevent further deterioration.
Dry the Area Thoroughly: If you catch water damage early, your first step should be to dry the affected area as quickly as possible. Use fans or a dehumidifier to remove moisture from the wood and prevent further warping.
Sanding and Refinishing Water-Damaged Sections: For minor water damage, sanding and refinishing the affected area may be enough to restore the floor. However, if the damage is more extensive, such as significant warping or buckling, you may need to replace individual floorboards or even sections of the floor.
Prevent Future Water Damage: To avoid future water damage, make sure your home is properly ventilated, especially in areas like kitchens, bathrooms, or entryways where water exposure is more common. Clean up spills promptly and use rugs or mats in high-risk areas.
6. When to Consider Full Refinishing
If your hardwood floors have extensive wear and tear that can’t be addressed through spot repairs or buffing, it may be time to consider a full refinishing job. Refinishing involves sanding down the entire surface of the floor to remove the old finish and imperfections, then applying a fresh coat of stain and sealant.
Refinishing can restore even severely worn floors to their original beauty, but it’s a more time-consuming and costly process. The good news is that solid hardwood floors can be refinished multiple times throughout their lifespan, making it a long-term investment in maintaining your home’s aesthetics.
7. Preventing Future Wear and Tear
Once you’ve addressed the current wear and tear on your hardwood floors, it’s essential to take steps to prevent future damage. Here are a few tips to keep your floors looking their best:
Use Protective Mats: Place mats at entryways to trap dirt and moisture before they reach your floors. In high-traffic areas, consider using runners or area rugs to protect the floor from excessive wear.
Regular Cleaning: Sweep, vacuum, or dry mop your floors regularly to remove dirt and debris that can cause scratches. Avoid using harsh chemicals or excessive water when cleaning hardwood floors.
Maintain Proper Humidity Levels: Wood expands and contracts with changes in humidity, so maintaining a consistent humidity level in your home can prevent warping and cracking.
Final Thoughts
Hardwood floors are a beautiful and valuable feature in any home, but they require care and attention to stay in top condition. Whether you’re dealing with minor scratches, discolouration, or more significant damage, there are solutions to restore and protect your floors for years to come. From simple touch-ups to full refinishing, taking the right steps at the right time can help you preserve the natural beauty of your hardwood flooring. With a little effort, your french oak floors or any other hardwood type can remain a stunning feature in your home, providing warmth and elegance for generations.

Moving into an Old Home? Focus on These Replacement Essentials
Are you in the process of moving into an old home? Congratulations on your new place! While there's no denying the charm and character that comes with an older house, you need to keep in mind that some aspects may need a little extra attention. In this guide, we'll go over some essential replacements to focus on to ensure your new home is safe, functional, and ready for you to make lasting memories. So let's dive in and get you settled.
Are you in the process of moving into an old home? Congratulations on your new place! While there's no denying the charm and character that comes with an older house, you need to keep in mind that some aspects may need a little extra attention. In this guide, we'll go over some essential replacements to focus on to ensure your new home is safe, functional, and ready for you to make lasting memories. So let's dive in and get you settled.
Electrical Wiring
One of the most crucial aspects to consider in an old home is the electrical wiring. Many older houses may still have outdated wiring that can pose a safety hazard. If you're unsure if your home's electrical wiring needs an update, there are a few things to look for. Frequent power outages or tripped circuit breakers can be indicators of outdated or overloaded wiring.
You may also notice flickering lights, sparks when plugging in appliances, or hot outlets—all signs that the wiring may not be able to handle your household's electricity needs. It's always better to err on the side of caution and have a professional inspect and update the wiring as needed. Be sure to have a licensed electrician inspect the wiring and make any necessary updates or replacements. This will not only ensure your safety but also prevent potentially costly damage caused by faulty wiring.
Plumbing Systems
Another essential aspect to focus on is the plumbing system. Older homes may have pipes made from materials that are no longer considered safe, such as lead or galvanized steel. These pipes can corrode over time, causing leaks and water damage. You'll want to have a plumber inspect the plumbing and replace any outdated pipes to prevent future issues.
If your plumbing system needs to be redone, it's best to have a professional plumber handle the job. They will be able to assess the current plumbing and make recommendations for replacements or repairs. It's also a good idea to consider updating fixtures and appliances, such as toilets, sinks, and water heaters, for more efficient and modern options. This may seem like a significant expense at first but can save you money by preventing potential water damage or high utility bills later on.
Roofing
The roof is your first line of defense against the elements, and it's essential to ensure that it's in good condition. As a home ages, the roof may need replacing due to wear and tear or damage from harsh weather. A thorough inspection by a professional roofer, such as someone at Siefken Contracting, can help identify any potential issues and allow for timely repairs or replacements.
The duration of a re-roofing project can vary depending on the size and complexity of the roof, as well as any unexpected issues that may arise. Generally, it can take anywhere from a few days to a week or more to complete. It's essential to discuss timelines with your contractor before starting the project so you can plan accordingly.
Windows and Doors
Windows and doors are another critical aspect of an old home that may need attention. Over time, window frames can become warped or damaged, causing drafts and energy inefficiency. Similarly, older doors may not provide proper insulation, leading to higher energy bills.
Replacing these with newer, energy-efficient options can greatly improve the comfort and functionality of your home. A professional window and door company can help sort things out. They will have the expertise and experience to properly measure, install, and seal the new windows and doors for optimal performance. Additionally, they can help you choose the right type of windows and doors for your specific needs, such as energy efficiency or historical preservation.
Insulation
Proper insulation is essential for regulating the temperature in your home and reducing energy costs. Older homes may have inadequate or outdated insulation, resulting in uncomfortable living conditions and high utility bills. Consider having a professional assess the insulation in your new home and make any necessary updates or replacements.
The time it takes to redo insulation will depend on the size and complexity of your home, as well as the type of insulation being used. However, on average, it can take anywhere from a few days to a couple of weeks. This includes removing old insulation, preparing the space for new insulation, and installing the material. Do your best to be patient during this process and prioritize properly insulating your home for long-term comfort and savings.
Moving into an old home can be a wonderful experience filled with character and history. However, it's important to prioritize the replacement of certain essentials to ensure safety, functionality, and efficiency in your new space. By focusing on these key areas such as electrical wiring, plumbing systems, roofing, windows and doors, and insulation, you can make your new home feel like a safe and comfortable haven for years to come.
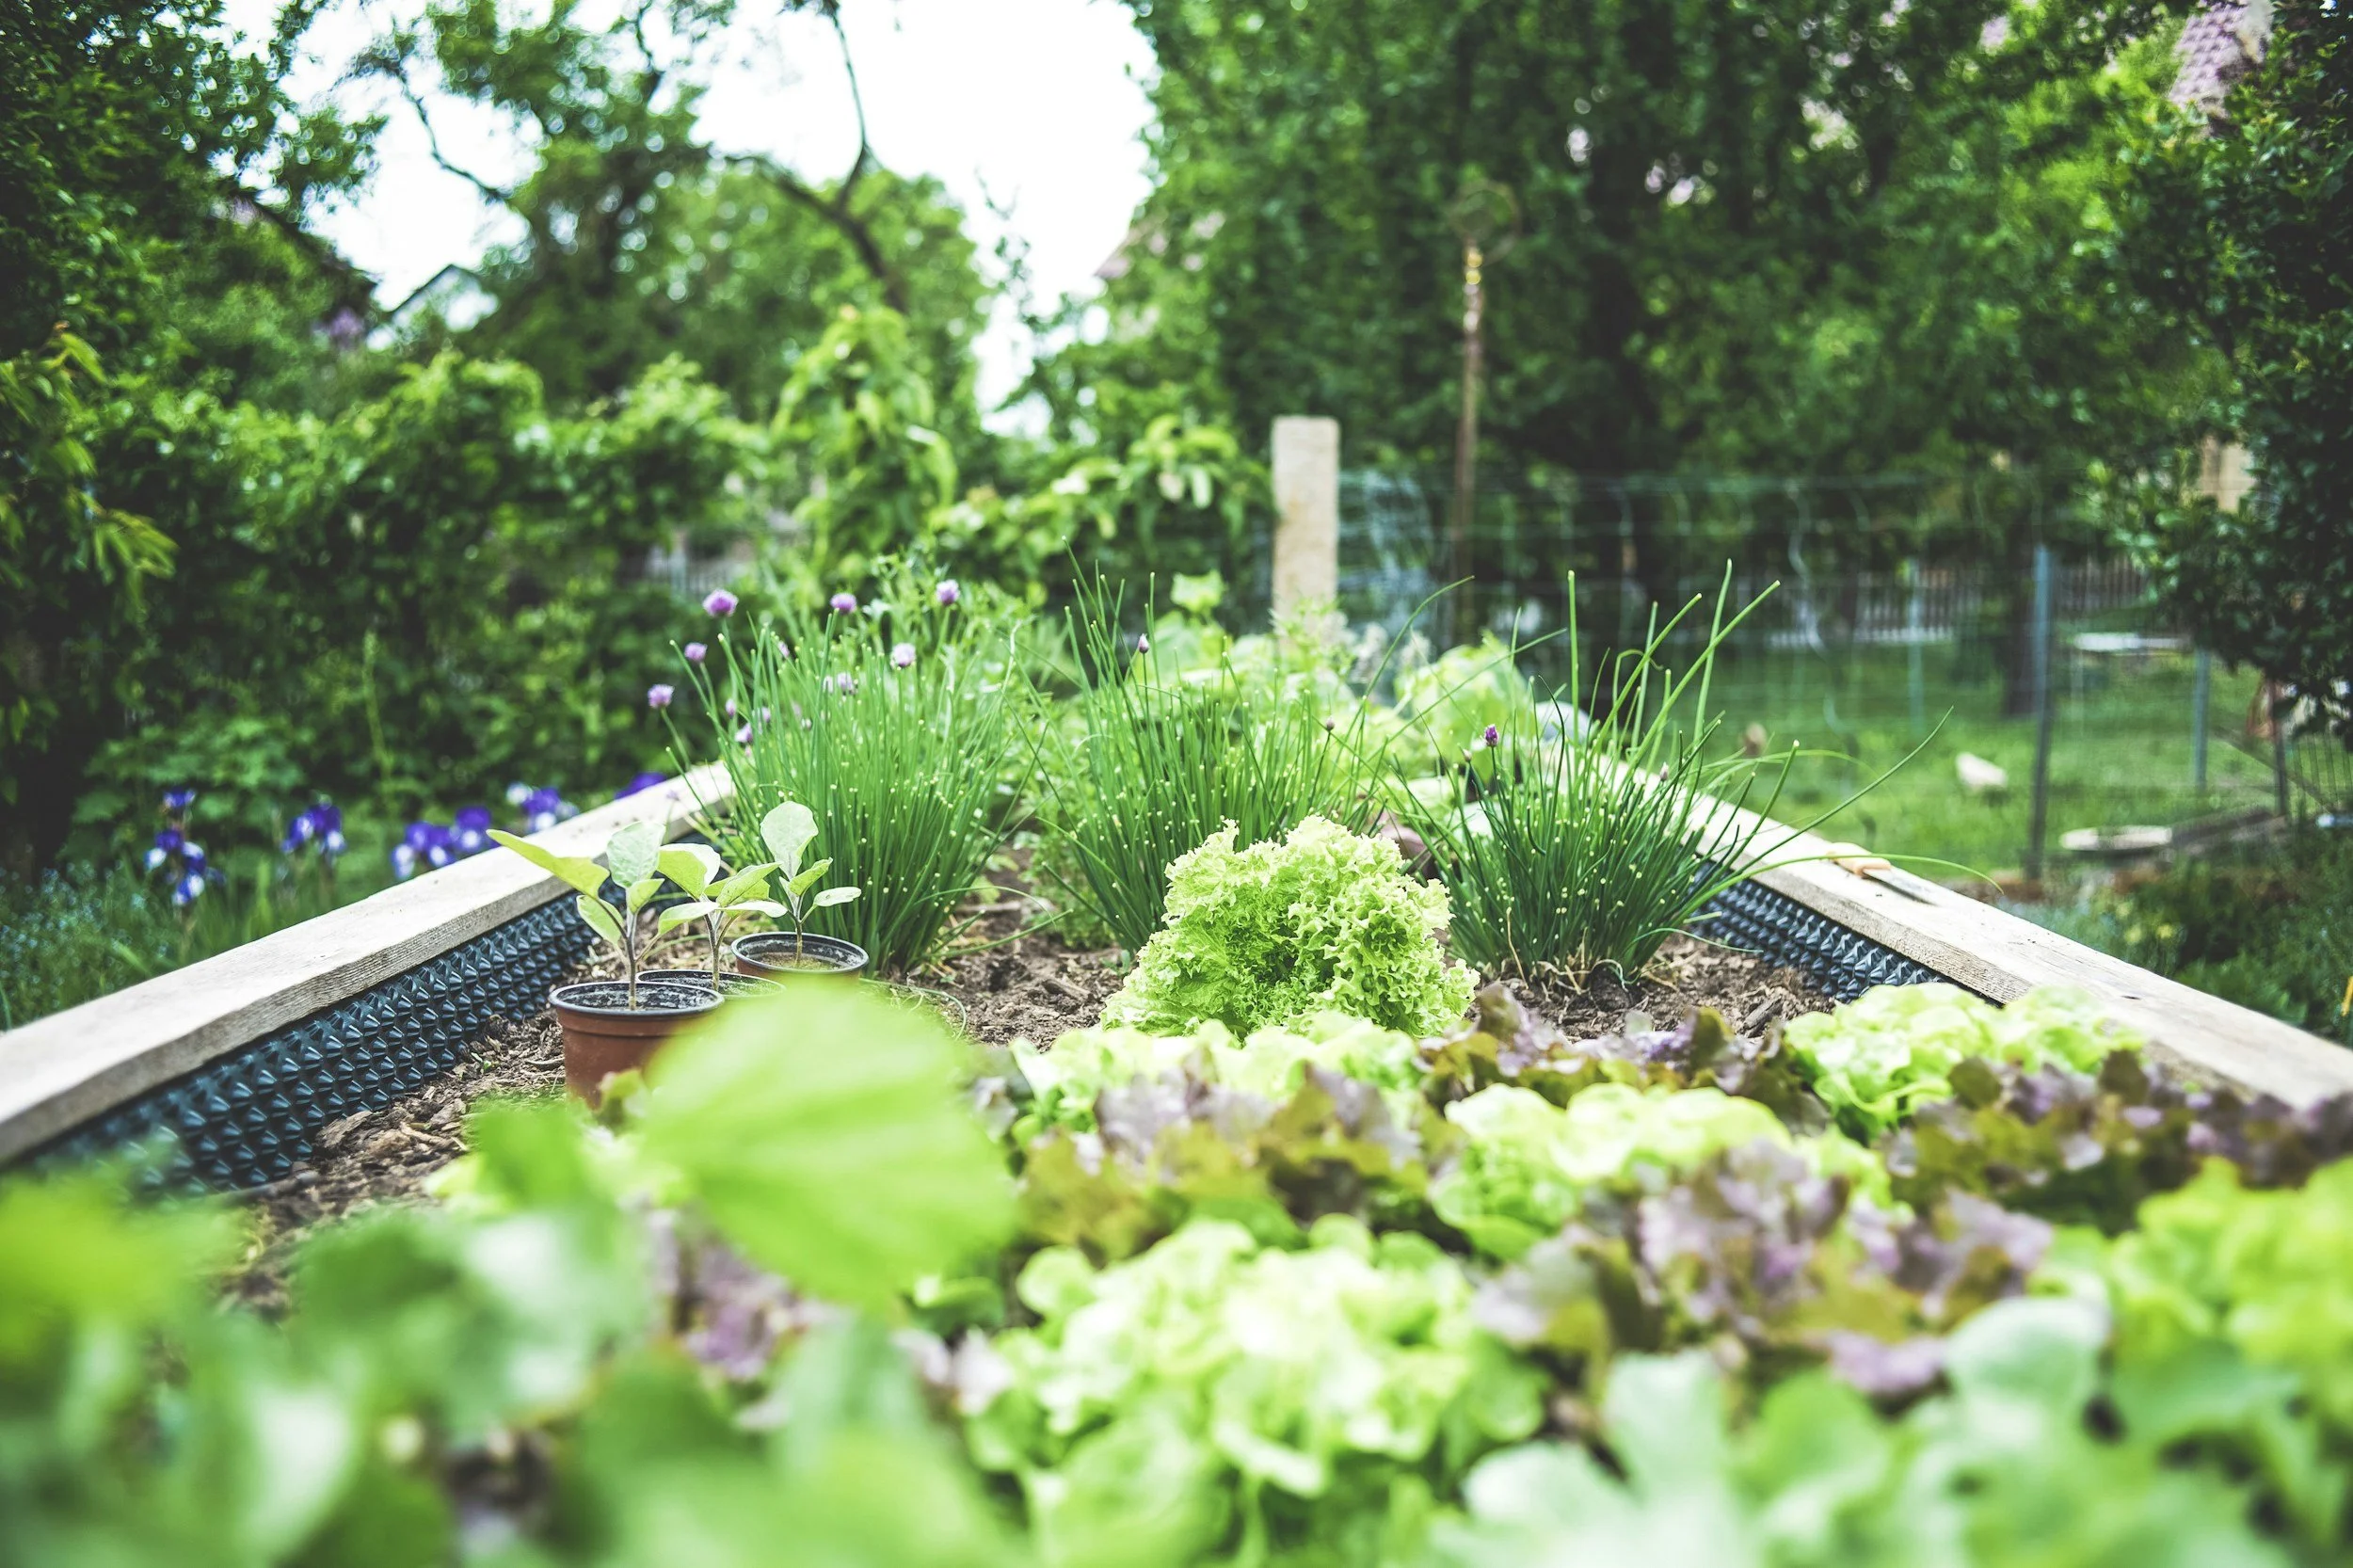
Want to Build Your Dream Garden? 8 Essential Tips
Dreaming of a lush, vibrant garden but feeling overwhelmed by where to start? You're not alone! Many homeowners share the desire to craft their perfect outdoor oasis—a space that brings joy, showcases their personality, and offers a peaceful retreat from hectic everyday life. But let's face it, the path from vision to reality can be a bit daunting with countless plant choices, design styles, and maintenance decisions. That's exactly why we're here. This guide is packed with practical, easy-to-follow tips, designed to streamline your gardening journey. We're going to cut through the chaos, highlight what really matters, and provide you with the insights needed to confidently bring your dream garden to life. Let's dive in and get those gardening gloves ready!

Dreaming of a lush, vibrant garden but feeling overwhelmed by where to start? You're not alone! Many homeowners share the desire to craft their perfect outdoor oasis—a space that brings joy, showcases their personality, and offers a peaceful retreat from hectic everyday life. But let's face it, the path from vision to reality can be a bit daunting with countless plant choices, design styles, and maintenance decisions. That's exactly why we're here. This guide is packed with practical, easy-to-follow tips, designed to streamline your gardening journey. We're going to cut through the chaos, highlight what really matters, and provide you with the insights needed to confidently bring your dream garden to life. Let's dive in and get those gardening gloves ready!
Start with a Plan
Establishing a clear and detailed plan is the foundation of transforming your garden dreams into a tangible reality. Without a well-thought-out plan, crucial elements such as plant positioning and design coherence can easily be overlooked, leading to a garden that feels disconnected and unsatisfying. Begin by defining your garden’s primary purpose. Do you envision it as a tranquil retreat where you can unwind, a lively space for entertaining family and friends, or a colorful haven bursting with vibrant blooms? This clarity will help you align your design choices with your vision, ensuring your garden serves your needs and aesthetics perfectly.
Once you have a purpose in mind, sketch out an initial layout, indicating specific zones for flower beds, water features, pathways, and seating areas. Dive into research on various styles and themes that resonate with you, from a minimalist Zen garden to a lively cottage style. Take note of your region’s climate to select plants that will thrive year-round, ensuring low maintenance and longevity. By focusing on these deliberate, customized design choices, you’ll be well on your way to nurturing a flourishing garden that aligns with your aspirations, turning your outdoor space into a personal sanctuary.
Engage Landscaping Design Services
Transforming an ordinary yard into a stunning landscape requires the nuanced touch of experienced landscaping design services. When you’re embarking on creating a dynamic and innovative garden, consulting with professionals like the team at AE Quality Landscaping bring to the table an invaluable eye for artistry and technical knowledge that ensures your vision is executed flawlessly. They specialize in designing gardens that harmonize perfectly with your home’s architecture, creating a seamless transition between indoor and outdoor living spaces. With their help, you can incorporate intricate details such as custom water features, unique plant groupings, and detailed topography adjustments that you might not venture into on your own.
By engaging with skilled landscapers, you tap into a wealth of guidance tailored specifically for your region’s climate and soil conditions, ensuring that you choose the right plants and materials for durability and thriving growth. Their expertise also lies in maximizing your space, whether your yard is generously sized or compact, adding value without unnecessary complexity. You’ll receive personalized advice on native plant options and environmentally friendly practices, which fosters a sustainable garden that requires less maintenance and resources over time. This collaboration allows you to focus on enjoying your vibrant oasis, confident that every detail has been crafted to perfection with both beauty and functionality in mind.
Choose the Right Plants
When crafting your dream garden, the specific plants you choose directly influence its success by dictating how well it will grow and how much effort you'll need to maintain it. Plants perfectly adjusted to your climate and soil conditions will flourish with minimal input, saving you time and resources. For this reason, it's important to carefully evaluate your garden’s unique environmental factors, such as sunlight, moisture, and temperature variations throughout the year. By doing so, you’ll understand where each type of plant will thrive, enhancing not only the appearance but also the health and longevity of your garden.
To create a dynamic and visually appealing garden, mix plants of various heights, colors, and textures. Look into native species, as they are adapted to survive in local conditions, typically require less maintenance, and invite local wildlife, adding another layer of vitality to your space. Don’t shy away from blending perennials with annuals to ensure constant blooms and changing scenery with the seasons. For added interest and structure, consider integrating ornamental grasses, flowering shrubs, and trees to develop focal points and natural borders. By focusing on a well-researched and diverse selection of plants, you'll be steps ahead in developing a lush, vibrant sanctuary that reflects your personal style while effortlessly thriving in its environment.
Explore Paving Ideas
Creating distinct pathways in your garden not only guides foot traffic but also unifies different areas, enhancing both functionality and beauty. The material you select for paving is pivotal; it shapes the atmosphere of your outdoor space. Consider pebble pathways if you seek a rustic vibe that blends seamlessly with nature’s elements. Their textured feel and natural look provide an inviting and relaxed ambiance suitable for gardens aiming to evoke a countryside charm. Pebbles also offer flexibility in design, allowing for creative patterns that can reflect your unique taste. For more information on what paving might look like and what will work best with your designs, consult with a professional paving contractor like .
For a more formal appearance, opt for brick or flagstone, materials known for their durability and timeless appeal. Brick paths can add warmth with their earthy tones while offering sturdy footing across your garden. Flagstone, with its varied shapes and colors, creates an elegant, cohesive surface that harmonizes with greenery and planted borders. Both materials are easy to maintain, ensuring that your garden remains beautiful with minimal effort. Additionally, by considering the layout and integration of these pathways with other features, such as flower beds and seating areas, you can craft a garden that feels naturally connected and pleasantly navigable.
Invest in Quality Soil
The secret to vibrant, thriving plants in your garden lies in the quality of your soil, which directly impacts nutrient availability and root support. Simply put, healthy soil makes the difference between plants that just survive and those that truly thrive. Conduct a thorough soil test to determine its current condition, identifying deficiencies or imbalances that might be hindering growth. Testing can reveal essential nutrients, pH levels, and organic matter content, guiding you to tailor specific amendments that your soil needs. Enhancing your soil with organic matter such as compost, well-rotted manure, or peat moss can dramatically improve its structure, water retention, and fertility.
Don’t overlook the importance of maintaining balanced microbial activity, as these beneficial organisms aid in nutrient breakdown and uptake by plants. Select the right additives; for example, if your soil is too acidic, a dose of limestone can adjust pH for optimal plant health. Regularly incorporating organic matter not only enriches the soil but also encourages beneficial earthworms and microbes, creating a robust ecosystem underground. By making these deliberate efforts to nurture your soil, you set a strong foundation for a flourishing garden that brings your outdoor retreat to life. These careful considerations empower you to maximize growth potential and build a dream garden that is both stunning and sustainable.
Hire a Mulch Delivery Service
Mulch acts as an insulator for your garden, protecting plant roots from temperature fluctuations and preserving moisture levels critical for growth, particularly in extreme weather conditions. By incorporating bulk mulch into your garden, you create a stable environment that mimics natural forest floors, where organic matter breaks down gradually, enriching the soil over time. This protective layer also minimizes weed growth, saving you the labor and reducing competition for nutrients and water that your plants need for optimal health and vitality.
By hiring a mulch delivery service, you gain convenience and access to a variety of mulch types suitable for different garden needs. Consider options like bark chips for their durability and ability to retain moisture, or straw for its lightweight nature and ease of spreading around delicate plants. Each mulch type offers unique benefits, from enriching soil with organic matter as it decomposes to adding a finished, aesthetically pleasing look to your garden. By selecting the right mulch and service, you ensure a seamless integration into your garden, allowing you to focus more on enjoying your outdoor sanctuary with less maintenance hassle.
Incorporate Water Features
Enrich your garden's atmosphere by incorporating a water feature, a unique element that introduces both serenity and an auditory dimension of gentle flowing sounds, unlike any other garden component. Imagine a small fountain or a tranquil pond that not only enhances visual appeal but also soothes with its calming, rhythmic water sounds. As you consider adding water features, it's crucial to scale appropriately so they blend harmoniously rather than overshadow the surrounding elements. A bubbling fountain, positioned near a seating area, can serve as a delightful auditory centerpiece, providing a restful environment for relaxation or contemplation.
Beyond their aesthetic appeal, water features contribute to your garden's ecological health by inviting wildlife, such as birds, dragonflies, and frogs, that promote biodiversity. Choose materials and designs that complement your garden’s style—natural stones for a rustic look or sleek metals for a modern touch. Ensure these elements are easy to maintain by incorporating features like UV clarifiers for pond water to prevent algae growth. With careful planning and placement, a well-executed water feature can transform your garden into a tranquil retreat, offering a personal oasis that enriches both the auditory and visual landscape of your outdoor space.
Incorporate an Outdoor Patio
Incorporating an outdoor patio into your garden design adds a new dimension of charm, seamlessly blending indoor and outdoor living. A well-designed patio allows you to enjoy your garden's beauty while providing a comfortable space for relaxation and entertaining. By creating a cozy atmosphere with comfortable seating and stylish furnishings, you transform your garden into a welcoming retreat.
To maximize your connection with nature, consider using glass windows and doors that provide stunning views of your garden. This design choice enhances natural light and creates a sense of openness. Collaborating with a skilled glass contractor such as A Pane in the Glass Construction, LLC can help you select the perfect window and door options that complement your patio while ensuring durability and style. With thoughtful integration of a patio and expansive glass features, you create an inviting space that allows you to savor the beauty of your garden year-round.
Creating your dream garden is a rewarding journey that blends creativity, nature, and design. By following these essential tips, you’ll be well on your way to crafting a personal sanctuary right in your own backyard. Remember, the key is to have fun with the process and make choices that resonate with your style and needs. Don't hesitate to seek professional help where needed, and always focus on making your garden a reflection of what brings you joy. You'll find that the effort and planning result in a beautiful, functional space where memories are made and tranquility thrives. So roll up your sleeves, trust your instincts, and get ready to enjoy the outdoor oasis you've been dreaming of!

How to Properly Store Rechargeable Batteries for Maximum Performance
Rechargeable batteries are essential for many of our daily gadgets. They power everything from our remote controls to our high-tech cameras. But storing them correctly can be tricky.
We partnered with a home technology company for this post. The opinions in the post are honest. All reviews and opinions expressed in this post are based on our personal views. We are excited because we know you will love it.

Rechargeable batteries are essential for many of our daily gadgets. They power everything from our remote controls to our high-tech cameras. But storing them correctly can be tricky.
Understanding Rechargeable Batteries
To get the most out of rechargeable batteries, it’s crucial to understand what makes them tick. Rechargeable batteries come in various types, such as NiMH, Li-ion, and NiCad. Each type has its specific storage needs and lifespan.
The Basics of Battery Care
One of my first experiences with rechargeable batteries was in college. I used them for my digital camera. Back then, I didn’t know much about storing them properly. I left them in my drawer, and after a few months, they barely held a charge. It turns out, proper storage could have saved me a lot of hassle.
Why Proper Storage Matters
Storing rechargeable batteries correctly can significantly extend their lifespan and performance. Improper storage can lead to reduced capacity, leakage, and even safety hazards. Imagine needing your flashlight during a power outage, only to find the batteries dead. That’s the kind of situation we want to avoid.
Cool and Dry: The Golden Rule
The first rule of storing rechargeable batteries is to keep them in a cool, dry place. Extreme temperatures and humidity can damage the batteries. A typical mistake is leaving batteries in a car during hot summer days. The heat can cause the batteries to degrade rapidly.
Avoid the Refrigerator Myth
There’s a common myth that storing batteries in the refrigerator extends their life. This isn’t true and can actually do more harm than good. Condensation from the fridge can lead to moisture buildup, which is harmful to batteries. Stick to a cool, dry drawer or cupboard.
Charge Before Storing
Before storing your rechargeable batteries, ensure they are charged. For most types, a charge level of around 50% is ideal. Fully discharged batteries can fall into a deep discharge state, which is often irreversible. On the other hand, fully charged batteries stored for long periods can lose capacity.
Use Battery Cases or Organizers
Using battery cases or organizers is an excellent way to store your batteries. They prevent the batteries from touching each other, which can cause short circuits. Battery organizers also help you keep track of which batteries are charged and which are not. I remember buying a cheap battery organizer online, and it made a world of difference in managing my batteries.
Regular Maintenance and Checks
Just like any other device, rechargeable batteries need regular maintenance. Check them every few months to ensure they haven’t leaked or degraded. I make it a habit to test my batteries every three months. This way, I catch any issues early and avoid problems when I need the batteries the most.
Safety First
Safety should always be a priority when dealing with rechargeable batteries. Avoid storing them in metal containers as this can cause short circuits. Keep them away from flammable materials. In my first apartment, I kept batteries in a metal tin. One day, I heard a hissing sound and found that one had started to leak. I learned my lesson and now use a plastic container.
Environmental Considerations
Proper disposal of old rechargeable batteries is essential. They contain materials that can be harmful to the environment. Many local stores and recycling centers offer battery recycling programs. I make it a point to take my old batteries to a local electronics store that has a recycling bin.
Real-Life Example: A Cautionary Tale
A friend of mine, Sarah, once stored her rechargeable batteries in a junk drawer in her kitchen. She didn’t use them for months. When she finally needed them, they had leaked and damaged her drawer. Not only did she lose the batteries, but she also had to replace the drawer. This could have been avoided with proper storage.
Conclusion
Storing rechargeable batteries properly isn’t complicated, but it does require some attention to detail. By following these simple guidelines, you can ensure your batteries last longer and perform better. Remember, keep them cool and dry, charge them before storing, use organizers, and check them regularly. Safety and environmental considerations are also vital.
Proper storage practices can save you time, money, and frustration. Start implementing these tips today, and you’ll see the benefits in the long run.
Bio
Markus Schimbaeck has been responsible for global purchasing in the ICT sector since 2003. During this time, he was able to build up a network of suppliers and take advantage of all the benefits of a global supply chain. In 2017 he focused on his own company with hardware and software sales.