

A resource for those seeking information on organizing and transforming spaces.

Understanding Leasing Fees: What You Need to Know Before Signing a Lease
Renting a new apartment or a house can be exciting for anyone. However, it comes with a share of paperwork and costs. One term that you will often see in the lease agreement is “leasing fee”. This cost often catches renters by surprise. That’s why you need to be 100% familiar with leasing fees before you sign the lease contract. Read on and let’s learn more about it.
We partnered with a real estate company for this post. The opinions in the post are honest. All reviews and opinions expressed in this post are based on our personal views. We are excited because we know you will love it.
Renting a new apartment or a house can be exciting for anyone. However, it comes with a share of paperwork and costs. One term that you will often see in the lease agreement is “leasing fee”. This cost often catches renters by surprise. That’s why you need to be 100% familiar with leasing fees before you sign the lease contract. Read on and let’s learn more about it.
What is a Leasing Fee and How Does it Affect Your Rental Agreement?
Before signing the lease, make sure you understand the leasing fee and how it will impact your upfront costs. A leasing fee is a one-time cost many renters face when starting a new lease. Landlords or property managers charge this fee to cover their time and work in finding and signing a new tenant. Typically, the fee is either a set amount, like $200 or $300, or a percentage of the first month’s rent, often about 10–20%.
But how does a leasing fee affect your agreement? First, it’s important to know that this cost is separate from your security deposit or monthly rent payments. You will usually pay it upfront, together with your first rent check. In some places, the leasing fee covers the cost for marketing the property, running background checks, or preparing the lease paperwork. Sometimes, the fee is split between the landlord and any real estate agent involved in the process.
For renters, the leasing fee can be a financial obstacle if you forget to budget for it. Let's say your rent is $1,000, and the leasing fee is 15% of your first month's rent. That means you'll pay $150 as your leasing fee, on top of your security deposit and first month's rent. In big cities, these fees can add up fast.
Reading your lease agreement carefully is key. Not all leases have a leasing fee, but if there is one, it must be listed in your rental documents. If you are unsure about any fee, ask the landlord or property manager for a breakdown of all upfront costs before you sign anything. Understanding this fee helps you avoid surprises on move-in day.
How to Negotiate a Leasing Fee: Tips for Renters
Just because you see a leasing fee listed doesn’t always mean it’s set in stone. In many cases, there is room for negotiation. Here are a few tips that can help you lower or even avoid paying a leasing fee:
1. Ask Early
Bring up the leasing fee when you first talk to the landlord or property manager. Ask if the fee is required and if there’s room to reduce it.
2. Shop Around
Sometimes properties down the block may not charge a leasing fee. Checking several options gives you bargaining power.
3. Offer to Sign a Longer Lease
Landlords love stability. If you plan to stay for more than a year, mention this. They may be willing to lower the fee in exchange for a longer commitment.
4. Point Out Your Strengths
If you have good credit, solid references, or a reliable source of income, use it to your advantage. You can present yourself as a low-risk tenant, making them more likely to negotiate.
5. Be Respectful, but Firm
Don't be afraid to walk away. Sometimes, the willingness to look elsewhere can encourage a landlord to reconsider extra fees.
If the landlord won’t budge, see if they can spread the fee over several months instead of requiring it all at once. While not always common, creative solutions can help make the move-in more affordable.
On the other hand, landlords need to be familiar with these negotiation requests and how to manage them effectively. This is where property managers can help. Professional Northern Virginia property management can help maximize your rental income and minimize vacancies.
Common Leasing Fee Structures and What They Mean for Tenants

Leasing fees can be charged in different ways. Here are the most common structures you might come across:
Flat Fee
This is a fixed amount, such as $250 or $400, no matter your rent price. This system is easy to predict and lets you plan your budget in advance.
Percentage of Rent
Some landlords charge a fee based on a percentage of your monthly rent. For example, if your rent is $1,200 and the fee is 20%, you owe $240 up front. Bigger apartments or higher-end properties may have higher fees.
Broker’s Fee
In places like New York City, renters often pay a fee to real estate agents who find rentals for them. This fee is usually one month’s rent or a large percentage of it. If you used a broker, always double-check who is responsible for the fee because sometimes it’s the landlord instead.
Renewal Fee
Some leases include a smaller fee when you renew at the end of the year. It’s often much less than the initial leasing fee and covers paperwork for your new lease term.
Make sure you know which fees to pay once and which you might pay every year. If you don’t understand a charge, ask the landlord for an explanation before you sign your lease. You can also check your local laws to get the right limits on how much a landlord can charge for certain fees, aside from the common ones, such as rent and security deposit.
Final Words
Leasing fees can make renting more expensive than you first think. Always check your lease agreement for fees, and don’t be afraid to negotiate or ask questions. If you know what leasing fees are and how they work, you are more likely to get a fair deal and start your lease on the right foot.
Moving into a new home should be a happy event, not a stressful one. By understanding leasing fees, you’ll be ready to make smart choices, budget correctly, and enjoy your new home without unwanted costs sneaking up on you.

Common Pressure Washing Mistakes To Avoid
Proper pressure washing ensures surfaces are clean and undamaged. Learn techniques and tips to achieve professional results safely and effectively.
Pressure washing is an effective way to clean driveways and home exteriors. However, when done incorrectly, it can also lead to permanent damage and expensive repairs. By understanding the most common pressure washing mistakes, you can achieve the best results while protecting your property. Here are four mistakes you should avoid next time you take out your pressure washer.
Using an Inadequate Nozzle
The nozzle you choose plays a crucial role in determining how effective and safe your pressure washing will be. Nozzles come in different spray angles, ranging from a narrow, powerful stream to a wider, gentler spray. Selecting the wrong one for your task can cause serious damage or fail to properly clean the surface.
For example, a 0-degree nozzle delivers an intense stream suited for small, tough stains, but it can easily gouge wood or paint. On the other hand, a 25-degree nozzle works well for general-purpose cleaning, including washing patios or decks. Always match the nozzle to the surface and the level of dirt to avoid mishaps.
Attaching the Wrong Hose
Using the wrong hose on a pressure washer can lead to poor performance or equipment damage. A pressure washer hose needs to match the water flow rate and pressure rating of your machine.
Choosing a hose that cannot handle high-pressure levels can result in breakages or leaks. Conversely, using an excessively thick or long hose could reduce pressure output, leaving you with suboptimal cleaning power. Always check the manufacturer’s recommendations when selecting a hose to make sure it’s compatible with your specific pressure washer.
Applying Too Much Pressure
More pressure doesn’t always mean better cleaning. Applying excessive pressure is one of the quickest ways to damage surfaces such as painted walls, wooden decks, or concrete.
This mistake often results from assuming that higher pressure will remove stubborn dirt more effectively, but too much force can strip paint or leave unsightly marks. Start with the lowest pressure setting, and gradually increase it if necessary, ensuring the surface remains unharmed while cleaning it thoroughly.
Skipping Surface Preparation
Another one of the most common pressure washing mistakes is improper surface preparation. Failing to remove debris, loose dirt, or cobwebs before starting can make the cleaning process less efficient and lead to unsatisfactory results or clogged nozzles.
Additionally, skipping crucial prep work such as protecting nearby plants, covering electrical outlets, and sealing cracks can lead to damage or safety risks. Taking a few extra minutes to clean and prepare the area ensures an even and effective washing experience while protecting your property from unintended damage.
Best Surfaces for Every Part of Your Bathroom
Explore the best materials for every part of your bathroom and learn how to choose surfaces that perform well in moisture-rich environments.
If you're renovating your bathroom, choosing the right materials is critical. From flooring to walls, vanities to ceilings, each area faces exposure to moisture, temperature changes, and daily wear. To ensure durability and design, you need to match every surface to its use. Let's explore the best surfaces for every part of your bathroom to help you build or renovate with confidence.
Flooring That Stands Up to Water
Your bathroom floor must be able to withstand splashes, spills, and steam without damage. Porcelain and ceramic tiles remain top choices because they're waterproof and easy to clean. Available in numerous colors and textures, they also mimic the appearance of natural stone or wood without the associated maintenance issues. For a softer touch underfoot, consider luxury vinyl tile (LVT). It's affordable and quick to install.
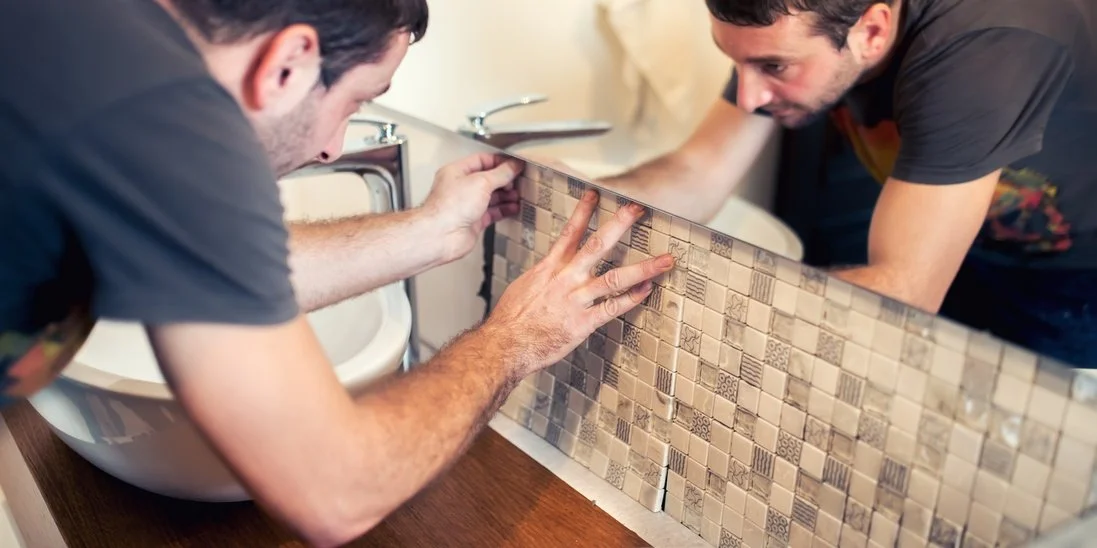
Moisture-Resistant Walls
Wall surfaces need to resist humidity while offering visual appeal. Ceramic tile offers a timeless solution, while acrylic wall panels or glass panels provide a sleek, low-maintenance alternative. High-quality paint rated for bathrooms can also do the job. Use satin or semi-gloss finishes for better mildew resistance.
Stylish Vanity Surfaces
The vanity countertop sees frequent use and should be both attractive and durable. Quartz is a top contender—it resists stains and water damage, and doesn't require sealing. Solid surface materials like Corian also offer water resistance and a smooth, modern look. For a touch of luxury, consider using natural stones like granite or marble; however, these options require sealing and additional maintenance.
Showers and Bathtubs
In wet areas like showers and bathtubs, materials act as a barrier against water, helping to prevent the buildup of mold or mildew. One popular choice for these high-moisture areas is fiberglass. The benefits of fiberglass for showers and tubs include affordability, lightweight construction, and aesthetic versatility. It also repairs easily if scratched or chipped. Acrylic is another strong option, offering similar benefits with a slightly more polished finish.
Don't Forget the Details
Beyond the major surfaces, think about backsplash materials, shower niches, and shelving. Glass tiles, for example, add shine and color while resisting water. Open wood shelving should be sealed properly or swapped for powder-coated metal or composite materials that won't warp.
Ultimately, the best surfaces for every part of your bathroom combine aesthetics with moisture resistance and longevity. By choosing purpose-built materials for each zone, you'll enjoy a space that looks fresh and performs well for years.

Specialty Window Styles That Transform Your Home's Character
Windows are more than just functional elements that let in light and air—they're architectural features that define your home's personality and curb appeal. While standard rectangular windows serve their purpose, specialty window styles can dramatically transform your living space, creating visual interest and enhancing your home's unique character. Whether you're building new or renovating, exploring distinctive window options can elevate your home from ordinary to extraordinary.
Windows are more than just functional elements that let in light and air—they're architectural features that define your home's personality and curb appeal. While standard rectangular windows serve their purpose, specialty window styles can dramatically transform your living space, creating visual interest and enhancing your home's unique character. Whether you're building new or renovating, exploring distinctive window options can elevate your home from ordinary to extraordinary.
Bay and Bow Windows: Creating Dimensional Drama
Bay and bow windows are among the most impactful specialty styles for transforming interior and exterior spaces. These protruding window configurations extend beyond the wall plane, creating additional interior space while adding architectural depth to your home's facade. Bay windows typically feature three panels arranged at angles, while bow windows curve gracefully with multiple panels forming a gentle arc.
Inside your home, these windows create cozy nooks perfect for reading corners, breakfast seating, or display areas for plants and decorative items. The extended sill space provides valuable real estate for storage or decoration, while the angled glass maximizes natural light from multiple directions. From the outside, these windows add substantial visual weight and elegance, making even modest homes appear more grand and architecturally sophisticated.
Picture Windows: Framing Nature's Artwork
Picture windows serve as living artwork, offering unobstructed views of your outdoor landscape. These large, fixed panes of glass don't open, but they excel at bringing the outdoors inside and making rooms feel more spacious and connected to nature. They're particularly effective in rooms with stunning views—whether overlooking gardens, water features, or scenic vistas.
The key to successful picture window placement lies in considering both interior and exterior perspectives. Inside, they create focal points and can make smaller rooms feel dramatically larger. Outside, they break up large wall expanses and can be combined with other window styles to create compelling compositions. When positioned strategically, picture windows can capture specific views while maintaining privacy from neighboring properties.
Arched and Round Windows: Adding Graceful Curves
Curved windows introduce organic shapes that soften the angular lines typical in most home designs. Arched windows, with their classical appeal, work beautifully in traditional and transitional styles, while circular or oval windows can complement both contemporary and historic aesthetics. These shapes create visual interest and can serve as stunning architectural accents.
Arched windows are particularly effective above doorways, paired with rectangular windows, or used in gable ends where they follow the roofline naturally. Round windows work well as accent features, often highlighting specific interior spaces like stairway landings or creating interesting focal points in otherwise plain wall areas. The curved glass also creates unique light patterns throughout the day, adding dynamic visual elements to interior spaces.
Specialty Glass Options: Beyond Clear Views
The glass itself offers numerous opportunities for customization and character enhancement. Textured glass provides privacy while maintaining light transmission, making it ideal for bathrooms or street-facing windows. Stained glass, whether in traditional or contemporary patterns, adds color and artistic flair while creating beautiful light displays.
Frosted and etched glass options offer varying degrees of opacity and can incorporate custom designs or patterns. These treatments work particularly well in transitional spaces like entryways or interior windows between rooms.
Transom and Side Light Windows: Maximizing Light and Style
Transom windows positioned above doors or other windows add height and grandeur to openings while increasing natural light. These horizontal windows work particularly well in homes with high ceilings, drawing the eye upward and creating more dramatic proportions. Side light windows flanking doors or larger windows create balanced compositions while providing additional light.
These supplementary windows are excellent for maintaining privacy in main living areas while still allowing light penetration. They can also provide ventilation opportunities in areas where larger operable windows might not be practical or desired.
Choosing the Right Style for Your Home
Selecting specialty windows requires considering your home's architectural style, your lifestyle needs, and your budget. Traditional homes often benefit from classical shapes like arches and bays, while contemporary designs might favor clean-lined picture windows or geometric configurations. Consider how each window will function both as an interior feature and an exterior design element.
The investment in specialty windows pays dividends in both daily enjoyment and long-term home value. These distinctive features become signature elements that set your home apart, creating spaces that are both more beautiful and more functional than standard window configurations could achieve. Click here for info about specialty window options that can transform your living space.