

A resource for those seeking information on organizing and transforming spaces.

Top Design Ideas for Epoxy Flake Flooring
Ever wondered how to transform a dull concrete floor into something truly stunning? Perhaps you're tired of looking at that boring garage floor or searching for a durable solution for your bathroom? Maybe you've spotted those gorgeous speckled floors on social media and thought, "I want that in my home!"
Ever wondered how to transform a dull concrete floor into something truly stunning? Perhaps you're tired of looking at that boring garage floor or searching for a durable solution for your bathroom? Maybe you've spotted those gorgeous speckled floors on social media and thought, "I want that in my home!"
Epoxy flake flooring has taken Australian homes by storm, and it's not hard to see why. This versatile flooring option combines durability with eye-catching aesthetics, making it perfect for everything from garages to living spaces. The beauty of an epoxy floor with flakes lies in its customisation options – you can create anything from subtle, sophisticated finishes to bold, statement-making designs.
In this guide, we'll explore the best design ideas for epoxy flake flooring across different spaces in your home. You'll discover inspiring garage flooring ideas, learn whether decorative epoxy flooring works for interior spaces, and explore exciting colour combinations. We'll also look at how epoxy compares to alternatives like metallic finishes, plus help you decide between DIY and professional installation. Ready to get inspired? Let's dive in.
Stunning Garage Flooring Ideas with Epoxy Flake
Why Custom Epoxy Garage Floors Are a Game-Changer?
Gone are the days when garages were just dark, dusty spaces for parking cars. Aussie homeowners are now transforming their garages into functional extensions of their homes. Custom epoxy garage floors play a massive role in this transformation.
The magic of garage epoxy flakes lies in their ability to hide imperfections while creating a showroom-quality finish. Those coloured flakes scattered across the surface do more than just look pretty – they add texture for slip resistance and help disguise tyre marks, oil drips, and everyday wear.
Best Garage Epoxy Flakes Colours and Combination
When it comes to coloured epoxy garage floor options, the possibilities are genuinely exciting. Popular choices for Australian garages include granite-inspired blends featuring greys, blacks, and whites. These neutral combinations complement any vehicle and never go out of style.
For something bolder, consider earthy terracotta blends that suit Australian homes beautifully. Blue and grey combinations create a cool, professional workshop vibe, while charcoal-dominant mixes offer that sleek, modern look many homeowners crave.
What is the Best Epoxy for Garage Floor Applications?
Choosing the best epoxy for garage floor projects depends on your specific needs. High-build epoxy systems with 100% solids offer maximum durability for heavy vehicle traffic. Water-based options work well for lighter use and easier application. For Australian conditions, UV-stable formulations are essential to prevent yellowing in areas with sun exposure.
Epoxy Flake Flooring for Interior Spaces
Bringing Flake Floors Indoors
Epoxy floor coating interior applications have grown massively popular in recent years. While many people associate epoxy with industrial settings, modern formulations and design options have made them perfectly suitable for residential interiors.
Living room epoxy flooring for homes might sound unusual, but it offers brilliant benefits. The seamless surface eliminates grout lines where dirt accumulates, making cleaning incredibly straightforward. Plus, the reflective properties can brighten rooms and make spaces feel larger.
How Durable is Decorative Epoxy Flooring in High-Traffic Areas?
One of the biggest concerns homeowners have is whether decorative epoxy flooring can handle daily life. The answer? Absolutely. Quality epoxy installations resist scratches, impacts, and chemical spills far better than many traditional flooring options.
High-traffic areas like hallways and kitchens benefit enormously from epoxy's durability. The flake components add visual interest while also increasing surface texture for better grip. For families with kids and pets, this flooring option proves incredibly practical whilst remaining stylish.
Bathroom Floor Coatings: Epoxy Resin Options
Can You Use Epoxy Resin Bathroom Floor Coatings in Wet Areas?
Here's a question we hear constantly – can epoxy resin bathroom floor applications really work in wet environments? The short answer is yes, but with some important considerations.
Quality bathroom floor coatings must include proper anti-slip additives and appropriate sealers designed for moisture exposure. When installed correctly, epoxy creates a waterproof barrier that protects the substrate beneath. This makes it an excellent choice for bathrooms, laundries, and even outdoor covered areas.
Design Ideas for Bathroom Floor Coatings with Flakes
Bathrooms offer fantastic opportunities for creative epoxy designs. Light blue and white flake combinations create a fresh, spa-like atmosphere. Sandy beige tones with subtle gold flecks bring warmth to modern bathrooms. For something dramatic, consider a dark green epoxy floor with contrasting lighter flakes – it's bold, sophisticated, and absolutely striking.
The seamless nature of epoxy means no grout to clean or seal, which is a massive win for bathroom maintenance.
Exploring Colour and Style Options
Popular Flake Colour Blends for Australian Homes
Australian homeowners tend to gravitate towards colours that complement our natural landscape and architectural styles. Coastal blues and sandy neutrals suit beachside properties perfectly. Earthy reds and ochres work beautifully with brick homes common throughout the suburbs.
When requesting epoxy flooring samples, consider how the colours will appear under your specific lighting. Flakes can look quite different under natural sunlight versus artificial lighting. Most reputable suppliers, including Sydney epoxy floors specialists, will provide samples so you can see colours in your actual space before committing.
Epoxy Swirl Flooring vs Flake Flooring: What's the Difference?
Understanding the distinction between epoxy swirl flooring and flake options helps you make the right choice. Swirl patterns create flowing, marble-like effects using coloured pigments manipulated during application. Flake flooring, meanwhile, achieves its look through scattered vinyl chips in various sizes and colours.
Both options offer stunning results, but they suit different aesthetics. Swirl patterns tend toward contemporary, artistic appearances, while flakes create more textured, practical finishes. Many custom epoxy floors actually combine both techniques for truly unique results.
Metallic Epoxy Floor Alternatives
What is Metallic Epoxy Floor and How Does It Compare to Flake?
Metallic epoxy floor coatings create stunning three-dimensional effects that mimic flowing lava, clouds, or marble. The epoxy metallic floor finish uses metallic pigments suspended in the coating, which shift and settle during curing to create unique patterns.
Compared to flake flooring, metallic options offer a more dramatic, artistic appearance. However, flakes provide better slip resistance and hide imperfections more effectively. Both options are equally durable when properly installed.
Combining Epoxy Metallic Floor Effects with Flake Designs
Why choose one when you can have both? Creative installers often combine metallic bases with flake accents for truly spectacular results. Imagine a shimmering silver metallic floor with scattered black and white flakes – the depth and visual interest are remarkable.
These combination designs work particularly well in entertainment areas, home bars, and creative spaces where you want maximum visual impact.
Custom Epoxy Floors: Bringing Your Vision to Life
Working with Professionals Like Sydney Epoxy Floors Specialists
Creating truly custom epoxy floors requires expertise and artistic vision. Sydney epoxy floors specialist and professionals across Australia can help translate your ideas into reality. They'll consider factors you might not think about – substrate preparation, humidity levels, and curing times all affect the final result.
Professional installers also have access to commercial-grade products and colours not available through retail channels. This opens up far more design possibilities than DIY approaches typically allow.
How to Create a Truly Custom Design
Start by gathering epoxy floor coating pictures and inspiration images. Browse epoxy floor pics online, create mood boards, and think about how the floor will complement your existing décor. Consider the room's purpose – a garage needs different characteristics than a living space.
Discuss your vision with professionals who can advise on practical considerations. Sometimes the most stunning epoxy floor coating images require specific techniques or materials that only experienced installers can provide.
DIY vs Professional Installation
Can You Buy Floor Epoxy Bunnings Products for DIY Projects?
Yes, floor epoxy Bunnings and other hardware stores stock products suitable for DIY projects. These kits work reasonably well for small, straightforward applications like single garage floors or utility spaces.
However, DIY epoxy has limitations. The products available to consumers generally aren't as durable as professional-grade materials. Application requires careful preparation, and mistakes can be costly to fix. Temperature and humidity affect curing, and getting the flake distribution even takes practice.
When to Hire a Professional for Decorative Epoxy Flooring?
For interior spaces, large areas, or designs requiring multiple colours and techniques, professional installation makes sense. Decorative epoxy flooring in living areas demands perfection – you'll see any imperfections daily. Professionals also provide warranties and can address any issues that arise.
Complex designs, metallic effects, and custom colour matching all benefit from experienced hands. Think of it as an investment in your home's value and your daily enjoyment of the space.
Choosing the Perfect Epoxy Flake Flooring Design for Your Space
So, what have we learned about epoxy flake flooring? This versatile option works brilliantly across numerous applications – from custom epoxy garage floors that impress the neighbours to sophisticated bathroom floor coatings that simplify your cleaning routine.
The key to success lies in careful planning and choosing the right approach for your space. Take advantage of epoxy flooring samples before making final decisions. Consider how colours will work with your existing décor and lighting. Think about the practical demands of each area – high traffic, moisture exposure, or heavy use all influence the best specification.
Whether you're dreaming of a bold dark green epoxy floor, a subtle neutral blend, or something completely unique, epoxy flake flooring offers the flexibility to make it happen. Chat with local professionals, gather inspiration from epoxy floor coating images, and don't be afraid to think creatively. Your perfect floor is waiting to be created!

How Humidity Affects Different Categories of Stored Items
Learn how humidity affects different categories of stored items and protect furniture, electronics, clothing, paper, and food from damage
Ambient environment is one of the factors that shape how well your stored belongings hold up over time. Too much moisture can cause mold, while dry air can lead to cracks. Many people overlook how humidity affects different categories of stored items, yet the impact is often costly. You need to understand these risks to protect both everyday and valuable possessions. Storage spaces vary in airflow, temperature, and exposure to moisture. These factors change how items react during long periods. Knowing what to expect helps you avoid damage and extend the item's lifespan.
Why Humidity Control Matters More Than You Think
Humidity refers to the amount of moisture in the air. High levels mean more water vapor, while low levels create dry conditions. Both extremes affect stored goods in different ways.
First and foremost, moist air supports mold growth and weakens materials over time. Dry air pulls moisture from items, which leads to cracks and brittleness. These changes often develop slowly and remain unnoticed at first.
Second, airflow plays a key role in moisture balance. Trapped air increases humidity, especially in enclosed spaces. Consistent ventilation helps maintain stable conditions and reduces sudden shifts.
Humidity also affects how materials age. Metal surfaces may corrode faster in damp air. At the same time, dry conditions increase dust buildup, which settles on stored items and affects their surface quality.
Environmental changes add yet another layer of risk. Seasonal shifts bring varying moisture levels, which stress materials repeatedly. Over time, these cycles reduce durability and structural strength.
The Way Humidity Affects Different Categories of Stored Items
Each material reacts differently to moisture in the air. Some absorb water quickly, while others resist it but still face damage over time. Understanding these differences helps you plan storage better.
Porous materials, such as wood and fabric, take in moisture easily. Non-porous items, such as metal and plastic, still suffer from condensation. Each category needs a specific approach to prevent damage.
Planning ahead makes a clear difference. Separate items based on material type and sensitivity. This simple step reduces risk and improves storage results.
Before storing large items, you may sort and remove unwanted objects. A clear space helps you organize better and avoid crowding. Having a clear vision on how to prepare for junk pickup, like separating items by type and ensuring easy access for removal, can support a stress-free junk removal process. This, in turn, will ensure better storage conditions.
Furniture and Wood: Warping, Cracking, and Swelling Risks
Wood reacts strongly to moisture changes. It expands when humidity rises and contracts when the air dries. These movements can distort shape and weaken joints. High humidity leads to swelling and mold growth. Surfaces may feel sticky, and finishes can degrade. Over time, the structure may lose stability.
Low humidity causes cracks and splits. Wood loses internal moisture, which makes it brittle. This damage often affects tables, chairs, and cabinets. In addition, positioning furniture above the ground reduces exposure to damp surfaces. Air circulation around each piece helps maintain balance. These steps support long-term durability without complex adjustments.
Electronics and Appliances: Moisture vs Circuits
Electronics contain delicate internal parts that react poorly to moisture. Water vapor can settle on circuits and cause corrosion. This damage may stop devices from working. Temperature changes increase condensation risk. For example, moving items from cold to warm spaces creates moisture buildup. This process harms internal components over time.
Common items at risk include televisions, laptops, and kitchen appliances. Even small amounts of moisture can lead to failure. Repairs often cost more than prevention. Above all, moisture-absorbing materials help reduce internal exposure. Stable environments limit condensation and support consistent performance. Protection depends on controlling both air and temperature conditions.
Clothing and Fabrics: Mold, Odors, and Fiber Damage
Fabrics absorb moisture quickly, especially in closed spaces. This creates a damp environment that supports mold growth. Odors can develop and spread across items.
Natural fibers such as wool and cotton are more vulnerable. Synthetic fabrics resist moisture but can still trap smells. Over time, fibers weaken and lose strength.
Poor storage can ruin clothing that holds personal or financial value. Seasonal garments often face these risks during long storage periods. Damage may not appear until you unpack them. You can prevent issues with breathable containers and proper drying. Avoid sealing damp clothes in plastic bags. Keep storage areas clean and dry to reduce risk.
Paper, Books, and Documents: Fading and Decay
Paper products react quickly to humidity changes. High moisture causes pages to stick and warp. Ink may fade or bleed, which ruins important information. Books often develop mold in damp conditions. This growth spreads fast and damages entire collections. Photos and documents can lose clarity and detail.
Low humidity can also harm paper. Dry air makes pages brittle and easy to tear. This damage affects archives, files, and personal records. Protective storage materials slow down these effects. Dry environments help preserve structure and clarity. Stable conditions support long-term preservation.
Food and Perishables: Spoilage and Safety Concerns
Humidity affects how long food stays safe to eat. Moist air speeds up spoilage and supports bacterial growth. This increases the risk of contamination. Dry foods such as grains and flour absorb moisture easily. This leads to clumping and mold formation. Even sealed packaging may fail in poor conditions.
Perishable items face even higher risks. Changes in humidity can shorten shelf life. Food may spoil before the expected dates. Controlled environments help maintain food quality. Limiting moisture exposure reduces contamination risks. Regular checks help identify early signs of spoilage.
Protecting Your Belongings from Humidity Damage
Humidity has a direct impact on the condition of stored items. Each category reacts differently, which requires careful planning. Ignoring these differences often leads to damage and loss. These risks can be reduced by controlling moisture and organizing items by material type. Small adjustments in storage methods can make a clear difference over time. Understanding how humidity affects different categories of stored items helps you protect your belongings with confidence.

From Planning to Perfection: Tools That Transform Outdoor Operations
Outdoor projects offer both opportunity and complexity. From taking precise site measurements to mapping sun patterns and managing budgets, every step shapes the final result. Using the right tools can turn outdoor operations into a streamlined process, whether you are a landscape professional or a dedicated DIYer.
Outdoor projects offer both opportunity and complexity. From taking precise site measurements to mapping sun patterns and managing budgets, every step shapes the final result. Using the right tools can turn outdoor operations into a streamlined process, whether you are a landscape professional or a dedicated DIYer.
In this guide, you will learn how to:
• Assess your outdoor space with accurate measurements and site analysis
• Blend digital and analog landscape planning tools for design clarity
• Build realistic budgets and phased schedules to manage costs and timeline
• Select hand tools, power tools, and heavy equipment for each landscape task
• Follow a step-by-step outdoor project implementation plan from clearing to final styling
• Establish maintenance routines and explore eco-friendly landscaping innovations
Each section focuses on practical methods and recommended products that streamline planning and execution. By the end, you will have a clear roadmap and toolset to guide every phase of your outdoor project.
Let’s begin by assessing your outdoor space and laying the groundwork for a successful design.
Assessing Your Outdoor Space
Measuring & Mapping
Accurate dimensions are the foundation of any outdoor plan. Use a laser distance meter or measuring wheel to record length and width. Plot these figures on graph paper or in a landscape design app. For uneven terrain, consider a simple topographic survey. Mapping key points like property lines, hardscape, and utilities ensures a reliable base plan.
Sunlight & Microclimates
Track sun exposure and shade patterns to match plants and materials to real conditions. A sun-path diagram or mobile light meter app helps chart daily sunlight hours. Note areas of full sun, afternoon shade, and pockets of reflected heat near walls or pavement. Identifying these microclimates guides irrigation strategy and plant selection.
Site Constraints & Opportunities
Existing Features
Catalog trees, fences, patios, and underground utilities. Identify mature trees that offer shade or require protection. Mapping these elements highlights both challenges and built-in assets.
Terrain & Drainage
Evaluate slope direction and steepness to anticipate runoff zones. Perform a simple percolation test by digging small holes and timing water absorption. Mark any low spots prone to pooling. Addressing drainage early prevents erosion and water damage.
Digital & Analog Planning Tools
Blending digital and analog approaches to landscape planning helps landscape professionals refine ideas without limiting creativity. Modern outdoor design software and immersive visualization apps speed up concept testing. You can also rely onhelpful softwarefor task management and outdoor project management.
Traditional sketchbooks and vision boards ground the design process and reduce screen fatigue. Below are tools that work together to take plans from sketch to reality.
Landscape Design Software
Popular CAD and 3D modeling platforms simplify technical layouts and material choices:
• AutoCAD: Industry standard for precise 2D plans and detailed site drawings.
• SketchUp: Easy-to-use 3D modeling with terrain and plant libraries.
• Vectorworks Landmark: Combines hardscape design and plant database in one interface.
AR & VR Visualization Apps
Immersive apps let clients experience designs in real time:
• Morpholio AR SketchWalk: Overlay 3D concepts on an existing site using a smartphone.
• Augment: Place scale models in physical space to test proportions.
• IrisVR: Offers walk-through simulations for collaborative reviews.
Mood Boards & Sketching
Analog tools foster deeper focus and better memory:
• Portable notebooks and planners capture ideas anywhere.
• Paper feels more real to our brains, aiding recall and creativity.
• Vision boards with printed swatches help organize color palettes and materials.
• Ticking off tasks on tearable notepads adds satisfying progress tracking.
Budgeting, Scheduling & Resource Management
A successful outdoor project hinges on accurate budgets, timelines, and resource planning. By mapping costs and tasks early, teams avoid delays and budget overruns.
Breaking Down Costs
Start with six resource categories:
• People: hourly rates and crew sizes.
• Tools & equipment: purchase or rental fees.
• Materials & supplies: bulk vs. per-unit pricing.
• Facilities & space: storage or staging areas.
• Time: labor hours by phase.
• Money: contingency funds for unexpected needs.
Detail estimates using a spreadsheet, resource planning software, or an online planner. Link resource bookings to cost centers for clearer forecasting and real-time budget tracking.
Creating a Phased Timeline
Use a Gantt chart to map tasks, milestones, and dependencies. Combine with Kanban boards for workflow visibility. Apply resource leveling to adjust dates around crew availability or equipment constraints. Resource smoothing helps rebalance workloads without extending deadlines.
Prioritizing Features
Evaluate each feature by ROI and strategic fit. Simple frameworks like MoSCoW (Must have, Should have, Could have, Won’t have) guide which tasks move first. This ensures essential elements receive resources before lower-priority items.
Selecting the Right Tools & Equipment
Hand Tools vs. Power Tools
Hand tools offer precision for planting and trimming. Essential picks include sturdy shovels, trowels, ergonomic pruning shears for deadheading, and heavy-duty loppers for thicker branches. These lightweight tools let crews work in tight spots without fuel or battery concerns.
Power tools boost efficiency on larger jobs. Cordless string trimmers carve crisp edges around beds and fences. Electric tillers speed up soil prep and reduce manual strain. Look for battery-powered models to cut maintenance and eliminate gas storage.
Heavy Equipment & Rentals
Mini-excavators and skid-steer loaders handle excavation and grading on mid-scale sites. Plate compactors and garden equipment ensure a solid base for hardscape. Renting machines by the day aligns cost with project phase and avoids idle equipment expenses.
Safety & Maintenance
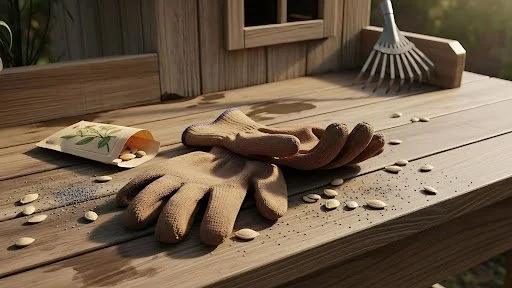
Equip every crew member with gloves, eye protection, and hard hats. Inspect tools before use to check for loose parts or frayed cords. After each shift, clean blades, lubricate moving parts, and sharpen cutting edges. Regular upkeep extends tool life and ensures jobsite safety.
Step-by-Step Implementation Guide
Site Clearing & Grading
Begin with a thorough site clearing to remove debris, old plants, and unwanted structures. Screen topsoil for reuse in planting beds.
• Remove roots, rocks, and concrete fragments.
• Level high and low spots for proper runoff.
Use skid-steers or laser-guided graders to achieve a consistent slope. Map sun and shade to align future plantings and structures.
Hardscape & Structures
Prepare a compacted subbase of crushed stone or gravel for patios, walkways, and retaining walls. Verify base levels with a laser level before laying pavers or blocks.
Base Preparation
• Spread and compact material in 4-inch lifts.
• Check grade with a straightedge.
Feature Installation
Install elements such as pergolas,firepit, and outdoor kitchen footings using local code requirements. Anchor fixtures with concrete and seal joints for weather resistance.
Irrigation & Planting
Install a drip-irrigation network with smart controllers and zone valves near key plant groups.
Controller Setup
• Mount the controller in a sheltered spot.
• Group emitters by water needs.
Plant in order of size: large trees and shrubs first, then perennials, annuals, and ground covers. Backfill with amended soil and apply 2 inches of mulch to conserve moisture.
Decor & Final Styling
Outline pathways and focal points with low-voltage or solar lights. Arrange furniture in conversation clusters and add outdoor rugs for comfort.
• Highlight water features or sculptures.
• Position planters and outdoor art.
Finish with a deep soak of all new plantings and review system functions. Perform a final walk-through to ensure every element works as intended.
Project Review
Check each zone against your timeline and budget. Document adjustments and take photos for records. Confirm permits are closed out and obtain client approval. This final review safeguards quality and ensures every detail aligns with the original plan.
Maintenance Best Practices
Regular maintenance keeps systems efficient and plants healthy. Follow these best practices to streamline care routines, reduce downtime, and control costs.
Watering Schedules & Smart Controllers
Plan irrigation tune-ups each late winter and winterize pumps by August to cut service costs by 10 to 15%. Embed soil moisture sensors and Wi-Fi controllers for real-time alerts on dry spots or pressure drops. Conduct monthly or quarterly inspections of filters, valves, and emitters to catch leaks early and reduce unplanned downtime by up to 45%.
Pruning, Fertilizing & Mulching
Prune shrubs and trees in late winter or early spring before new growth. Apply balanced slow-release fertilizers (N-P-K tailored to plant needs) in early spring and mid-summer. Lay 2 to 3 inches of organic mulch to conserve moisture, moderate soil temperature, and suppress weeds.
Equipment Upkeep
Sharpen mower blades and lubricate trimmer blades every 25 hours of use. Service irrigation pumps, replace aging belts, and update smart controller firmware via a CMMS dashboard for consistent work order tracking.
Sustainability & Eco-Friendly Innovations
Green Materials
Use recycled composite lumber and permeable pavers to cut waste and improve drainage.
Water-Conserving Technologies
Install drip-line irrigation with soilmoisture sensors and rainwater harvesting systems to lower water use.
Native Planting
Select local plant species adapted to your region to reduce maintenance and support local ecosystems.
Modular Kits
Choose prefabricated snap-together planter modules and modular hardscape kits for minimal on-site waste and easy assembly.
Conclusion
From initial measurements to final styling, a well-chosen set of landscape tools and a clear process can turn any outdoor project into a success story. By combining precise site assessment, digital and analog planning, detailed budgeting, and a phased implementation plan, you gain control over each step. Regular maintenance and sustainable choices help preserve your work and reduce long-term costs.
Key takeaways:
• Measure and map your site accurately to build a reliable base plan
• Use both outdoor design software and analog sketching to refine design ideas
• Create detailed budgets and phased schedules with built-in contingency funds
• Select the right mix of hand tools, power tools, and rental equipment
• Follow a structured sequence: clearing, grading, hardscaping, irrigation, planting, and styling
• Implement maintenance routines with smart controllers, seasonal tune-ups, and eco-friendly materials
With these landscape tools and management methods in hand, you can optimize outdoor operations and achieve perfection on any scale. Now it is time to bring your vision to life and transform outdoor operations into lasting value.
Ellie Williams

Ellie Williams studied at Miami State University and majored in Marketing with a minor in creative writing. She enjoys doing freelance writing on general business, wellness, and lifestyle tips. During her free time, she enjoys catching up with friends and family or attending local events.
Can You Sell a House With an Old AC System in the Vegas Heat?
Selling a home in Las Vegas comes with unique challenges, and one of the biggest concerns for buyers is air conditioning. Desert temperatures regularly climb above 100 degrees, which means cooling systems play a huge role in everyday comfort. When a house has an older AC unit, many homeowners worry that buyers will walk away from the deal.
We partnered with a real estate company for this post. The opinions in the post are honest. All reviews and opinions expressed in this post are based on our personal views. We are excited because we know you will love it.
Selling a home in Las Vegas comes with unique challenges, and one of the biggest concerns for buyers is air conditioning. Desert temperatures regularly climb above 100 degrees, which means cooling systems play a huge role in everyday comfort. When a house has an older AC unit, many homeowners worry that buyers will walk away from the deal.
In reality, homes with aging cooling systems still sell every day. Buyers often look at many factors beyond one mechanical system. Location, property size, layout, and future improvement potential can all influence a purchase decision. Understanding how buyers think about older AC systems can help sellers approach the process with more confidence.
Why Cooling Systems Matter in Desert Climates
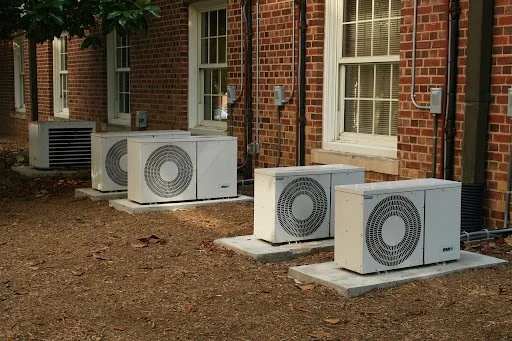
In a hot desert city like Las Vegas, a reliable cooling system is not a luxury. It is part of daily living. During long summers, indoor temperatures can quickly become uncomfortable without proper air conditioning. For this reason, buyers often ask questions about the age, condition, and maintenance history of an AC unit when touring a property.
An older AC system does not automatically eliminate buyer interest. Many homes built years ago still operate with units that have provided service for decades. Buyers often consider whether the system still functions properly and how soon replacement may be necessary. Some buyers even expect certain components of a home to be older.
Properties in established neighborhoods frequently include aging mechanical systems. When buyers see a home priced appropriately, they may simply factor potential upgrades into their plans.
How Sellers Still Close Deals With Older AC Units
Many homeowners assume that replacing an air conditioner is required before selling. In some situations that may help attract buyers. In other cases, sellers move forward without major upgrades and still find interested buyers. Companies such as Fast Vegas Home Buyers often purchase properties in various conditions, including homes with older cooling systems. These buyers evaluate a property as a whole rather than focusing on a single component.
They look at overall potential, neighborhood demand, and possible renovation opportunities. Traditional buyers can also remain interested when they see value in a property. If the structure is solid, the layout is appealing, and the location fits their needs, an aging AC system may simply become part of their renovation plans.
Some homeowners choose to provide information about the unit’s maintenance history. Service records, filter replacements, and repair documentation help demonstrate that the system has been cared for properly.
Signs Buyers Look For During Home Tours
Buyers rarely walk into a home and immediately search for the air conditioning unit. They typically focus first on the overall feel of the property. Comfort, airflow, and indoor temperature often give the first clues about how well the system performs. If the house feels cool and comfortable during a showing, buyers may feel reassured about the condition of the system. When indoor air feels stagnant or warm, they may begin asking questions about the equipment.
Many buyers also check visible components such as vents, thermostats, and exterior condenser units. Clean vents, well-maintained outdoor equipment, and organized utility areas can create a positive impression. Noise level also matters. A loud or struggling AC unit may draw attention, while a quiet system operating smoothly can help buyers feel confident during their visit.
Pricing Strategy When Cooling Equipment Is Aging
Pricing plays an important role when selling any home with older features. Buyers understand that mechanical systems eventually reach the end of their lifespan. When sellers price a property realistically, buyers often accept that upgrades may be part of ownership.
Real estate professionals frequently review recent residential neighborhood sales before recommending a listing price. Homes with updated systems may sell for higher amounts, while houses with older equipment sometimes reflect those price differences.
Some sellers choose to offer small incentives during negotiations. A credit toward closing costs or future repairs can make a buyer feel more comfortable moving forward with the purchase. These adjustments often help balance concerns about replacement costs while keeping the transaction moving smoothly.
Small Improvements That Help a Home Feel Cooler
Even when an AC unit is older, small improvements can help a home feel more comfortable during showings. These changes create a better experience for buyers walking through the property.
Helpful steps may include:
Replacing air filters before showings
Cleaning vents and removing dust buildup
Adjusting the thermostat to maintain a comfortable temperature
Clearing debris around the outdoor condenser unit
Using ceiling fans to improve airflow
These simple actions help buyers experience the home at its best. A cool, comfortable interior often leaves a stronger impression than a house that feels warm or poorly ventilated.
Buyers Who See Renovation Potential
Not every buyer expects a move-in-ready property. Some actively search for homes they can update over time. An older AC system can fall into that category. Investors and renovation-minded buyers often evaluate replacement costs alongside potential long-term value. If the property sits in a desirable Las Vegas neighborhood, installing a new cooling system may feel like a reasonable investment. New homeowners sometimes prefer choosing their own upgrades as well. Selecting modern energy-efficient equipment allows them to control comfort levels and reduce future energy costs. Because of this mindset, an aging AC system does not automatically prevent a successful sale.
What Sellers Should Keep in Mind During the Process
Selling a home with an older air conditioning unit requires clear communication and realistic expectations. Transparency helps create trust between sellers and potential buyers. Providing accurate information about the system’s age and performance allows buyers to make informed decisions. When questions arise during inspections, open conversations often keep negotiations productive. Homeowners can also explore different selling paths depending on their priorities. Some prefer traditional listings, while others consider faster options that involve fewer repairs and quicker timelines. Each approach offers different advantages depending on the seller’s goals and situation.
Setting Realistic Expectations for Your Sale
Homes across Las Vegas sell with a wide range of property conditions every year. Aging AC systems are just one of many factors buyers evaluate when considering a purchase. While cooling equipment matters in desert climates, it rarely determines the entire outcome of a sale. Buyers often think about the bigger picture. Location, layout, price, and long-term potential all influence their decisions. When sellers understand these priorities, they can approach the selling process with a clearer strategy.
With honest communication, realistic pricing, and a comfortable indoor environment during showings, homeowners can still attract strong interest. Even under the intense Vegas sun, properties with older AC systems continue to find new owners ready to make the house their own.
Frequently Asked Questions
Q1: Can I sell my house in Las Vegas if it has an old AC system?
A: Yes! Homes with older AC systems sell all the time in Las Vegas. Buyers consider various factors, including location, property size, and layout, rather than just focusing on the age of the AC unit. If your home is priced appropriately and has other appealing features, you’re likely to find interested buyers.
Q2: What should I do to make my old AC system more appealing to buyers?
A: You can take a few simple steps to enhance buyer perception of your AC system. Clean the vents, replace air filters, and ensure the thermostat is set to a comfortable temperature during showings. Also, clearing debris from around the outdoor condenser unit can make a positive impression.
Q3: Who typically buys homes with older cooling systems?
A: Investors, renovation buyers, and companies such as Fast Vegas Home Buyers often purchase properties with aging systems. These buyers usually look at long-term potential and may already plan upgrades after purchasing the home.
Q4: Do I need to replace my old AC unit before selling my house?
A: Not necessarily! While a new AC unit might attract some buyers, many are open to older systems, especially if they see the overall value in the property. If you provide maintenance records or demonstrate that the system is functioning well, it can help reassure buyers without needing a full replacement.