

A resource for those seeking information on organizing and transforming spaces.

Guest Post - Free Yourself From Clutter | A Simple Guide To Get You Started
You know you need to declutter your house, but you’re not sure where to get started. Here’s a simple guide to help.
Free Yourself From Clutter | A Simple Guide To Get You Started

We’ve all got a junk drawer at home. You know the one. It’s the drawer in your kitchen that accumulates just about everything. Scissors, toothpicks, three different kinds of tape, a lighter, some rubber bands, a knife cutter, a few random jelly beans for some reason, and a receipt from three years ago, among other things.
Some people don’t limit it to their junk drawer, though, and the clutter that’s in the junk drawer takes over their entire house. Every drawer is a “junk” drawer. Closets are jam-packed, and the doors won’t shut. You can’t eat at the dining room table because it’s full of mail and other...stuff. There’s not a single surface in the house that isn’t covered.
If this sounds familiar, you probably live in a cluttered home. Clutter is simply anything you don’t like, don’t use, or don’t really need. In feng shui philosophy, it’s believed free-flowing energy creates health, wealth and love. If you have clutter in your house, you probably feel the opposite of those feelings. Clutter typically produces feelings of stress, anxiety, and recklessness.
But don’t worry; if your house is cluttered, it’s not too late to fix it. The thought of getting rid of all the clutter can be very overwhelming, but it can be done. In the article below, we will talk about clutter, and how to finally get rid of it.
The Signs Your House Is Cluttered

First things first; we need to find out if your house really is cluttered. Below is a list of 10 things that are telltale signs that you have a cluttered home. If you read anything off of this list and think, “This is me!” you probably live in a cluttered home.
Your medicine cabinet is full of expired medicine
You’re embarrassed to have guests over
You have a drawer full of chords that you’re sure you need, you just don’t know why
You find something you forgot you own every time you clean
You have posters and artwork on the floors and tables, not your walls.
There are clothes in your closet with the tags on them
You have a stack of cards and letters several years old
To you, cleaning is just putting things into the correct pile
You can’t even throw away your junk mail
You have the same shirt in ten different colors
If any of these struck a chord with you, your house is probably cluttered. Some of the things listed above might not seem like a huge deal, but they are often a symptom of a much larger problem.
Where Does Clutter Come From?

So you’ve accepted that you have a problem with clutter. The first step to getting rid of your clutter is to understand where clutter comes from. All clutter stems from indecision. You have ten colors of the same shirt because you couldn’t decide which color you liked best. You haven’t hung your artwork yet because you can’t decide where you want it.
You have stuff just laying around your house because you can’t decide what to do with it, and there is clutter in your life because you haven’t taken control and decided what’s important to you. When you fail to make decisions, you end up with clutter. It’s as simple as that.
Once you start making these decisions, then the clutter starts clearing up without you really trying. When you decide that shirt looks best in blue, you don’t need the other nine. When you decide that picture you bought looks fantastic over the mantle, it’s no longer taking up space on your dining room table.
If everything in your home has a place, and you put it where it belongs, and you get rid of everything that you don’t have a space for, clutter wouldn’t exist.
Why You Should Declutter

Admitting to the problem isn’t enough. If your house is cluttered, you need to fix it. Some people tend to justify their clutter, and say things like, “I know where everything is,” or, “If I didn’t need everything here I would’ve already gotten rid of it.” Those are just excuses, and the clutter really needs to go.
When you finally declutter your home, you will instantly start noticing how things are different. First, you’ll feel an instant wave of relief. All that stress you had because of the clutter will be gone. There’s science that backs this claim too. There’s a link between high cortisol, which is a stress hormone, and people who own homes with a high density of household objects. So, the more stuff you have, the more stress you experience. Remove the stuff, remove the stress.
You won’t feel as tired anymore. That’s right, the reason you’re always so tired could be directly related to the clutter in your home. A study done by the Princeton University Neuroscience Institute found that people with cluttered homes experience exhaustion as a result of expanding mental energy on stress that’s caused by your messy environment. Also, it’s harder to focus when your house is cluttered, so you have to try harder and spend more energy doing everyday tasks.
You won’t be putting yourself in constant danger anymore, either. How many times have you tripped over something in the floor, or knocked something off of a shelf above you because it was so cluttered? Every time you walk through or do any chores in your cluttered home, you’re putting yourself in physical danger. No one needs to sprain their ankle or get a concussion because they can’t figure out what to do with all their stuff.
Time To Declutter

Decluttering your house is one of those things that is easier said than done. The clutter in your home could have accumulated over years and years of indecision. It can be incredibly overwhelming, and the process of cleaning up the clutter is often more stressful than just living in the clutter. But because of what we’ve talked about above, the payoff is worth it. Living in a clutter-free home will significantly improve your quality of life, making the stress of decluttering worth it.
But, where do you start? You can’t just grab a trash bag a box and go nuts. You need to have a plan. The absolute first thing you have to do before you can accomplish anything is believing it’s possible.
For some of you reading this, your house has probably been cluttered for so long that you’ve given up hope of ever being clutter free. If that’s you, then the first step for you is to really believe that you can do this. Your home can be clutter free. You will never get rid of the clutter in your home if you don’t remove the clutter from your mind and allow yourself to believe it’s possible.
The “Hurricane List”
When you’re ready to start, a first thing to do is to decide what you would replace if you lost everything. If a tornado or a hurricane came through and just destroyed everything you own, what would be the first few things you replaced?
Don’t do this sitting in your home. Go to a friends house a coffee shop, or the library; somewhere where you can’t see any of the stuff sitting in your house. Just sit down and make a list of everything that would be on your list to replace immediately. Don’t worry about model numbers or brand names either. If your TV is the first thing you'd replace, just write TV. Once that is done, you can go back to your house and start cleaning, armed with a list of the things that are truly important to you.
Short, Focused Bursts
Once you’re ready to clean, it is best to work in short, focused bursts. It took a long time to accumulate the stuff, so it’ll take a long time to organize it and get rid of it. Don’t expect to complete a marathon session and get it all done in one day. Make a plan that targets specific areas you’re going to declutter, clean up, and organize over an extended period of time. Then stick to that plan, so you don’t get overwhelmed.
Something that works for a lot of people is picking one room, and then working on it in 30-minute bursts. Declutter for 30 minutes, and then rest for 30 minutes. The point of this is to avoid the emotions and stress that come along with decluttering a room that hasn’t been touched in years. When you start, set a 30-minute timer, and drop whatever it is you’re doing when it goes off and walk away. Leave the space completely and allow yourself to detach for 30 minutes before you come back. Then rinse and repeat.
Utility Over Sentiment
Anyone that has decluttered their house before will tell you the absolute hardest thing to do was get rid of sentimental items. It’s very easy to get attached to things. Maybe you’ve had them since you were a kid, they have a special meaning to you, or because they represent the hard work that went into buying them. That’s completely normal; everyone has things that are sentimental to them. When you’re trying to declutter, though, you need to be able to separate yourself from those feelings.
The best way to do that is to ask yourself these questions:
What Does This Do For Me That Nothing Else Does?
Think about the utility of the item you have. Why is it unique? What does it do? Can it do more than one thing?
Do I Own Anything Else That Can Replace This?
This is the point where you line up all of your staplers and decide which one is best. Because really, who needs eight staplers? Pick the stapler that does the best job, and that holds the most value to you. The other seven aren’t necessary.
Does This Have Sentimental Meaning To Me?
When you’re deciding which appliances or electronics to keep, those first two questions are pretty easy to answer. However, when you start looking at things like old photos and knick-knacks, utility doesn’t really apply. Sentimental value is important; we’re not here to downplay what something means to you. Just try not to get overwhelmed by how much everything makes you feel versus what it does for you and how much space it takes.
You can apply those three questions to everything you own. Give yourself the appropriate time to review everything instead of deciding a room or closet is fine just the way it is. It probably isn’t. Even if it seems okay to you, that box in your office full of old papers needs to be shredded. You’ll be much happier when they’re gone and they’re not crowding you at your desk.
Take A Deep Breath And Go
This won’t be easy. This is going to take time. You aren’t on an episode of hoarders, so there isn’t going to be a fleet of dump trucks and a team of movers and psychologists that show up to help you out.
But you can do this on your own or with the help of a select few loved ones. Start out by making your plan. Take it room by room and day by day. Work in thirty-minute bursts and don’t overextend yourself and get overwhelmed.
Once you’re done, you are going to thank yourself for working so hard to get everything cleaned up. You deserve all the advantages of living in a clutter-free home.
Republished, original text here.

Author Bio: Anna Kucirkova works as a copywriter for over 4 years. She speaks 3 languages, loves traveling and has a passion for kids and writing. While she has been to many places in Europe and South East Asia, she still wants to explore the rest of the world.

Guest Post - Declutter Your Home in 21 Days
Clutter can really take hold and ruin the appearance of an otherwise beautiful home. This infographic from our friends at HappyCleans looks at how you can make your home clutter free in just 21 short days. One area of concern in many homes is paper and this can pile up needlessly with the amount of bills, mails and other random bits around the house. The reality is the majority of these items can be thrown away or recycled.

Clutter can really take hold and ruin the appearance of an otherwise beautiful home. This infographic from our friends at HappyCleans looks at how you can make your home clutter free in just 21 short days. One area of concern in many homes is paper and this can pile up needlessly with the amount of bills, mails and other random bits around the house. The reality is the majority of these items can be thrown away or recycled.
The fridge & freezer is one appliance in that also needs regular decluttering. Old jars of peanut butter and other random concoctions we never plan on consuming are often kept needlessly. Spend one of the 21 days just clearing this area out and it’ll be like having a new fridge.
Magazines and books can also tend to pile up and the majority of these will never be read again. Sort through them keeping your favourites and consider donating the rest to local charities. They would sure appreciate them and someone would of course benefit from reading them!
The entertainment area is another place we tend to needlessly store piles of DVDs and CDs. With the advent of streaming services such as Netflix and Spotify the majority of these have become redundant. Again, these would be perfect for local charities.
Check out the full infographic now and begin your decluttering journey today. Today is the beginning of your brand new home, enjoy!
Author bio
Kat Buckley is the owner of a local services company called HappyCleans. She is passionate about giving people a little extra time to spend with loved ones by cleaning their homes.

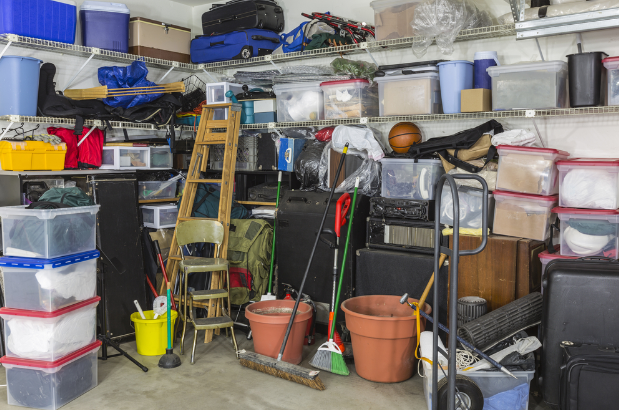
Guest Post - 12 Ways to Better Organize Your Garage and Workshop Storage Space
If your home has a garage, you know how easy it is for it to become the “everything room.” If there’s not a better place for something (or, let’s be real, if the right place is too far away), it often ends up in the garage. Many homeowners find it frustrating and stressful to see a mess every time they pull into or out of their garage, and it can be even worse if the area also doubles as a workshop.

If your home has a garage, you know how easy it is for it to become the “everything room.” If there’s not a better place for something (or, let’s be real, if the right place is too far away), it often ends up in the garage. Many homeowners find it frustrating and stressful to see a mess every time they pull into or out of their garage, and it can be even worse if the area also doubles as a workshop.
However, you’re not the first to have this problem. Many brilliant DIYers and home organizers have created their own solutions for getting your garage in shape, and there are many excellent products on the market now as well. Here are some of the simplest and most effective strategies and products you can use.
Zone it out.
A plan is the first step toward a well-organized garage. It’s a good idea to measure your garage, then sit down and create a diagram of where things could go. Plot out where you usually park and where you’re currently storing large equipment. Then, start figuring out how to consolidate and organize. However, don’t treat your original plan as something set in stone. It will most likely need to change and evolve as you go. Stay flexible and don’t worry if your first idea isn’t perfect.
Shelving is a basic need.
Just getting some basic metal shelving can be a huge upgrade for your garage or workshop. Four-pole steel shelving racks are inexpensive, widely available, and highly versatile. You can also utilize floor space even further by going with wall-mounted shelving. It’s a good idea, though, to implement shelving as one part of a larger plan. Shelving rarely solves a problem on its own, and it can become just as messy as the rest of your garage!
Use a pegboard or other hand tool storage solutions.
There’s a reason the pegboard is an iconic element of the garage or workshop area. It’s a great way to keep tools visible and easily accessible without sacrificing space. If you don’t have room for a pegboard, you can also consider using VELCRO® Brand Hook and Loop Fasteners on your smaller hand tools. A few quick applications of these sturdy fasteners can create an easy space to store and keep track of your screwdrivers, hammers, and other commonly-used tools.
Create a DIY mudroom to keep muddy shoes where they belong.
A mudroom is a great way to control mess in your home, particularly if you live in a climate with lots of precipitation (or have a very outdoorsy household.) You don’t even have to have an actual separate room for it. In many cases, just installing a basic coat rack and shoe rack by the entrance to your home is enough. For smaller households, you could just add a couple of 3M Command Hooks for coats and a small mat for shoes. As always, modify according to your needs!
Using something frequently? Put it on wheels.
This tip is particularly good for those who use their garage as a workshop. A rolling cart or toolbox is perfect for accessing all of your most frequently-needed items. Whether it’s a standard plastic cart or a professional-level rolling toolbox, the important thing is that it’s mobile!
Try a lattice rack for lumber and other long items.
Here’s an ingeniously simple DIY tip that can save you serious workshop space. It’s easy to turn a standard lattice into a wall-or-ceiling mounted rack that’s great for storing piping, lumber, or even fishing poles!
Get the little things organized.

As you probably know, drill bits, socket wrenches and other small and numerous items are highly prone to get lost. Invest in some good small-item organizers and label them well. Most are designed to be easy to stack and slot, so getting a small metal rack and going vertical is another great space saver here.
Labels, labels, labels.
Speaking of labels: Organization can only be so helpful when you don’t know where anything is! Invest in a label maker or even just use paper signs or writing on boxes. The important thing is to have a labelling system that’s easy to use and understand.
Make it critter-proof.
Much as we love our animal friends, there’s a time and place for them. For most people, the garage is not that place. It’s an easy afternoon’s work to inspect and replace your garage threshold to keep out stray animals.
Don’t forget the ceiling.
We’ve already discussed the power of vertical storage, but maybe you didn’t expect to go this vertical. If you’ve got some stuff you don’t use very often but need to keep around, ceiling racks are a surprisingly popular and efficient solution. Almost every home improvement store offers them, and they can fit a variety of standard-sized storage totes.
Tackle bulky items such as hoses and extension cords.
Bulky corded items such as hoses and extension cords can quickly turn into a tangled mess. What’s more, it’s easy to damage these items by not storing them correctly—they should be stored in a neat roll any time they’re not in use. Installing a few heavy-duty metal hooks on the walls is an easy way to get them into a manageable state, and cable straps and organizers will help keep the rolls together.
Utilize studs to build your own shelving.

Finally, make sure you’re using what your building gives you. If your garage is unfinished, you may have exposed studs. These actually present a great opportunity to build some high-utility shelving and save a lot of space. Take a look at one of the many guides to building between-the-studs shelving for ideas and inspiration!
Whether your garage looks like a war zone or just needs a little TLC to get its best look, it’s easier than you might think to get it under control. All of these projects involve commonly available materials, and only a few demand carpentry skills! Home organization and DIY are projects that anybody can tackle, and the garage is the perfect place to get started.
Author Bio: Halle Summers is a Marketing Coordinator for FASTENation Inc., a premier global manufacturer, technical converter, distributor, and designer of adhesive based fasteners and tapes. She has extensive knowledge of adhesives and fastener solutions, vendors, industry trends, and how they are used across various verticals. When she isn’t writing articles, she enjoys spending time in downtown Charleston, South Carolina and all the amazing food her hometown has to offer.

Guest Post - Prep Your Home for a Handover: A Pre-Move Cleaning Checklist
Moving into a new home can be so exciting and fun. Relocating can mean better opportunities, change (the right kind), and a fresh start. As such, when you’ve found the perfect place, almost all your thoughts will be about it.

Moving into a new home can be so exciting and fun. Relocating can mean better opportunities, change (the right kind), and a fresh start. As such, when you’ve found the perfect place, almost all your thoughts will be about it.
Before you move on, however, think about your old home and the responsibilities you still have to take care of it. Whether you’re renting or owned your former abode, it still needs to be left in near pristine condition. After all, it will be a “new” home, signaling a fresh start, for some other lucky person.
Below is a cleaning checklist for your old house before moving to the new one.
Exit Cleaning Checklist
If you were renting your old place, exit cleaning is important to get your full deposit or bond back. The landlord or caretaker of your former home will inspect every nook and cranny to see of the place to see if it is still presentable for new renters.
On the other hand, if you’re selling your house, cleaning is essential to attract potential buyers. Most people looking to purchase real estate don’t want a messy place from the outset.
When it comes to cleaning, work through every section of the house. Start with rooms that are the hardest to clean, and make your way to the easier parts of the home. Follow the checklist below as you are cleaning:
1. Kitchen
a. Appliances
Sometimes appliances are included with the lease of a place. Whether they were there before you came or were purchased by you, make sure the ones left behind are clean. Below are some of the kitchen appliances people usually don’t bring with them during a move.
Stove - Scrub the exhaust fan and hood. Use the self-cleaning option if it is available.
Microwave - Don’t forget to clean behind and underneath it. Make sure the inside is scrubbed clean as well.
Fridge - Scrub all the layers, dividers and compartments, and get rid of any accumulated ice in the freezer (if any).
b. Cabinets and Countertops
Open the cabinet doors and let them air out a bit, especially the ones on the bottom level where trash cans are usually kept. Then scrub every inch inside of them. Don’t forget to clean the exterior of the cabinet doors and to throw out any liners you used during your stay.
For countertops, start with the area surrounding the stove as it is usually the hardest to clean. Work your way to the sink and use cleaning solutions to polish it.
c. Floor
Most kitchen floors are tiled. Start by scrubbing them with specialized cleaning products. Try to clean the grout between each tile as much as possible. Wipe everything down with a mop and let it air dry.
2. Bathroom
a. Toilet
Most people focus on cleaning the inside of the toilet, but they should also scrub the outside of the bowl, the tank, and the base. If the seat needs replacing, do your landlord or the next renter a favor and buy a new one. They are relatively inexpensive and easy to install.
b. Bathroom Sink — Similar to the kitchen sink, scrub it clean using products to make it bright and shiny.
c. Shower Area
Don’t forget to clean the walls of the shower and floor.
Pick up any stray hair that might be sitting near the drain.
Use a vinegar solution to clean the shower head and make sure the water flows properly.
d. Floor — Follow the same cleaning procedure as the kitchen floor.
3. Living Room
a. Furniture
Typically, people bring all their furniture with them during a move. However, sometimes people leave a couple of pieces behind. If you are thinking of doing the same, make sure it is clean. Use a vacuum to clear furniture of any pet hair if you own one and let the pillows air outside.
b. Walls and Ceiling
Take out any screws, nails, or other items you used to hang pictures and other decorations on the walls. If you can, cover them up.
Get rid of any cobwebs in the corners. (Bonus Tip: If you are selling the place and can spare the change, paint the walls white.)
Dust any ceiling fixtures and make sure they are working.
c. Floor

Use specialized cleaning products on the floor. Depending on the type you have, dust, sweep, and vacuum the area.
4. Bedrooms
a. Floors — Follow the same procedure mentioned for the floor in the living room section.
b. Walls and Ceilings — Refer to the cleaning instructions for the walls and ceiling in the living room.
5. Garage
Take out all the stored items in the garage. Scrub the walls and floor clean.
6. Yard
Uproot any weeds in the yard. Try to make it look presentable by mowing the grass and raking up leaves.
7. Patio
Wipe down any patio furniture you may be leaving behind. Scrub the deck if it is an outdoor patio. If it is indoor, clean it the same way you would the bedroom.
Time to Start Afresh
Think about the new renters or owner of your former home and how happy they would be in a beautiful, spotless place. Refer to the checklist above to make sure that the entire house is ready for its new owners.
If cleaning your old place is too much of a hassle, consider hiring professional cleaners to do it for you. After all, no one would want to leave an old home knowing they’ve left behind a mess.
Your new place would have (hopefully) been cleaned by someone, too.
As for you, it’s now time to move on and begin a new life in your new home.
AUTHOR BIO
Craig Jones is the Managing Director at Aussiemove, Australia’s largest independent moving alliance. With 23 years of experience at Aussiemove, he has the skills and the highly trained team to move families safely and reliably, in Adelaide, across Australia and around the world.