

A resource for those seeking information on organizing and transforming spaces.
How to Organize Your Utility Closet Without Blocking Your HVAC System
An organized utility closet can make everyday storage easier, but it should never get in the way of your heating and cooling equipment. If your closet houses an HVAC system, the space needs to stay open enough for airflow, maintenance, and safe access. These simple tips from an HVAC company can help homeowners use HVAC closet storage wisely while keeping airflow storage clear and practical.
We partnered with a home improvement company for this post. The opinions in the post are honest. All reviews and opinions expressed in this post are based on our personal views. We are excited because we know you will love it.
An organized utility closet can make everyday storage easier, but it should never get in the way of your heating and cooling equipment. If your closet houses an HVAC system, the space needs to stay open enough for airflow, maintenance, and safe access. These simple tips from an HVAC company can help homeowners use HVAC closet storage wisely while keeping airflow storage clear and practical.
Utility Closet Organization Basics
A utility closet is a small service space used to house important home systems, such as an air handler, furnace, water heater, electrical panel, ductwork, cleaning supplies, or household storage. When HVAC equipment is inside the closet, the space is no longer just a storage area. It also becomes part of the home’s comfort, safety, and maintenance system.
A utility closet may look like extra storage, but when it contains HVAC equipment, it is really a working mechanical zone. That means the closet is doing two jobs at once: holding household items and supporting the system that heats, cools, filters, and circulates air through the home.
Good utility closet organization matters because HVAC equipment needs room to breathe, release heat, pull in or move air, and stay accessible for filter changes, inspections, repairs, and emergency shutoffs. A closet packed with boxes, brooms, laundry products, or seasonal décor can quietly create problems before a homeowner notices anything is wrong. When the closet is crowded, the equipment may have less breathing room, filters may be harder to replace, service panels may be blocked, and small warning signs, like a leak, dust buildup, strange smell, or loose duct connection, may be hidden behind clutter.
The goal is not to make the closet "Pinterest perfect." The goal is to make it easy for the HVAC system to operate, easy for homeowners to maintain, and easy for a technician to inspect without moving a pile of storage first. The best organized HVAC closet is not the fullest closet. It is the one that keeps storage controlled, airflow open, and service access clear. A well-organized HVAC closet should feel open, visible, and intentional.
Avoid Blocking Your HVAC Closet
When stored items block an HVAC closet, the first issue is often restricted airflow. The system may have to work harder to move conditioned air through the home, which can lead to weak airflow, uneven temperatures, longer heating or cooling cycles, higher energy use, more dust, and unnecessary strain on the equipment.
Blocked closet space can also make routine maintenance harder. If a technician has to move stacks of boxes before reaching the unit, filter slot, drain line, shutoff switch, or access panel, small issues may go unnoticed for longer. A small condensate drain leak may soak into cardboard before anyone notices. Dust can collect around the unit and get pulled toward the system. A filter slot may become so hard to reach that filter changes are delayed. A service panel may be blocked, turning a simple inspection into a bigger hassle.
In some cases, clutter can increase fire risk, trap dust around the system, block combustion or ventilation openings, interfere with condensate drainage, or make it harder to reach the equipment quickly during an emergency.
Cleaning supplies create another concern. Aerosols, solvents, paints, gasoline, pool chemicals, and strong household cleaners should not sit near HVAC equipment because they may be flammable, corrosive, or harmful to indoor air quality if fumes are pulled into the system.
A useful way to think about it is this: if an item would make it harder to see, reach, clean, inspect, or safely service the HVAC system, it does not belong in that spot.
Signs Your HVAC In Closet Needs Airflow Storage
A homeowner may need more open space or better airflow storage if the HVAC closet feels packed, hot, dusty, difficult to access, or hard to visually inspect. Warning signs include boxes touching the unit, items leaning against ducts or panels, a blocked return grille, a filter that is difficult to remove, shelves that make it hard to reach the front of the equipment, items stacked in front of vents, returns, or louvers, or no clear floor space in front of the unit.
Comfort problems can also point to an airflow issue. If certain rooms feel stuffy, the system runs longer than usual, airflow from vents feels weak, energy bills rise without a clear reason, or the closet door rattles or pulls inward when the system runs, the closet setup may be interfering with proper air movement.
A simple test is to open the closet and ask: "Could a technician safely reach every service panel, replace the filter, inspect the drain line, access the shutoff, and look around the unit without moving my storage?" If the answer is no, the closet needs more open space and a better organization plan.
Other warning signs are easy to miss. Boxes may be dusty on the side facing the equipment, and the closet may feel unusually warm. Comfort issues inside the home can also be clues, so the utility closet should be checked as part of the troubleshooting process.
When homeowners have HVAC in closet spaces, the area should pass three tests: air can move, people can access the equipment, and problems can be spotted quickly.
What Not To Store In An HVAC Closet
Homeowners should avoid storing anything directly against HVAC equipment, vents, returns, filter openings, or access panels. These areas are not storage surfaces. They are part of the system’s operating and service space.
That includes cardboard boxes, paper products, towels, linens, plastic bins, mops, brooms, vacuum hoses, toys, luggage, holiday decorations, pet supplies, and loose household clutter. Even harmless-looking items can become a problem if they block airflow, collect dust, press against hot surfaces, shift into the equipment, or prevent fast service access.
The most important items to keep out of an HVAC closet are flammable or chemical products. That includes paint, paint thinner, gasoline, lighter fluid, propane cylinders, aerosol cans, pesticides, pool chemicals, heavy-duty cleaners, solvents, adhesive products, and oily rags. These products should be stored in a safer location away from mechanical equipment.
Nothing should cover or crowd a return air grille, supply vent, louvered door, filter slot, disconnect switch, drain pan, condensate line, gas shutoff, or removable equipment panel. These areas need to remain visible and reachable.
Homeowners should also avoid storing heavy items above HVAC equipment. A bin falling onto a line, wire, panel, or drain connection can create a problem that did not need to happen.
A helpful rule is: if the item sheds dust, releases fumes, catches fire easily, leaks, tips over, or blocks visibility, keep it somewhere else.
Safe HVAC Closet Storage Clearance
Follow the HVAC manufacturer’s installation manual and local code requirements, because clearance needs vary by equipment type, fuel source, model, and closet design. Homeowners should always ask a licensed HVAC professional when they are unsure.
As a general rule, homeowners should leave generous open space around the unit and avoid building shelves or placing bins close enough to restrict airflow or block service access. Many residential codes and manufacturer instructions require working clearance around furnaces and air handlers, and some equipment needs specific clearance from combustible materials. A common minimum for some furnace or air-handler compartments is several inches along sides, back, and top, plus adequate space in front for service access, but homeowners should not treat one number as universal.
For practical closet organization, think beyond the minimum. The closet needs two types of space: operating space and working space. Operating space helps the equipment get the airflow and ventilation it needs. Working space gives a technician enough room to inspect, remove panels, replace parts, clean components, and reach shutoffs.
Before adding shelves, bins, or cabinets, homeowners should keep the front of the unit clear, leave access panels unobstructed, protect the filter path, avoid covering vents or return grilles, avoid storing items above the unit where they can fall or shed dust, and make sure stored items cannot fall into the equipment. Shelving should be installed only where it does not crowd the system or reduce service access.
A better question than "How much can I fit in here?" is "What space should stay permanently empty?" In an HVAC closet, empty space has a job. When in doubt, give the HVAC system more room, not less.
HVAC Closet Storage That Keeps Airflow Open
Separate "mechanical space" from "storage space." Keep the HVAC side open and use only the remaining wall areas for carefully selected storage. The HVAC zone should stay open, visible, and easy to reach. The storage zone should be limited to wall areas, shelves, or bins that do not interfere with airflow, vents, returns, filter changes, shutoffs, or service panels.
Start by removing everything from the floor around the equipment. Then relocate chemicals, flammable products, and rarely used items. Store only low-risk, non-chemical household items in the closet.
Open wall shelving can work well when it is installed away from the unit, vents, returns, and access panels. Wall hooks are useful for lightweight items like a broom or dustpan, as long as they do not swing into the equipment. Labeled bins can keep small items contained, but they should be placed on shelves instead of stacked on the floor around the system. Open shelving, wall-mounted hooks, shallow bins, and labeled containers usually work better than deep stacks of mystery boxes.
Keep replacement filters nearby if there is room, but never in a way that blocks the filter slot or service area. Keep the floor around the HVAC equipment clear, avoid loose piles, and leave a direct path to the filter, shutoff, and service panels. Avoid stacking items on top of, beside, or in front of HVAC components.
A good rule is that everything in the closet should have a defined place, and nothing should depend on leaning against the HVAC equipment for support. The best utility closet organization is simple enough to maintain. If every item has a clear place and the HVAC equipment remains easy to see, the closet is much less likely to become unsafe or overstuffed again.
When homeowners plan HVAC closet storage carefully, the closet can still be useful without becoming crowded, unsafe, or difficult to service.
When To Use A Ventilated Storage Cabinet
A ventilated storage cabinet makes sense when homeowners need to store small household items but still want air movement and visibility. It can help contain clutter without turning the closet into a sealed, overloaded storage box. It is a good option for small household items, spare filters, batteries, light bulbs, or maintenance supplies, as long as the cabinet is not placed too close to the HVAC equipment or blocking any required access.
Open shelving works best for lightweight items that are used regularly and need to stay visible. Because open shelves do not trap items behind closed doors, they make it easier to see when the closet is getting too crowded.
Wall hooks are ideal for tall, narrow tools like brooms, dusters, a dustpan, or a compact step stool, as long as they are mounted away from the unit and do not block a vent, return, door louver, or access panel. Hooks should not allow items to swing into the HVAC unit.
Labeled bins are best for grouping small items, such as spare filters, light bulbs, extension cords, or home maintenance supplies. Clear labels prevent the "mystery bin" problem, which is how utility closets slowly become cluttered again. They work especially well when the labels are specific: "HVAC filters," "light bulbs," "cleaning cloths," or "home repair supplies." Vague labels like "miscellaneous" usually mean the clutter will come back.
The right storage choice depends on the item. If it needs airflow, visibility, or frequent access, choose open or ventilated storage. If it is hazardous, flammable, dusty, or rarely used, it probably belongs somewhere else.
A ventilated storage cabinet should still leave enough empty space around the HVAC system, especially when there is HVAC in closet equipment that needs steady airflow and access.
Why Storage Ventilation Matters
Storage ventilation helps because it discourages the packed, sealed-off closet setup that causes many HVAC storage problems. Ventilated shelves, wire baskets, open-front bins, and cabinets with vented doors allow homeowners to organize items without creating a dense wall of storage around the equipment.
Good storage ventilation also improves visibility. When homeowners can see what is stored, they are less likely to overbuy, overstack, or shove items in front of important HVAC components. It becomes easier to spot dust buildup, water near the drain line, moisture, rust, disconnected parts, a blocked filter area, or items drifting too close to the unit.
Ventilated storage does not replace the HVAC system’s required airflow or equipment clearance, and it does not mean homeowners can store anything anywhere. But it supports a safer closet layout. It keeps belongings contained while helping the closet stay open, serviceable, and easier to maintain.
Think of storage ventilation as a clutter-control tool. It helps the closet stay organized without sacrificing the breathing room, visibility, and access that the HVAC system depends on.
Utility Closet Organization Checklist
Homeowners can use this simple checklist to keep a utility closet organized and HVAC-safe:
First, remove everything from the closet and identify the HVAC equipment, filter slot, vents, returns, access panels, drain line, shutoff switch, and service path.
Second, check the manufacturer’s manual or ask an HVAC professional how much clearance the system requires.
Third, keep the floor around the equipment clear and remove anything touching the unit, ducts, vents, return grille, filter slot, access panels, drain line, or shutoff.
Fourth, create a permanent empty zone around the equipment so the system can operate and a technician can work without moving storage first. This empty area should support airflow storage instead of becoming another place for bins, tools, or supplies.
Fifth, move chemicals, paints, fuels, aerosols, solvents, pesticides, pool products, strong cleaners, oily rags, and other hazardous materials to a safer storage location.
Sixth, use wall-mounted storage, open shelving, wall hooks, a ventilated storage cabinet, or labeled bins only in areas that do not block airflow or service access.
Seventh, label bins clearly so the closet stays organized after the first cleanup.
Eighth, keep replacement filters easy to reach, but do not stack them against the HVAC unit or block the filter opening.
Ninth, avoid stacking heavy bins above the HVAC equipment.
Tenth, inspect the closet monthly for dust, clutter creep, water around the unit, odors, blocked vents, or items that have shifted too close to the equipment.
Finally, leave the closet less full than you think it can be. With HVAC storage, empty space is not wasted space. It is the safety and performance zone your system needs to work properly.
A utility closet with HVAC equipment should never be organized like a junk drawer. It should be organized like a small control room for home comfort: clean, clear, visible, and easy to service.
Why Your Drains Keep Clogging Even After Professional Cleaning
You had a plumber out, they cleared the blockage, and everything seemed fine. Then a few weeks later, the water is backing up again. Sound familiar? Recurring drain clogs are one of the most frustrating plumbing problems homeowners face, and the answer isn’t always as simple as another round of snaking or hydro jetting. If your drains keep clogging despite professional cleaning, there’s usually an underlying reason that hasn’t been addressed yet.
We partnered with a home improvement company for this post. The opinions in the post are honest. All reviews and opinions expressed in this post are based on our personal views. We are excited because we know you will love it.
You had a plumber out, they cleared the blockage, and everything seemed fine. Then a few weeks later, the water is backing up again. Sound familiar? Recurring drain clogs are one of the most frustrating plumbing problems homeowners face, and the answer isn’t always as simple as another round of snaking or hydro jetting. If your drains keep clogging despite professional cleaning, there’s usually an underlying reason that hasn’t been addressed yet.
The Cleaning Fixed the Symptom, Not the Cause
Drain cleaning removes whatever is blocking the pipe at that moment, whether it’s a grease buildup, a tangle of hair, or a wad of debris. But if something structural is causing waste to accumulate in the same spot over and over, clearing the clog is only a temporary fix. Think of it like mopping up a puddle without fixing the leak above it. The mop does its job, but the water keeps coming back.
This is especially common in older homes where the pipes themselves have deteriorated over decades of use. Corrosion, mineral buildup on interior pipe walls, and shifting ground can all create conditions where debris naturally collects, no matter how thoroughly the drain is cleaned.
Common Reasons Drains Clog Again After Cleaning
Tree Root Intrusion
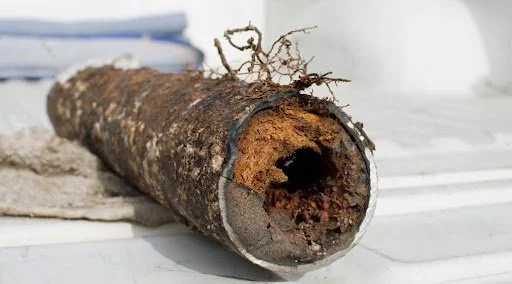
Tree roots are one of the most common culprits behind recurring sewer and drain clogs, particularly in older neighborhoods with mature landscaping. Roots naturally seek out moisture and nutrients, and even a hairline crack in a sewer pipe is enough of an invitation. Once inside, roots expand over time and create a web that catches everything flowing through the line. A plumber can cut roots out during a cleaning, but unless the pipe itself is repaired or lined, the roots will grow back, often within months.
Pipe Bellies and Negative Grade
Sewer pipes are designed to flow downward at a specific grade so that waste moves toward the main sewer line by gravity. When the ground shifts, pipes can sag and create a low spot called a belly. Wastewater slows down in that section and solids begin to settle rather than flow through. Over time, those settled solids build up into a blockage. Drain cleaning flushes out what’s collected there, but the belly remains, and so does the problem.
Grease Buildup in Kitchen Lines
Kitchen drain lines are particularly vulnerable to grease and fat deposits. Even if you avoid pouring cooking oil directly down the drain, small amounts accumulate every time you rinse a pan or wash dishes. Grease coats the interior of the pipe, and over weeks and months that coating thickens. Hot water clears some of it, and a professional cleaning removes the active clog, but the pipe walls remain coated and quickly start collecting new material.
Damaged or Collapsed Pipe Sections
Clay tile and cast iron pipes, both common in homes built before the 1980s, are prone to cracking, separating at joints, and in severe cases, collapsing. A cleaning can temporarily restore some flow, but a partially collapsed pipe will clog again almost immediately because the passageway is simply too restricted for normal use. This type of problem requires repair or full replacement of the affected section.
Why You Need to See Inside the Pipe
The only reliable way to diagnose a recurring drain problem is to actually look inside the pipe. A sewer camera inspection by RJP Plumbing & Heating uses a flexible waterproof camera fed directly into the drain line, giving a plumber a real-time view of exactly what’s happening inside. Bellies, root intrusions, cracks, grease coating, and collapsed sections all show up clearly on camera, something no amount of poking around from the outside can tell you.
Skipping the camera inspection when drains are repeatedly clogging is a bit like a doctor treating symptoms without ordering any tests. You might get temporary relief, but without knowing what’s actually going on, the problem will keep coming back. A camera inspection eliminates the guesswork and lets your plumber recommend the right long-term fix rather than the same short-term patch over and over.
What Happens After a Camera Inspection
Once your plumber has a clear picture of what’s inside the line, the path forward becomes much more straightforward. Minor root intrusion caught early can sometimes be handled with root treatment and regular maintenance. A pipe belly may require excavation and re-sloping the line. Corroded or cracked sections can often be rehabilitated with trenchless pipe lining, which avoids tearing up your yard or flooring. And if a section has fully collapsed, replacement is usually the only option.
The key takeaway is that each of these solutions is targeted. You’re not paying for another cleaning that will only buy you a few more weeks of function. You’re addressing the actual cause and getting ahead of it.
Don’t Keep Treating the Same Clog
There’s a point where repeated drain cleanings stop making financial sense. If you’ve had the same drain cleared two or three times in the past year, what you’ve spent on service calls has likely already covered the cost of a proper inspection. And every month you go without addressing the root issue, you risk the problem progressing into something more serious and more expensive.
Recurring drain clogs are almost always telling you something. They’re not random bad luck, and they’re not something you just have to live with. The right inspection and the right repair can put an end to the cycle for good.
If your drains keep backing up despite repeated cleanings, reach out to a licensed plumber who can run a camera through the line and give you a straight answer about what’s really going on. That one step will tell you more than a dozen service calls ever could.

Simple Home Maintenance Tasks That Improve Indoor Comfort
Comfortable homes don’t always need major renovations. Minor maintenance tasks may make a great difference in how you make your home feel daily. If done properly, these tasks won’t just improve overall comfort. They will also enhance temperature control and air quality.
We partnered with a home improvement company for this post. The opinions in the post are honest. All reviews and opinions expressed in this post are based on our personal views. We are excited because we know you will love it.

Comfortable homes don’t always need major renovations. Minor maintenance tasks may make a great difference in how you make your home feel daily. If done properly, these tasks won’t just improve overall comfort. They will also enhance temperature control and air quality.
Most comfort issues start with minor problems that are simple to fix. Sparing a couple of minutes of your time to inspect your home will prevent major issues later. Some of the maintenance tasks that can improve indoor comfort are:
1. Keep Air Pathways Clean
Clean airflow can help all rooms in your home feel more comfortable and fresher. Debris and dust may accumulate inside vents. Not to mention, they may minimise the efficiency of your system. As a homeowner, schedule air duct cleaning as part of your routine maintenance. This won’t just support a cleaner indoor environment. It will also improve airflow.
2. Replace Filters on Time
Air filters in ventilation systems are made to trap dust. So, they should be in good condition. If they clog, the entire system will work harder. Replacing them regularly is crucial. It will help make indoor space feel comfortable.
3. Seal Drafts around Windows and Doors
Gaps around your windows or doors are an issue. They will let outdoor air enter the house. Sealing those openings is important. By doing so, you will maintain a stable indoor temperature.
4. Clean Ceiling Fans and Vent Covers
Dust collects on vent covers and ceilings over time. As fans operate, they spread dust throughout your home. Cleaning them regularly keeps air fresh. Not to mention, it ensures those fixtures work effectively.
5. Manage Indoor Humidity
The level of humidity matters. It can impact how comfortable your home feels. Excess moisture creates a sticky feeling. But dry air causes discomfort. Using exhaust fans in your bathroom is crucial. It will help to maintain a healthier balance indoors.
6. Keep Floors and Carpets Clean
Carpets and floors usually collect dust. This dust can affect the quality of indoor air. So, regular cleaning is crucial. It will help create a more comfortable living space.
7. Check Your Thermostat Settings
Thermostats control how ventilation systems operate. Incorrect settings don’t just result in uneven temperatures. They also lead to unnecessary energy use. Reviewing settings every season will keep you comfortable.
8. Maintain Bathroom and Kitchen Ventilation
Kitchens and bathrooms produce odours and moisture daily. Good ventilation doesn’t just keep indoor air fresh. It also removes excess humidity. Cleaning fans more regularly ensures they run more efficiently.
The bottom line is that indoor comfort depends on consistent maintenance. Minor tasks, like cleaning vents, make a great difference. By being proactive with these simple tasks, you will enjoy a more comfortable home.
WHAT TO DO IF YOU SMELL GAS NEAR YOUR FURNACE: A STEP-BY-STEP SAFETY GUIDE
A whiff of gas around a heater means trouble. So, act without delay! When leaks go unchecked, fires might start, health could suffer, and property damage may follow.
We partnered with a home improvement company for this post. The opinions in the post are honest. All reviews and opinions expressed in this post are based on our personal views. We are excited because we know you will love it.
A whiff of gas around a heater means trouble. So, act without delay! When leaks go unchecked, fires might start, health could suffer, and property damage may follow.
Here is what to do to ensure your safety.
Notice the early signals
That odd stench near your heater is a warning. Natural gas is usually odorless. But utility providers use a smelly additive so people spot leaks fast. Smells like spoiled eggs? Pay attention.
Other warning signs of a leak include:
A hissing noise near gas lines
Dead plants around a gas line
Unusual furnace performance
Strange physical symptoms like dizziness, headache, and nausea.
A technician should inspect the unit right away.
Do not use electrical devices
Get out the door fast if you smell gas. Don’t touch any switches. Even flipping a light might spark the air. Step away without messing with gadgets or power things. Get people out first, worry about stuff later.
Evacuate
Get everyone out of the house right away. Do not grab things on your way out. Staying alive matters most.
After getting out safely, reach out to a firm that handles emergency furnace repair Red Deer. An expert can spot where the problem started and get your home warm again without risk.
Leave doors open if safe
Open doors as you leave. But only if doing so is quick and safe. That might let gas escape. It lowers how much gas builds up inside. Still, getting out fast matters more than airing out the place. Risking your safety just to crack a window? Not worth it.
Contact emergency services and your gas provider
Reach out to your gas provider. Ask about the possible leak. Listen closely to what they tell you. Do exactly that.
Strong smell filling the air? Think things might go wrong fast? Get hold of emergency responders too.
Schedule a professional furnace inspection
Smells like gas might come from:
Worn parts
Shaky joints
An old unit that is falling apart
A comprehensive inspection can reveal why a problem happened. It can also stop risks later on. What you spot today might prevent trouble tomorrow.
Stop future gas leaks before they happen
Catch small issues early! This often prevents bigger troubles later. A yearly check is important. It gives experts time to:
Examine pieces that might be failing
Verify fuel ducts are secure
Confirm everything runs without waste or risk.
The takeaway
A whiff of gas by your furnace? Never treat that lightly. Get out fast instead. Reach out to emergency services once you are safe. Let trained experts handle fixes after that. Acting without delay helps lower danger. So does checking the system often.

