

A resource for those seeking information on organizing and transforming spaces.

Why Your Old AC Can’t Keep Up, So Replacement Makes More Sense
Air conditioners rarely fail all at once; instead, their performance slips gradually in ways homeowners often overlook, like longer cooling cycles or rooms that never quite feel comfortable. Because these changes happen slowly and the system is usually out of sight, it’s easy to assume a quick repair will solve the problem. In reality, these early signs often point to deeper issues that make replacement a smarter long‑term choice, and recognizing them early can help you avoid unexpected breakdowns during peak summer heat.
Air conditioners rarely fail all at once; instead, their performance slips gradually in ways homeowners often overlook, like longer cooling cycles or rooms that never quite feel comfortable. Because these changes happen slowly and the system is usually out of sight, it’s easy to assume a quick repair will solve the problem. In reality, these early signs often point to deeper issues that make replacement a smarter long‑term choice, and recognizing them early can help you avoid unexpected breakdowns during peak summer heat.
Contributing Factors to AC Performance Decline
As air conditioners age, natural wear begins to affect how well they cool. After 10 to 15 years of operation, components like the compressor, blower motor, and evaporator coil lose efficiency, making it harder for the system to move heat and circulate air effectively. This gradual decline often shows up as longer cooling cycles, reduced airflow, or a general sense that the system just isn’t keeping up the way it used to.
Older systems also fall behind modern units in terms of energy efficiency. Today’s air conditioners use advanced technology to cool more effectively while consuming less electricity, but equipment installed more than a decade ago wasn’t designed to meet these standards. Refrigerant regulations add another challenge.
Airflow limitations further reduce performance. Blower motors weaken, coils accumulate dirt, and ductwork can deteriorate or develop leaks over time. Even small airflow restrictions can noticeably reduce comfort, especially during the hottest months. When these issues combine, they create a predictable pattern of reduced cooling performance that becomes harder to ignore as the system gets older.
AC Running Constantly Without Cooling the Home
If your AC runs nonstop but still struggles to cool your home, it’s a strong sign the system is losing its ability to keep up. A weakened compressor is often the cause. When the compressor can’t circulate refrigerant effectively, the system has to run longer to achieve the same cooling, sometimes without ever reaching the temperature you set. This is one of the earliest signs that the system’s core components are wearing out.
Airflow issues can also contribute to constant cycling. A failing blower motor or restricted ductwork reduces the amount of cool air reaching your living spaces, forcing the AC to run continuously to compensate. This not only drives up energy bills but also strains the system. Because airflow problems can stem from several sources, working with a professional HVAC technician is the best way to pinpoint whether the issue is mechanical, duct‑related, or a combination of both.
This nonstop operation is more than an inconvenience; it’s one of the clearest indicators that the system is nearing the end of its lifespan. When an air conditioner can no longer cool effectively despite running constantly, replacement is usually the most cost‑effective solution. A professional installation, such as from TRS Heating and Air Conditioning, means your AC won’t run constantly, saving you money and frustration.
Recurring AC Repairs Increasing Over Time
Recurring repairs are another sign your AC may be ready for replacement. Aging systems often experience repeated issues with capacitors, contactors, refrigerant leaks, or electrical components. While each repair may seem manageable, the costs add up quickly.
A helpful guideline is the “50 percent rule.” If the cost of repairing your AC approaches 50 percent of a new system, replacement is typically the better investment. This rule is especially relevant when the system is more than a decade old or when multiple components are showing signs of failure.
Repeated breakdowns also indicate deeper mechanical decline. When one part fails, it often strains other components, creating a cycle of repairs that gets increasingly expensive. If you’ve had two or three repairs in a single season, it’s a strong sign that the system is wearing out.
Uneven Cooling and Temperature Imbalances
Uneven cooling is a common complaint among homeowners with aging AC systems. You may notice that some rooms stay comfortable while others feel warm or stuffy. These hot and cold spots often stem from airflow distribution problems rather than overall system capacity.
As systems age, blower motors lose power and can’t push air evenly through the ductwork. Ducts may develop leaks or become partially blocked, reducing airflow to certain areas. Older systems also lack the advanced controls found in modern units, making it harder to maintain consistent temperatures throughout the home.
Newer air conditioners with variable‑speed technology can adjust airflow and cooling output more precisely, helping eliminate temperature imbalances. If your home has persistent hot and cold spots, upgrading to a modern system can noticeably improve comfort.
Energy Bills Rising Without Changes in Usage
Many homeowners first notice AC problems when their energy bills start rising. If your cooling costs are increasing even though your usage hasn’t changed, it’s a sign the system is working harder than it should. As components age, they lose efficiency and require more electricity to deliver the same level of cooling, which often shows up on your utility bill long before comfort noticeably drops.
Dirty coils reduce heat transfer, worn motors struggle to circulate air, and failing compressors draw more power as they decline. Because these issues develop gradually, homeowners often overlook them until the bills become noticeably higher. A professional HVAC technician, such as someone like Trane South, can determine whether the problem is repairable or whether the system’s declining efficiency signals it’s nearing the end of its lifespan.
Rising energy costs are one of the earliest and most reliable indicators that it may be time to consider getting an AC installation. A new system operates far more efficiently, helping lower monthly bills while restoring consistent comfort throughout the home. If your energy costs have climbed steadily over the past few summers, upgrading to a modern unit can be a smart long‑term investment.
Use of Outdated or Hard‑to‑Find Refrigerant
If your AC uses older refrigerant like R‑22, keeping it running can become difficult and expensive. Because this refrigerant is no longer produced, the remaining supply is limited, and any repair that requires adding more can come with a surprisingly high price tag. A simple leak that might have been affordable years ago can now turn into a major repair bill.
For many homeowners, fixing an R‑22 system just isn’t practical anymore. Even if a technician can repair the leak, refilling the refrigerant may cost more than the system is worth, especially if the AC is already showing other signs of age. Newer systems use refrigerants that are easier to get, more affordable, and designed to work more efficiently.
Choosing to install a new AC eliminates the worry about outdated refrigerant altogether. A modern system provides reliable cooling, lower operating costs, and peace of mind that future repairs won’t be held back by hard‑to‑find materials.
Reasons AC Repairs Stop Being Cost-Effective
At some point, repairing an old AC system simply doesn’t make financial sense. Beyond the cost of individual repairs, homeowners should consider the hidden expenses of keeping an aging system running.
Older systems often have multiple components nearing failure. Fixing one issue may only delay the next breakdown. Meanwhile, rising energy bills and reduced comfort add to the overall cost of keeping the system in place. When repairs become frequent, expensive, or unpredictable, replacement becomes the more cost‑effective option. A new system provides reliable performance, lower energy costs, and fewer surprises.
Benefits of Installing a New AC System
Replacing an old AC system comes with several meaningful benefits. Modern units run far more efficiently, which can lower your cooling costs and make your home feel more comfortable even on the hottest days. Improved airflow and better humidity control also help maintain steady temperatures throughout the house.
New systems typically include stronger warranties, giving you peace of mind and protection against unexpected breakdowns. A professional installation, such as one done by the technicians at Mullin Plumbing, ensures the system is set up correctly from day one, which helps prevent early wear and keeps your new AC performing at its best. With fewer repairs and more reliable cooling, you can enjoy a more comfortable home without the stress of constant maintenance.
If you’re experiencing frequent repairs, uneven cooling, rising energy bills, or refrigerant issues, now is probably a good time to contact an HVAC company for a replacement quote. A professional can evaluate your home’s cooling needs, perform load calculations, and recommend the right system size. Getting quotes before peak summer demand ensures you have time to compare options and schedule installation without delays.

What a Full Roof Replacement Does for Your Home
Few home projects change a house as completely as a new roof. The day the old shingles come off and the new ones go on, the whole property looks different from the street.
Few home projects change a house as completely as a new roof. The day the old shingles come off and the new ones go on, the whole property looks different from the street.
It also changes something less visible. Homeowners who have spent a few storm seasons checking ceilings for stains and listening for dripping tend to describe the finished job the same way, as a real sense of relief.
Knowing When It Is Time
Roofs rarely fail all at once. They wear down gradually, and the signs usually show up well before a leak does.
Curling or cracked shingles are one clue. Granules collecting in the gutters are another, since those small mineral pieces protect the asphalt from the sun. Bald patches, soft spots underfoot, shingles missing after a windstorm and daylight showing through the attic boards all point in the same direction.
Hail changes the timeline in Colorado. A single storm can bruise shingles in ways that are hard to spot from the ground but shorten their life considerably, which is why an inspection after a major hailstorm is worth scheduling even when nothing looks wrong.
Age matters too. A roof that has been up for a long stretch may simply be at the end of its service life, and patching it further often costs more over time than starting fresh.
Starting With a Full Tear-Off
A replacement done right removes everything down to the wood. Laying new shingles over old ones can seem like a shortcut, but it hides problems and adds weight to the structure.
Once the old material is gone, the crew can see what has been happening underneath. Soft or rotted decking gets replaced. New underlayment goes down as a moisture barrier. Flashing around chimneys and vents gets renewed rather than reused. Ice and water protection goes along the eaves and valleys, where melting snow tends to back up.
Ventilation deserves attention at this stage as well. An attic that cannot breathe traps heat in summer and moisture in winter, and both shorten the life of even the best shingles.
This is where the choice of contractor starts to show. Established companies such as Advanced Exteriors Inc., which handles roof replacement in Colorado Springs and along the Front Range, are worth evaluating on whether they provide a detailed written estimate, whether they walk homeowners through material options and their drawbacks, whether they can help with an insurance claim after hail, and whether their workmanship is backed by a clear warranty. Ask how the crew protects landscaping during tear-off and how the site gets cleaned afterward, too. A contractor who answers those questions plainly is usually the one who plans the job carefully.
Choosing Materials for the Front Range
The look of a new roof is the part most homeowners enjoy deciding.
Architectural shingles add depth and shadow lines that older flat shingles never had. Color choices have grown well beyond basic gray and brown, and a darker or warmer tone can make trim, stone, siding and even the front door look sharper by contrast.
Performance belongs in the conversation too. Impact-resistant shingles hold up better against hail, and some insurers offer discounts for them. Metal roofing is another option for homeowners who want a long service life and a cleaner, more modern profile.
Matching the roof to the house matters more than chasing a trend. A good contractor will bring samples and show photos of finished homes before anything is ordered.
Enjoying the Fresh Start
The transformation shows up almost immediately. Clean lines along the ridge, fresh color from the street, crisp edges at the eaves and straight, even rows make a house look cared for in a way that paint alone cannot.
The practical benefits follow quietly. Fewer worries during storm season. Lower chance of a surprise leak. A stronger selling point if the house goes on the market. More comfortable rooms once the attic is properly ventilated.
There is real satisfaction in pulling into the driveway and seeing it for the first time. The house looks like itself again, only better, and the next hailstorm feels a lot less like something to dread.

DIY Repairs That Make Kids' Furniture Last Longer
Kids are tough on furniture, but worn does not always mean ruined! Explore these simple fixes that help your favorite pieces last longer before you shop.
Kids have a special talent for making furniture look much older than it is. A perfectly good chair starts wobbling after a few months. The playroom bench picks up a tear, and somehow a dresser drawer stops closing even though nobody remembers doing anything to it.
Before you replace another piece, try a few of these DIY repairs that make kids' furniture last longer. Many common problems come from loose hardware or worn surfaces rather than a piece reaching the end of its life. Fixing those issues helps you stretch your budget and saves you from another furniture-shopping trip after work.
Tighten Wobbly Chairs Before They Get Worse
A slight wobble rarely stays slight for long. Every time your child climbs onto the chair or drags it across the floor, the loose joint takes more stress.
Start by turning the chair over and checking the screws. Tighten anything that has worked loose, but stop once the hardware feels secure. Overtightening might strip the hole and leave you with a bigger repair.
Check the Joints While You Are There
Give each leg a gentle wiggle after tightening the hardware. If the movement comes from a glued joint instead of a screw, you might need to reglue it. Fixing the wobble now keeps the frame from shifting every time someone sits down, which also makes the chair feel much safer during busy mornings when nobody has time to think about furniture stability.
Repair Loose Upholstery Before It Tears
Loose fabric on a kid's chair or bench usually starts small. One edge pulls away underneath, then little hands find it. From there, the problem tends to grow quickly.
Flip the piece over and see how the fabric attaches to the frame. If the material still looks strong, you might only need to pull it snug and secure the loose edge again.
For a larger upholstery project, an upholsterer’s guide to heavy-duty staple guns offers a helpful starting point for choosing tools that suit thicker materials. The right tool makes the repair easier, but technique is the most important part.
Keep the tension even so one side does not end up tighter than the other. Once the seat looks smooth again, secure the material underneath where the fasteners stay out of sight.
Stop Drawers From Becoming a Daily Battle
Before replacing the dresser, pull out the drawer and inspect the slides. A loose screw might cause the drawer to tilt slightly, which makes it catch every time someone opens it. Tighten the hardware and clear anything blocking the track. If the slides show damage, replacing them usually costs much less than buying a new dresser.
You should also check whether children have overloaded the drawer. Kids are excellent at turning one drawer into storage for half the room, after all. Removing some weight sometimes solves the problem before you reach for a screwdriver.
Smooth Rough Edges Before They Spread
Furniture edges take plenty of abuse in a family home. A toy hits the corner, paint chips away, and suddenly a small rough patch starts catching on clothes. Take care of those spots before more material breaks away. Start by gently smoothing the damaged area with fine sandpaper. You want to remove the rough edge without reshaping the furniture.
For painted pieces, touch-up paint helps protect the exposed area afterward. Try to match the existing finish closely, but don't stress about making the repair invisible. On kids' furniture, durability matters more than perfection.
Give Scratched Surfaces a Quick Refresh
A scratched tabletop does not always need refinishing from top to bottom. Start by cleaning the surface so you know which marks are permanent and which ones came from crayons or everyday grime. Once the table dries, look at the scratches again.
Light marks sometimes respond well to a furniture touch-up product made for the existing finish. Deeper scratches, on the other hand, need more attention because exposed wood has less protection from spills.
Before you start, gather what you need:
A soft cleaning cloth
Fine sandpaper for rough spots
A matching touch-up product
A small brush for detailed areas
Clean rags for wiping excess product
Keep the repair focused on the damaged section. You do not need to turn a Tuesday evening into a full furniture-restoration project.
Replace Small Hardware Instead of the Furniture
Sometimes the broken part costs only a few dollars. For example, a missing drawer pull makes a dresser feel worn out. A damaged hinge makes a toy chest frustrating to use. Neither problem means the whole piece needs to go. Take the damaged hardware with you when shopping for a replacement. Matching the hole spacing saves you from drilling new holes into the furniture.
If the original hardware feels flimsy, this is also your chance to choose something sturdier. A stronger hinge or better handle gives an older piece a little more life without changing how your child uses it. One replacement part might save you an entire afternoon of furniture shopping and assembly.
Fix Peeling Finishes Before Moisture Gets In
Once a painted or sealed surface starts peeling, water has an easier path to the material underneath. Start by removing loose finish around the damaged spot, then smooth the edge gently so the remaining coating does not keep lifting.
After cleaning the area, apply a suitable finish that matches the original surface as closely as possible. Give it enough drying time before the furniture goes back into regular use.
Know When a Repair Is No Longer Worth It
Repairing furniture makes sense when the structure still feels solid, but safety should decide when you stop. If a chair frame has a major crack or a crib component shows structural damage, replacing the piece makes more sense than trying to repair it. The same goes for furniture that keeps failing in the same spot.
Still, plenty of everyday damage falls nowhere near that level. Loose hardware, worn fabric, and sticky drawers usually deserve a closer look before you give up on the piece.
Once you get comfortable with these DIY repairs that make kids' furniture last longer, you start seeing worn furniture differently. Instead of assuming something needs replacing, you first ask what actually failed.
Sometimes the answer takes ten minutes and a screwdriver. For a busy family, that is a lot easier than hauling another flat-packed box through the front door.
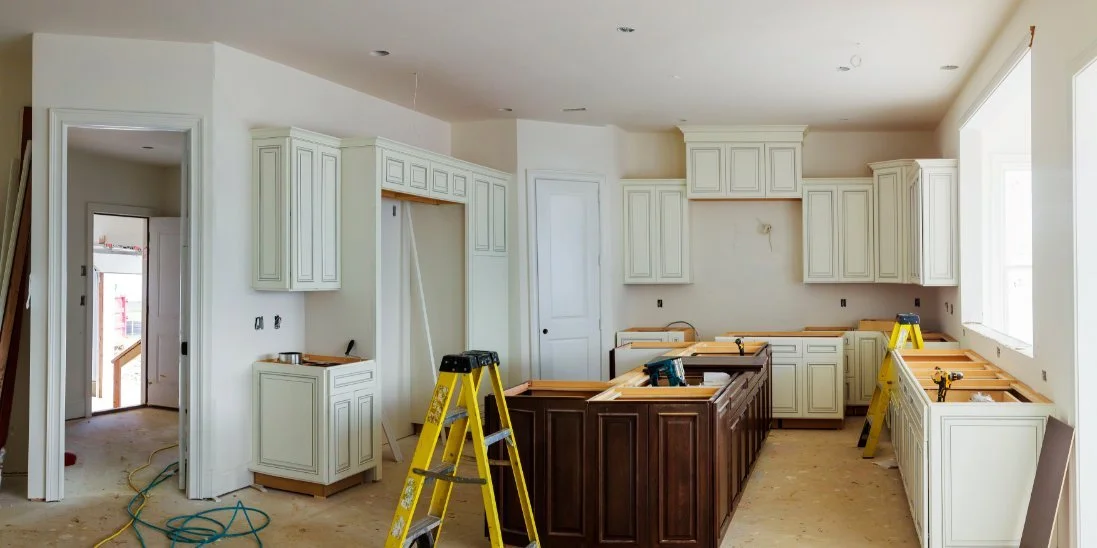
Keeping a Remodeling Project Organized From Start to Finish
Keep your remodeling project organized with smart scheduling, material planning, waste removal, clear communication, and practical job site management tips.
Remodeling can transform a dated or inefficient space into something that better fits the needs of the people using it. Whether the project involves updating a kitchen, renovating an entire home, or improving a commercial property, however, the finished result depends on much more than design choices. There are schedules to coordinate, materials to manage, contractors to communicate with, and unexpected problems to resolve along the way.
Without a clear organizational system, even a relatively straightforward renovation can become difficult to manage. Delayed deliveries, misplaced materials, accumulated debris, and scheduling conflicts can quickly affect both the timeline and budget. Keeping a remodeling project organized from start to finish helps reduce these disruptions while making it easier for everyone involved to understand what needs to happen next.
Establish the Scope Before Work Begins
Organization should begin well before demolition or construction starts. One of the first priorities is defining exactly what the remodel is intended to accomplish. A project without a clearly established scope can gradually expand as new ideas arise, creating additional expenses and complicating the original schedule.
Determine which areas will be renovated, which features will be replaced, and which elements will remain untouched. Decisions about finishes, fixtures, structural changes, and major appliances should also be made as early as practical. The more questions that can be answered before construction begins, the fewer decisions will need to be made under pressure later.
A defined scope also gives contractors a clearer understanding of the work involved. This can improve estimates, scheduling, material ordering, and coordination between different trades.
Build a Realistic Project Schedule
Remodeling work rarely consists of a single continuous task. Instead, projects typically move through several phases that depend on one another. Demolition may need to happen before electrical or plumbing work, for example, while drywall installation must be completed before certain finishing work can begin.
Creating a realistic schedule helps everyone understand these dependencies. Rather than simply establishing a desired completion date, break the project into phases and determine approximately when each one should occur.
Some flexibility should be built into the timeline. Hidden damage may be uncovered during demolition, materials may arrive later than expected, or a particular phase may require additional work. A schedule with no room for adjustments can become unrealistic as soon as the first unexpected issue appears.
Keep Project Information in One Place
A remodel can generate a surprising amount of information. Contracts, estimates, invoices, product specifications, measurements, warranties, permits, and design selections may all need to be referenced throughout the project.
Keeping these documents organized prevents time from being wasted searching for important details. Whether records are stored digitally, physically, or through a combination of both, everyone responsible for major decisions should know where essential information can be found.
It is also useful to keep records of significant changes made during construction. If a product is substituted, a design is modified, or additional work is approved, documenting the decision can prevent confusion later. This is particularly important when a change affects the project's cost or completion date.
Plan Material Deliveries Carefully
Ordering materials is only part of the challenge. Those materials also need to arrive at the appropriate time and have somewhere safe to go when they reach the property.
Deliveries that arrive too early can crowd the work area and increase the possibility of damage. Deliveries that arrive too late can leave contractors waiting and interrupt the construction sequence. Coordinating purchases with the project schedule can help maintain a steady workflow.
Consider storage requirements as well. Flooring, cabinetry, fixtures, lumber, tile, and other materials may need to remain on-site before installation. Designating storage areas protects these products while keeping walkways and active work zones clear.
Stay Ahead of Construction Debris
Demolition and construction produce waste quickly. Old cabinets, flooring, drywall, lumber, packaging, fixtures, and other discarded materials can consume valuable working space if they are not removed regularly.
A waste-management plan should therefore be established before demolition begins. Depending on the scale of the project, this may involve scheduled pickups or an on-site container. Working with a professional provider can simplify decisions surrounding container size, placement, pickup schedules, and disposal requirements. Understanding the advantages of professional dumpster rental services can be useful when determining how waste removal fits into the broader logistics of a remodeling project.
Keeping debris under control does more than improve appearances. Clear work areas make it easier for crews to move equipment and materials, locate what they need, and perform tasks without unnecessary obstructions.
Create Defined Work and Storage Zones
An active remodeling site can quickly become cluttered when tools, materials, debris, and personal belongings compete for the same space. Establishing specific zones can bring structure to an otherwise changing environment.
Materials awaiting installation can have a designated storage area, while tools can be returned to an established location when they are not being used. Items scheduled for removal should be separated from materials that need to remain on the property.
Defined pathways are equally important. Workers should be able to move between active areas without stepping over supplies or navigating unnecessary obstacles. This becomes especially valuable when multiple trades are working at the property simultaneously.
Maintain Consistent Communication
Good organization depends heavily on communication. Homeowners, property managers, contractors, subcontractors, designers, and suppliers may all be involved in different parts of the remodel. When information does not reach the appropriate people, minor misunderstandings can create substantial delays.
Establish how project updates will be communicated and who is responsible for making key decisions. Regular conversations about progress can identify concerns before they interfere with later phases of work.
Communication is particularly important when the original plan changes. If an unexpected plumbing issue affects cabinetry installation, for instance, the people responsible for both tasks need to understand the revised schedule. Keeping everyone informed reduces the likelihood that one adjustment will create problems elsewhere.
Finish With the Same Level of Organization
As construction nears completion, it can be tempting to treat the organizational work as finished. The final stage, however, often includes inspections, touch-ups, cleaning, documentation, warranty information, and final payments.
Walk through the remodeled area carefully and identify anything that still requires attention. Keep records related to installed products, contractor warranties, paint colors, flooring selections, and replacement components. These details may be valuable months or years after the project is complete.
Leftover materials should also be evaluated. Useful spare tile, flooring, paint, or hardware can be labeled and stored for future repairs, while unnecessary construction waste should be removed.
Ultimately, keeping a remodeling project organized from beginning through completion is about creating enough structure to manage a process that will inevitably involve moving parts. Clear plans, coordinated schedules, controlled work areas, consistent communication, and timely waste removal all contribute to smoother progress. When organization remains a priority throughout every phase, homeowners and contractors can spend less time untangling avoidable problems and more time moving the renovation toward completion.