

A resource for those seeking information on organizing and transforming spaces.

Nature At Home: Biophilic Touchpoints That Transform Interiors
Biophilic design focuses on strengthening the connection between people and nature within built environments. In home interiors, this approach is less about dramatic statements and more about thoughtful touchpoints that quietly improve comfort, mood, and daily experience. By integrating natural elements in practical ways, homeowners can create spaces that feel grounded and restorative without sacrificing function or style.
Biophilic design focuses on strengthening the connection between people and nature within built environments. In home interiors, this approach is less about dramatic statements and more about thoughtful touchpoints that quietly improve comfort, mood, and daily experience. By integrating natural elements in practical ways, homeowners can create spaces that feel grounded and restorative without sacrificing function or style.
Natural Materials as Everyday Anchors
Wood, stone, clay, and natural fibers form the foundation of biophilic interiors. Exposed wood beams, hardwood flooring, or stone countertops introduce visual warmth and tactile interest. These materials age gracefully, developing character over time rather than appearing worn. Even small additions like linen upholstery, jute rugs, or ceramic accessories can reinforce a sense of material honesty throughout the home.
Daylight as a Design Driver
Access to natural light is one of the most impactful biophilic touchpoints. Large windows, clerestory glazing, and glass doors support circadian rhythms while reducing reliance on artificial lighting. Sheer window treatments allow daylight to diffuse without sacrificing privacy. Thoughtful orientation, often considered during the development of semi-custom home floor plans, helps maximize light penetration across shared living spaces.
Plants as Living Infrastructure
Indoor plants serve both aesthetic and environmental roles. Beyond visual appeal, they support humidity regulation and air quality. Placement matters more than volume. A tall plant in a corner can soften hard edges, while herbs in a kitchen window reinforce daily interaction with living elements. Consistency across rooms creates a subtle rhythm rather than a decorative afterthought.
Nature-Inspired Patterns and Colors
Biophilic design also extends to visual references. Organic patterns, muted earth tones, and textures inspired by leaves, water, or terrain can be integrated through textiles, wall finishes, and artwork. These elements provide visual continuity with the outdoors, especially in urban or colder climates where direct access to nature may be limited.
Sensory Variety and Movement
Nature is dynamic, and interiors benefit from variation. Operable windows that allow fresh air, water features that introduce gentle sound, or textured surfaces that invite touch add layers of sensory engagement. These details contribute to spaces that feel alive rather than static.
Biophilic touchpoints do not require a complete redesign. Small, intentional choices layered over time can reshape how a home feels and functions. Look over the infographic below for more tips and tricks.


The 24-Hour Unpack: Organizing Your Essentials in One Day Without Stress
Organize your new home fast with the 24-hour unpack method. Learn simple steps to set up essentials and reduce moving stress.
Moving day can drain your energy, yet the first 24 hours in a new home set the tone for how the next few weeks will feel. A focused plan helps you breathe easier, regain control, and settle in with confidence. Explore how the 24-hour unpack and simple post-move rituals for order give you structure so you can sort your essentials quickly, stay calm, and enjoy a clearer living space by the end of day one.
The 24-Hour Unpack: A Simple Plan to Take Control on Day One
Most people feel overwhelmed by boxes on the first day, but you can ease that pressure with a direct process. This method groups your efforts into small, clear steps. It also helps you stay productive without pushing yourself too hard. Keyword-rich strategies such as moving organization, efficient unpacking, packing essentials, and post-move setup support your goal of quick order and less stress.
Create a Smart System Before You Open a Box
Start with high-impact steps—place boxes in the correct rooms. Keep a small bin for trash and packing materials so your space stays clear. Use a simple sorting method: open one box, empty it, break it down, then move to the next. That helps you track progress without clutter creeping back, similar to guidance you might receive from a professional organizer for your home. Set a timer if you need structure. Short bursts of focused work help you stay consistent and avoid fatigue.
Unpack Your Survival Essentials First
Your first-day essentials should sit in a labeled “open-first” box. Include toiletries, simple cookware, chargers, medication, and key office items. These basics help you function through the day and sleep comfortably at night.
As you settle in, check the home for urgent tasks: lightbulbs that need replacing, outlets that need testing, or alarms that require batteries. Small fixes early on reduce stress later.
How to Stay Organized While You Continue Unpacking
As the unpacking process moves into its busiest stage, your focus may start to slip. That is the moment to rely on simple habits that keep your momentum steady. When you follow a moving checklist, you build a clear path for tasks like decluttering, ordering packing supplies, notifying important parties, and researching moving companies. These steps create structure and support a more organized relocation because each action has a defined place in your plan. With this approach, you adjust your pace, reduce pressure, and keep your setup moving forward without feeling overwhelmed.
Set Up Your Kitchen for Quick Use
The kitchen often feels like the heart of your new home, so give it early attention. Set up your coffee items, plates, a few cups, and essential utensils. Keep counters clear so you have room to work.
Place larger appliances where they make the most sense for daily use. Avoid perfection on day one. You can adjust the layout later. This simple setup helps you prepare basic meals without sorting through stacks of boxes.
Organize Your Bedroom to Support Good Rest
A good night’s sleep helps you stay productive on day two. Make your bed early in the day so you have a grounded space to return to at night. Unpack clothing you need for the next few days and place them in drawers or hang them in the closet. Keep decor for later. Your priority is function, comfort, and easy access.
Set Up Your Bathroom for Daily Use
Unpack your bathroom bag next. Place your toiletries, towels, and shower supplies in easy-to-reach spots. This simple task gives you comfort right away. A prepared bathroom signals that the home is ready for regular routines.
Boost Day-One Success With Practical Zones
Create quick-use zones in your home so your essentials stay organized. A small charging station near an outlet, a drop zone for keys, or a folder for important documents helps you stay centered. These zones bring structure and cut down on misplaced items.
Stay Focused on What You Need Today (and Not Everything Else)
One of the most helpful parts of the 24-hour unpack is the focus on essentials only. You do not need to unbox your entire home today. Instead, choose the pieces that support comfort and function. That prevents burnout and allows your new space to take shape at a steady pace.
Tackle Common Bottlenecks With Small Wins
Some boxes make slow progress because they hold mixed items. Sort them into quick categories: keep, donate, or trash. Fast decisions help you move forward without overthinking. Use small wins to stay energized. Unpacking a single drawer or a stack of dishes builds momentum.
Let Your Living Room Evolve Over Time
The living room often holds decor, books, and extra items that take time to sort. Start with core pieces such as seating, lighting, and a space for entertainment devices. Leave detailed styling for another day. That gives the room purpose without slowing your progress.
Keep Kids and Pets Comfortable
If you have kids or pets, prepare their essentials early. Set up a safe spot with toys, snacks, or a familiar blanket. This small step reduces stress for them and allows you to stay productive.
Use Breaks to Reset Your Energy
Short breaks keep your mind sharp. Stretch, get water, or step outside for fresh air. Even a few minutes away from the boxes can help you stay motivated for the rest of the day.
Know When to Pause for the Day
The goal of the 24-hour unpack is comfort, order, and a calm atmosphere by the end of day one. Stop once your essentials are set, and your living space feels usable. The rest can wait. This approach supports a healthier mindset and helps you work toward an organised home, maximise light and space, giving you room to enjoy your new surroundings.
A Cleaner Start With the 24-Hour Unpack
A focused plan helps you settle into your home with ease. With the 24-hour unpack, you place your energy on the items that matter most. Each small step builds a clear, functional space that supports your daily life. When you finish the first day with order, comfort, and a sense of readiness, you give yourself a stronger start in your new home.
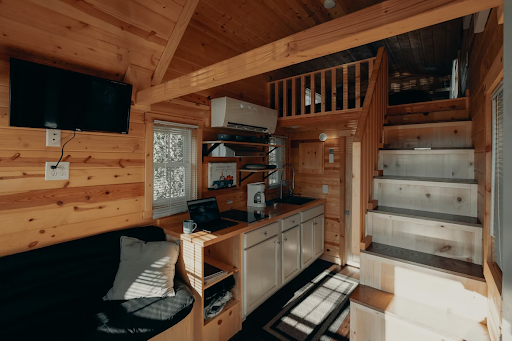
How to Prepare for Tiny Home Living
Preparing for living in a tiny home isn’t just about hyping yourself up to crawl into a loft bedroom. It’s about downsizing your possessions, organizing them effectively, and living simply. It’s also about learning how to keep clutter to a minimum so you can feel comfortable in your new, much smaller home. If you’re getting ready to downsize to tiny home living, these tips may be helpful:
We partnered with a home improvement company for this post. The opinions in the post are honest. All reviews and opinions expressed in this post are based on our personal views. We are excited because we know you will love it.
Preparing for living in a tiny home isn’t just about hyping yourself up to crawl into a loft bedroom. It’s about downsizing your possessions, organizing them effectively, and living simply. It’s also about learning how to keep clutter to a minimum so you can feel comfortable in your new, much smaller home. If you’re getting ready to downsize to tiny home living, these tips may be helpful:
Don’t Rush the Process
Even if it means investing in onsite storage solutions to house your furniture and other possessions short-term or long-term, don’t rush the downsizing process. Giving up things you’re very attached to or that hold fond memories can be difficult, and it may take time to accept selling or donating them. Many people find it helpful to put their possessions in storage, be away from them for a while, and realize they can live comfortably without them.
Adopt the KonMari Method
The KonMari Method is a tidying method created by Japanese organizing consultant, TV presenter, and author, Marie Kondo. It involves choosing items to keep in your home that spark joy and letting everything else go.
Rather than decluttering and organizing room by room, Marie Kondo recommends organizing and tidying by location. Start with clothes, then books, miscellaneous items, and sentimental items.
Digitize and Simplify
One of the most frustrating aspects of downsizing for tiny home living is realizing you have so much stuff you love and use, but not all of it will fit. Books and movies are a great example. You might spend much of your spare time reading books and watching movies, but you don’t have enough room for a large bookcase and shelves for your collections. In that case, digitize and declutter.
Obtain digital copies of your favorite movies to watch anytime you like. You can also download books on a digital book reader, reducing the need for countless physical books.
Invest in Multi-functional Furniture
There are ways to ensure you can bring as many of your belongings as possible into your tiny home. It involves getting clever with furniture and investing in pieces that can serve multiple purposes.
For example, instead of a simple bed base with a mattress, choose one with built-in drawers. Many tiny homes also have sofas built on top of drawers, high shelves, and storage stairs leading to the loft bedrooms. The more innovative furniture you invest in, the more of your valuable possessions you can keep.
Develop Daily and Weekly Routines
Clutter and feeling cramped are two common challenges people face with tiny home living. Even just a few items out of place can become overwhelming in such a small environment.
The average tiny home is only around 37m2, or under 400 square feet. That’s why developing daily and weekly cleaning routines is so important. These routines can involve putting away misplaced items, doing dishes immediately after meals, and making your bed.
You might not be ready for tiny home living yet, but it’s only a matter of time before you are. Start downsizing, decluttering, and investing in multi-functional furniture. Before long, you can be moving into your new tiny home with confidence.

A Homeowner's Guide to Sewer Pipe Repair and Maintenance
Sewer pipe health represents one of the most critical yet overlooked aspects of home maintenance. Functioning sewer lines prevent costly structural damage, protect household sanitation, and avoid the nightmare of sewage backups that disrupt daily life. Common issues, including clogs, leaks, tree root intrusion, and pipe deterioration, can transform from minor inconveniences into expensive emergencies without proper attention. This guide provides practical steps for identifying and addressing sewer pipe problems before they escalate, helping homeowners protect their investment and maintain a safe living environment.
Sewer pipe health represents one of the most critical yet overlooked aspects of home maintenance. Functioning sewer lines prevent costly structural damage, protect household sanitation, and avoid the nightmare of sewage backups that disrupt daily life. Common issues, including clogs, leaks, tree root intrusion, and pipe deterioration, can transform from minor inconveniences into expensive emergencies without proper attention. This guide provides practical steps for identifying and addressing sewer pipe problems before they escalate, helping homeowners protect their investment and maintain a safe living environment.
Recognizing Warning Signs
Early detection makes the difference between simple fixes and major repairs. Slow drains throughout the home—sinks emptying sluggishly, bathtubs holding standing water, or toilets requiring multiple flushes—often indicate developing sewer line problems rather than isolated fixture issues. Unpleasant sewage odors either inside the home or wafting from yard drains signal potential blockages or damaged pipe seals allowing gases to escape. Backups represent more serious warnings, with water or waste returning into fixtures, particularly lower-level drains or basement floor drains during heavy use.
Outside indicators prove equally important. Unusual lawn patches appearing soggy without recent rain, or sections of grass growing noticeably greener and lusher than surrounding areas, frequently mark underground sewer line leaks. These leaks essentially fertilize the soil above, creating distinctive visual patterns that alert observant homeowners to hidden problems beneath their yards.
Initial Troubleshooting
Before calling professionals, conduct basic diagnostic checks. Test multiple drains simultaneously to determine whether problems affect a single fixture or the entire system. Localized issues typically involve individual drain traps, while system-wide slowness points toward main sewer line trouble. Use appropriate basic tools—plungers for simple clogs, drain snakes for deeper obstructions, or enzyme-based cleaners that biologically break down organic matter without harsh effects.
Critically, avoid chemical drain cleaners marketed as quick fixes. These corrosive products can damage aging pipes, harm septic systems, and contaminate groundwater without effectively addressing root causes. They provide temporary relief at best while potentially worsening underlying conditions.
Professional Inspection
When DIY efforts fail or problems persist, professional inspection becomes essential. Modern plumbers employ camera inspection technology, threading video scopes through sewer lines to visually identify blockage locations, pipe damage, and structural integrity. This non-invasive diagnostic approach pinpoints problems precisely without exploratory excavation.
Hydro-jetting uses high-pressure water streams to clear stubborn clogs and scour pipe interiors clean, removing accumulated grease, mineral deposits, and debris that snaking cannot eliminate. Tree root intrusion requires specialized cutting tools that slice through invasive growth and extract root masses blocking flow. Comprehensive pipe condition assessments reveal cracks, corrosion, offset joints, or complete collapse, informing repair strategy decisions.
Repair and Replacement Options
Treatment approaches vary based on damage severity and pipe condition, with licensed plumbers or sewer specialists guiding homeowners through appropriate solutions. Spot repairs address small cracks or isolated leaks through targeted interventions that restore specific damaged sections. Pipe relining, such as what’s offered through professionals like John's Sewer and Drain Cleaning, offers innovative trenchless solutions, inserting resin-coated liners into existing pipes that cure to form new interior surfaces, restoring structural integrity without extensive excavation that destroys landscaping.
Pipe bursting replaces severely compromised lines by breaking old pipes while simultaneously pulling new pipes through the same path, minimizing surface disruption. Full replacement becomes necessary for outdated systems with widespread deterioration, collapsed sections, or materials like Orangeburg or early PVC that have reached the end of their service life. While expensive, a complete replacement provides decades of reliable service and peace of mind.
Preventive Maintenance
Proactive care prevents most sewer emergencies. Schedule professional inspections every three to five years, or more frequently for older homes with mature landscaping. Practice proper disposal habits: never flush grease that solidifies in pipes, wet wipes that don't break down despite "flushable" labels, or foreign objects that cause blockages.
Tree root management proves crucial—plant new trees at least ten feet from sewer lines and consider root barriers that redirect growth away from pipes. Routine cleaning through periodic hydro-jetting or enzyme treatments maintains clear flow and prevents gradual buildup that eventually causes failure.
Sewer pipe problems escalate quickly when ignored, transforming manageable repairs into catastrophic failures requiring emergency response and extensive excavation. Early detection combined with professional expertise saves substantial money and stress while protecting property value. Proactive maintenance care ensures safe, functional, and long-lasting sewer systems that operate reliably for decades, providing homeowners with confidence in their home's most essential infrastructure.